Arduino IDE Development Tutorial
Overview
We provide ESP32 example code based on the Arduino platform, offering wireless connection examples for Bluetooth gamepads and PS2 gamepads, as well as usage cases for devices such as DC motors, servos, encoder motors, voltage sensors, gyroscopes, and OLED displays.
We have implemented specific controls for various types of remote controllers and motor control using the PlatformIO environment; you can contact customer service for the source code.
1. Setting Up the Development Environment
1) Install the Driver
Since the computer needs to communicate with the motherboard, a serial port driver needs to be installed.
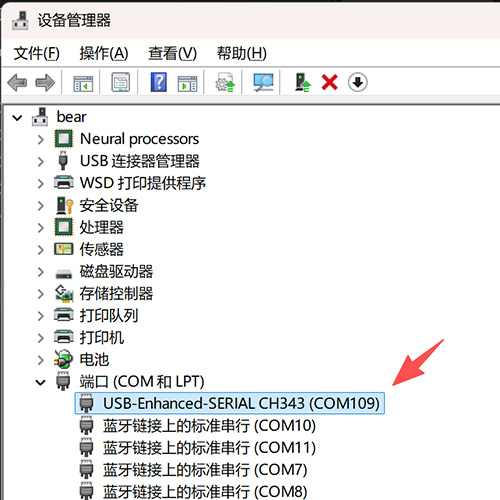
After downloading, extract and install. Click "Computer" -- "Properties" -- "Device Manager"; if it displays as shown in the figure below, the installation was successful.
2) Download the Development Tool
For Windows systems, you can download from the network drive Download IDE from network drive
Both Mac and Windows systems can download from the official website Download IDE from official website

Choose the version to download according to your system. For older systems, it is recommended to download the zip archive, which can be used after extraction.

After downloading, proceed with the installation step by step; I won't demonstrate with screenshots.
3) Configure Arduino IDE
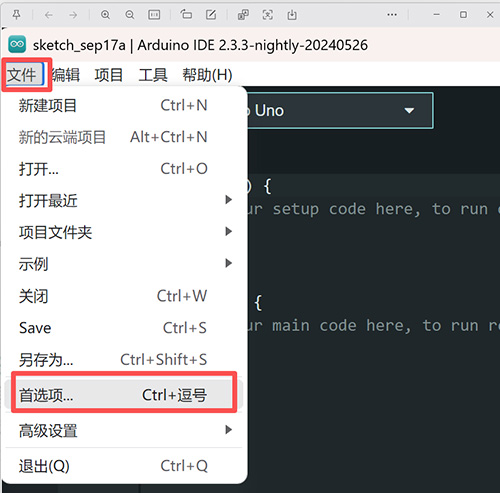
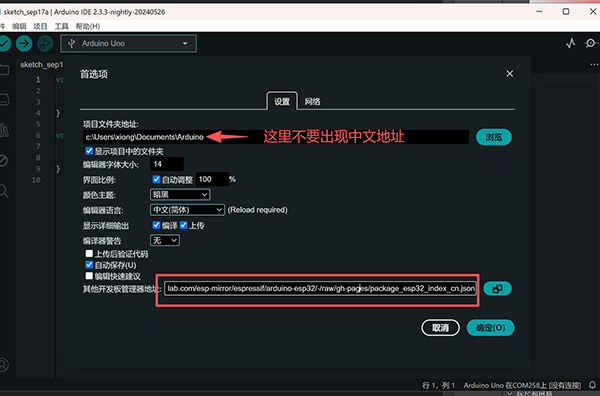
Due to restrictions on accessing foreign networks, it is best to change the service address to a domestic one. Use this address:
https://jihulab.com/esp-mirror/espressif/arduino-esp32/-/raw/gh-pages/package_esp32_index_cn.json
Paste it into the input box at the bottom, then click "OK" to save this address, as shown below:
4) Install the Development Board
First click "Tools" → "Board:", then click "Boards Manager..." to enter the "Boards Manager" page, enter "esp32" in the text box, select the 2.xcn or 3.xcn version to install, and click "Install" to start installing the relevant packages. As shown below: (Special reminder: choose the domestic version ending with "cn", otherwise you may not be able to access foreign servers.)

Select the package ending with "cn".

2. Install the Plugin
-
Download the library file Qiguopai Arduino IDE Library File
-
Import the library file
Project – Include Library – Add .ZIP Library, and select the archive downloaded in the previous step.

If the library is updated later, you can first delete the folder QGP_EVMotor under the directory C:\Users\yourName\Documents\Arduino\libraries, then import the library again to complete the update.
- Use the example code
Select File – Examples – QGP_EVMotor; you will see multiple example files. Open any one and save it as a copy in your working directory.

- Flashing
Please use a USB cable with the Type-C end plugged into the development board and the Type-A end plugged into the computer.
Select Tools – Board – esp32, then select the board "ESP32S3 Dev Module".
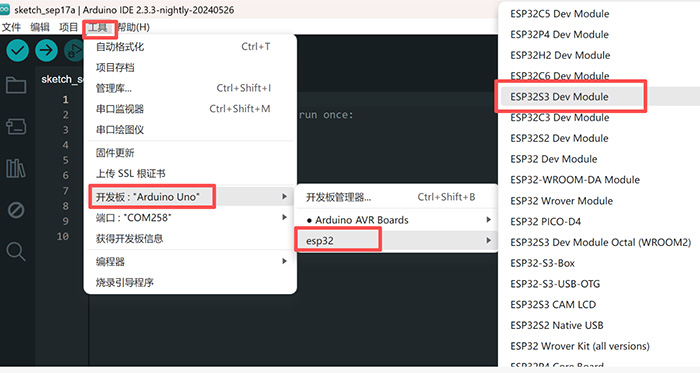
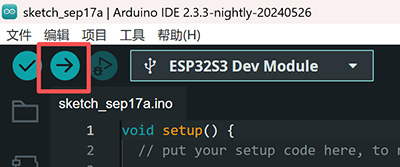
Then click the red box in the figure below to select the correct USB port (the port shown in Device Manager), and click the arrow in the top-left corner to upload the program.
3. Code Analysis — Bluetooth Gamepad
- Include the library file
#include "StickCB.h"
-
Define global variables
BLEControlStick _joy; -
Initialize
void setup() { Serial.begin(115200); // 初始化蓝牙手柄 _joy.setStickCallback(new StickCB()); _joy.begin(); Serial.println("启动完毕"); } -
Usage
void loop() { _joy.update(); if (_joy.Button(BTN_DPAD_UP)) { //按下向上键时... }else if (_joy.Button(BTN_DPAD_DOWN)) { //按下向下键... } } -
Remote control button mapping diagram

4. Code Analysis — DC Motor
- Include the library file
#include "EMotionPI.h"
EMotionPI emo;
/**定义4个普通电机*/
EMO_DCMotor *enMotor1=emo.getMotor(M1);
EMO_DCMotor *enMotor2=emo.getMotor(M2);
EMO_DCMotor *enMotor3=emo.getMotor(M3);
EMO_DCMotor *enMotor4=emo.getMotor(M4);
void loop()
{
  _joy.update();

  //按遥控器的上、下键
  if (_joy.Button(BTN_DPAD_UP))
  {
    // 4个电机向前转
    enMotor1->run(FORWARD); enMotor1->setSpeed(100);
    enMotor2->run(FORWARD); enMotor2->setSpeed(100);
    enMotor3->run(FORWARD); enMotor3->setSpeed(100);
    enMotor4->run(FORWARD); enMotor4->setSpeed(100);
  }else if (_joy.Button(BTN_DPAD_DOWN))
  {
    //4个电机向后转
    enMotor1->run(BACKWARD); enMotor1->setSpeed(100);
    enMotor2->run(BACKWARD); enMotor2->setSpeed(100);
    enMotor3->run(BACKWARD); enMotor3->setSpeed(100);
    enMotor4->run(BACKWARD); enMotor4->setSpeed(100);
  }
}
enMotor1->run(BACKWARD); Controls motor direction; FORWARD moves forward, BACKWARD moves backward;
enMotor1->setSpeed(100); Controls motor speed, range 0 to 100. Note that some motors may not turn if the value is too low;
enMotor1->brake(100); Actively brakes the motor, range 0 to 100.
5. Code Analysis — Servo Control
- Include the library file
#include "EMotionPI.h"
- Define global variables
**定义4个舵机*/

EMO_Servo* servo1=emo.getServo(S1);

EMO_Servo* servo2=emo.getServo(S2);

EMO_Servo* servo3=emo.getServo(S3);

EMO_Servo* servo4=emo.getServo(S4);
void loop()
{
  _joy.update();

  //舵机1
  if (_joy.Button(BTN_DPAD_UP))
  {
    if(servo1->read() < 175)
      servo1->write(servo1->read()+1);
  }else if (_joy.Button(BTN_DPAD_DOWN))
  {
    if(servo1->read() > 5)
      servo1->write(servo1->read()-1);
  }
}
servo1->read(); Reads the current angle of the servo;
servo1->write(100); Controls the servo rotation angle; the specific value should not exceed the angle supported by your servo.
6. Code Analysis — Encoder Motor
- Include the library file
#include "EMotionPI.h"
/**定义4个编码器电机*/
EMO_EncoderMotor *enMotor1=emo.getEncoderMotor(M1);
EMO_EncoderMotor *enMotor2=emo.getEncoderMotor(M2);
EMO_EncoderMotor *enMotor3=emo.getEncoderMotor(M3);
EMO_EncoderMotor *enMotor4=emo.getEncoderMotor(M4);
void setup()
{
  Serial.begin(115200);
  // 初始化蓝牙手柄
  _joy.setStickCallback(new StickCB());
  _joy.begin();
  delay(100);
  emo.begin();
  enMotor1->begin(90);  //该电机齿数比是1:90
  enMotor2->begin(90);
  enMotor3->begin(90);
  enMotor4->begin(90);
  Serial.println("启动完毕");
}
void loop()
{
  _joy.update();

  int speed = 0;
  //左侧摇杆控制车子前进后退
  if (_joy.Analog(BPSS_LY) < 125)
  {
    speed = map(_joy.Analog(BPSS_LY), 125, 0, 30, cur_speed);
    enMotor1->run(FORWARD); enMotor1->setSpeed(100);   //控制电机先前转
    enMotor2->run(FORWARD); enMotor2->setSpeed(100);
    enMotor3->run(FORWARD); enMotor3->setSpeed(100);
    enMotor4->run(FORWARD); enMotor4->setSpeed(100);
  }else if (_joy.Analog(BPSS_LY) > 130){
    speed = map(_joy.Analog(BPSS_LY), 130, 255, 30, cur_speed);
    enMotor1->run(BACKWARD); enMotor1->setSpeed(100);
    enMotor2->run(BACKWARD); enMotor2->setSpeed(100);
    enMotor3->run(BACKWARD); enMotor3->setSpeed(100);
    enMotor4->run(BACKWARD); enMotor4->setSpeed(100);
  }
  if(millis() - gp_time > 1000){
    gp_time = millis();
    int rpm = enMotor1->getRPM();
    long pos = enMotor1->getEncoderPos();
    float laps = pos/48;
    Serial.printf("转速: %d/min,",enMotor1->getRPM());
    Serial.printf("位置: %d,",enMotor1->getEncoderPos());
    Serial.printf("第 %0.f圈 \n",laps);
  }
}
enMotor1->getRPM() Gets the current motor speed in revolutions/minute;
enMotor1->getEncoderPos() Gets the current position of the motor. The sensor has 48 contacts per revolution; whether rotating forward or reverse, each triggered contact increments by 1, so when the Hall sensor detects 48, the motor has completed exactly one revolution.