This article focuses on how to use micro-ROS technology to enable communication between ESP32 and ROS2, and provides an example of bidirectional communication for reference. Later, you can build on this to improve ESP32 motor control and ROS2 intelligent control, replacing keyboard remote control.
ROS 2 mainly runs on high-performance systems such as Linux, while low-level tasks with high real-time requirements such as motor control and sensor reading are usually handled by MCUs (such as STM32, ESP32). micro-ROS enables these MCUs to directly act as first-class nodes in the ROS 2 network and communicate seamlessly with the host computer (such as Ubuntu), without needing to convert data through cumbersome serial protocols.
Download source code from network drive
Test Environment
ESP32-S3 robot control board: used to directly drive motors, servos, and read sensor data such as IMU;
Raspberry Pi 5: used to process data requiring a high-performance CPU, such as radar and vision information;
ESP32 development environment: VS Code + PlatformIO;
Test Objective
-
Send control data from the Raspberry Pi to the ESP32 via the keyboard, and the ESP32 controls the car's movement according to that data;
-
The ESP32 sends heartbeat packets to the Raspberry Pi, and the Raspberry Pi prints the heartbeat frequency;
The above two steps implement bidirectional communication between ROS and ESP32. You can further improve the code according to your actual situation; this is just a starting point.
Test Procedure
The test environment uses a Raspberry Pi 5 with Ubuntu 22.04 installed.
1. Install ROS2
It is recommended to install the latest version of ROS2. Using a third-party source is the quickest, but you can also use the official source code to install.
The ROS2 version in the test environment is jazzy. The installation command for the third-party source is as follows:
wget http://fishros.com/install -O fishros && bash fishros
2. Configure the micro-ROS Agent
mkdir -p ~/microros_ws/src
cd ~/microros_ws
#下载代理源码
git clone https://github.com/micro-ROS/micro-ROS-Agent.git -b jazzy
git clone https://github.com/micro-ROS/micro_ros_msgs.git -b jazzy
#构建代理
colcon build
3. Install the Keyboard Control Package
# 安装键盘控制包
sudo apt update
sudo apt install ros-jazzy-teleop-twist-keyboard
# 确认安装成功
ros2 pkg list | grep teleop
4. Create the Heartbeat Listener Node
Create a heartbeat listener node to subscribe to the heartbeat messages sent by the ESP32.
mkdir -p ~/ros2_ws/src
cd ~/ros2_ws/src
touch heartbeat_listener.py
chmod +x heartbeat_listener.py
# 代码详见esp32的项目文件下的heartbeat_listener.py文件
5. Start Testing
#1.启动代理
cd ~/microros_ws
source install/setup.bash
ros2 run micro_ros_agent micro_ros_agent udp4 --port 8888

#2.另开一个终端 启动心跳监听节点
cd ~/ros2_ws/src
python3 heartbeat_listener.py

#3.再开一个终端 启动键盘控制节点
ros2 run teleop_twist_keyboard teleop_twist_keyboard

#4.修改esp32代码中的wifi参数信息后烧录代码,打开串口监听窗口
esp32会定时发送心跳包,在ubuntu的终端能看到心跳信息;
在ubuntu的键盘终端,按下ikjl等键,在esp32的串口日志中可以看到打印出twist数据。
6. Test Results
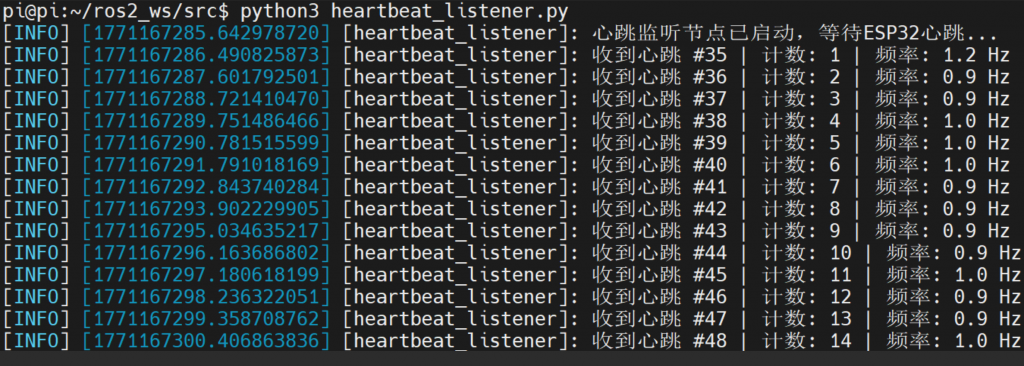
The ESP32 heartbeat data subscribed by the ROS2 heartbeat listener node.
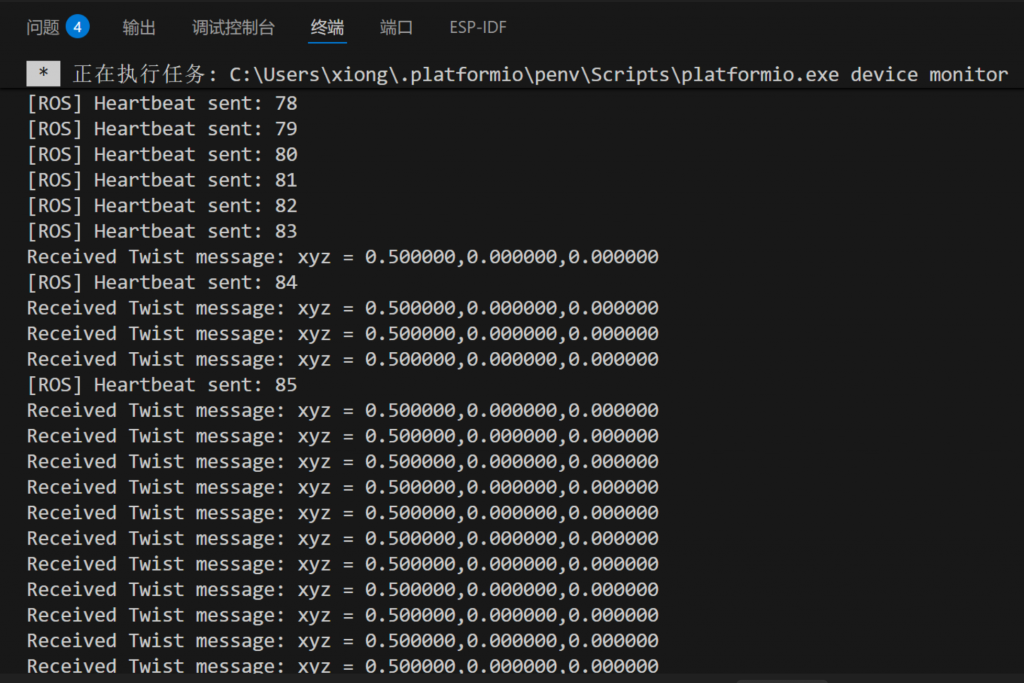
The log printed by the ESP32 is as follows, where xyz respectively represent the car movement commands sent from ROS2 to the ESP32. For example, x represents forward/backward movement, y represents left/right lateral movement, and z represents turning. You can also design your own data structure according to your specific situation.
Common Issues
If the test results do not meet expectations, you can troubleshoot the specific fault point. For example, check whether the heartbeat topic is published; if not, the ESP32 may have failed to publish the topic. Or if the heartbeat packets are fine but twist messages are not received, you can try manually publishing a message to verify whether the ESP32 receives it.
# 检查话题是否存在
ros2 topic list | grep heartbeat
# 直接 echo 话题内容
ros2 topic echo /esp32/heartbeat

# 检查 /cmd_vel 话题是否被正确发布
ros2 topic echo /cmd_vel --once
# 手动发布测试消息
ros2 topic pub /cmd_vel geometry_msgs/msg/Twist "{linear: {x: 0.5, y: 0.0, z: 0.0}, angular: {x: 0.0, y: 0.0, z: 0.0}}"
Optimization Suggestions
If there are too many startup commands on Ubuntu, you can try writing a script to start them together. Refer to the example below:
#!/bin/bash

# 颜色定义
RED='\033[0;31m'
GREEN='\033[0;32m'
YELLOW='\033[1;33m'
NC='\033[0m' # No Color

echo -e "${GREEN}=================================${NC}"
echo -e "${GREEN}    ESP32 小车控制系统启动      ${NC}"
echo -e "${GREEN}=================================${NC}"

# 检查代理是否已经在运行
if pgrep -f "micro_ros_agent" > /dev/null; then
    echo -e "${YELLOW}⚠️ micro-ROS代理已经在运行${NC}"
else
    echo -e "${GREEN}启动 micro-ROS 代理...${NC}"
    # 在新终端中启动代理
    gnome-terminal -- bash -c "source ~/ros2_ws/install/setup.bash; ros2 run micro_ros_agent micro_ros_agent udp4 --port 8888; exec bash" 2>/dev/null || \
    xterm -e "source ~/microros_ws/install/setup.bash; ros2 run micro_ros_agent micro_ros_agent udp4 --port 8888" &
    sleep 2
fi

echo -e "${GREEN}启动心跳监听节点...${NC}"
# 在新终端中启动心跳监听
gnome-terminal -- bash -c "cd ~/ros2_ws/src; python3 heartbeat_listener.py; exec bash" 2>/dev/null || \
xterm -e "cd ~/ros2_ws/src; python3 heartbeat_listener.py" &
sleep 1

echo -e "${GREEN}启动键盘控制节点...${NC}"
# 在当前终端启动键盘控制(或者新终端)
gnome-terminal -- bash -c "ros2 run teleop_twist_keyboard teleop_twist_keyboard; exec bash" 2>/dev/null || \
xterm -e "ros2 run teleop_twist_keyboard teleop_twist_keyboard" &

echo -e "${GREEN}所有节点已启动!${NC}"
echo -e "${YELLOW}控制说明:${NC}"
echo -e "  i - 前进"
echo -e "  k - 停止"
echo -e "  j - 左转"
echo -e "  l - 右转"
echo -e "  , - 后退"
echo -e "  q/z - 加速/减速"