Overview
Our driver board supports multiple remote controllers. The factory programs are included in the flashing tool. This article introduces how to use several remote controllers.
Bluetooth Remote Controller
If the car kit you purchased comes standard with this Bluetooth gamepad, the control logic of the factory program is as follows;
This is also the general-purpose program code in the flashing tool. You can download our flashing tool to flash the program directly.
The official website has open-sourced the entry-level source code developed with Arduino IDE and Mixly. You can also find "Resource Downloads" in the website navigation, which provides the advanced source code developed with VS Code + PlatformIO.
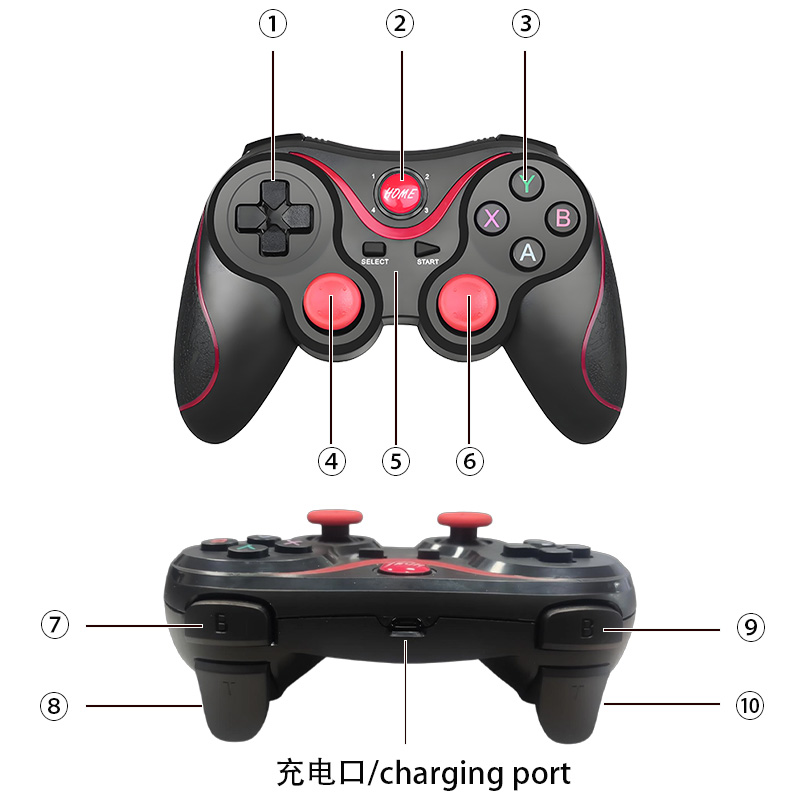
- ① Direction pad: servo control
- Controls the 2 servos on interfaces 5 and 6 of the driver board;
- ② Home key: short press to power on, long press to power off; it will automatically power off if not operated for a long time;
- LED 4 lit indicates the correct communication mode. If another LED is lit, power off, then press and hold the X key, and briefly press the Home key to power on; it will switch to LED 4;
- LED 4 flashing: indicates it is connecting; LED 4 steady on indicates a connection has been established with the device.
- Multiple LEDs flashing: indicates low battery; please plug in a USB cable to a computer or other charger to charge.
- ③ Function keys:
- Y key: enables parking brake; after stopping, the motor mechanism is used to brake;
- A key: releases the parking brake;
- X and B keys: control the servo on interface 7 of the driver board.
- ④ Left joystick: vehicle control
- Mecanum mode: calculates the vehicle's driving speed according to the tilt of the joystick: forward/backward, lateral left/right movement
- Normal mode: calculates the vehicle's driving speed according to the tilt of the joystick: forward/backward, left/right turning
- ⑤ Auxiliary keys
- SELECT: click to switch control mode (Mecanum mode / normal mode); default is Mecanum mode.
- START: vehicle self-check, automatically detects motor parameters.
- ⑥ Right joystick
- Mecanum mode: calculates the vehicle's driving speed according to the tilt of the joystick: left/right turning
- Normal mode: idle
- ⑦ Right index finger B key: increases maximum speed: the maximum motor speed when the joystick is pushed all the way (each press increases by 5%);
- ⑧ Right index finger T key: turns the servo on pin 15 to the left.
- ⑨ Left index finger B key: decreases maximum speed: the maximum motor speed when the joystick is pushed all the way (each press decreases by 5%);
- ⑩ Right index finger T key: turns the servo on pin 15 to the right.
One-handed RC Remote Controller
If you purchased the RC remote controller kit, the program is pre-flashed at the factory, and the default settings are as follows.
The official website has open-sourced the entry-level source code developed with Arduino IDE and Mixly. You can also contact customer service to request the advanced source code developed with VS Code + PlatformIO.

-
① LCD display: signal strength and the current voltage of the development board;
-
② Joystick: controls the vehicle (motors) according to the state of button 5.
-
Button 5 normal state: controls forward/backward and turning of the car.
-
Button 5 pressed state: controls forward/backward and lateral left/right movement of the vehicle;
-
-
③ Channel value fine-tuning; no adjustment needed. If you find the joystick value is inaccurate, try adjusting it downward multiple times.
-
④ Button 3: each press increases the maximum speed by 5%;
-
⑤ Button 5: status button, switches the joystick's control mode for the vehicle;
-
⑥ Button 6: reserved function; currently pressing it pulls pin 45 high, and this pin can be connected externally to LEDs, relay switches, etc.;
-
⑦ Button 4: each press decreases the maximum speed by 5%.