Inspection Video Car
1. Introduction
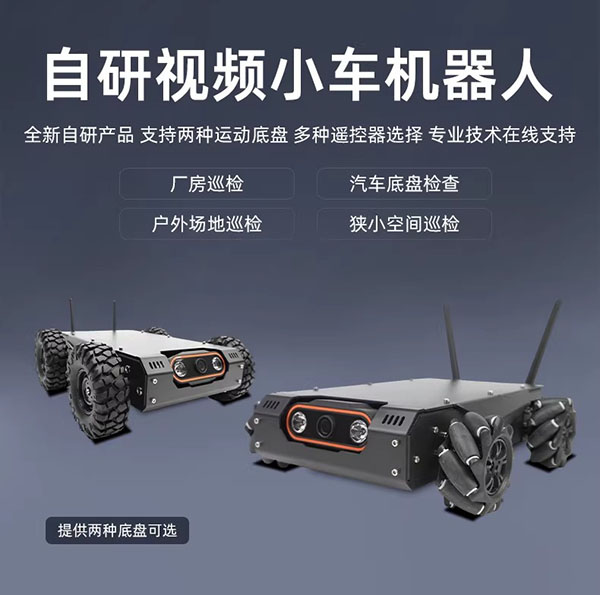
The video inspection car is a short-range video inspection vehicle independently developed by Qiguopai, suitable for inspecting narrow spaces such as automobile chassis and factory workshops. It is paired with two types of remote controllers with control ranges of 100 meters and 500 meters respectively. 4G remote control will be upgraded in a later version.
2. Operating Steps
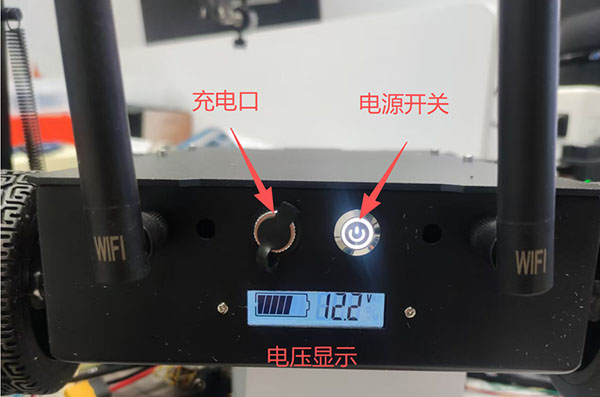
If you purchased the professional remote controller, the vehicle has a built-in receiver, so you can skip the WiFi connection steps.
-
Turn on the vehicle switch;
-
Turn on the remote controller, then tap the App icon on the screen to enter the control interface;
-
The app will take a few seconds to pair;
-
While using the remote controller, if a permission prompt pops up, please grant it; otherwise you may be unable to take photos or record videos.
2. Remote Controller Function Introduction - k56
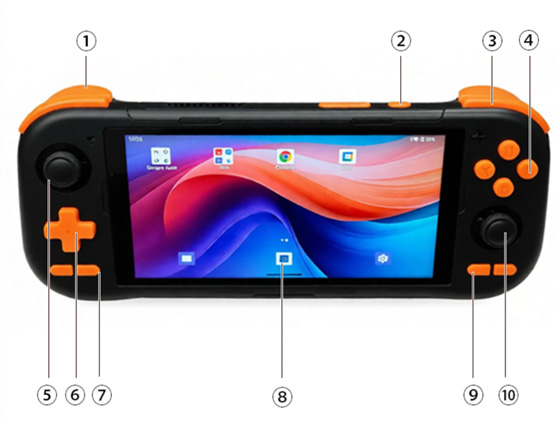
① Left index-finger key
-L1 key: moves the car left (lateral)
-L2 key: camera digital zoom out (-)
② Power key;
③ Right index-finger key -R1 key: moves the car right (lateral) -R2 key: camera digital zoom in (+);
④ 4 buttons
-Button A: turn on the light

-Button B: turn off the light

-Button X: reset the trip odometer

-Button Y: cruise control
⑤ Left joystick: forward/backward movement and left/right turning of the vehicle;
⑥ Directional pad: same function as the joystick;
⑦ Left function key
-Home key: return to the home screen

-Back key: open the help interface
⑧ Touch screen: launch the control software and enter the control interface;
⑨ Right function key
-Select key: take a photo

-Start key: start/stop recording
⑩ Right joystick: controls the camera gimbal rotation.
2. Remote Controller Function Introduction - G12
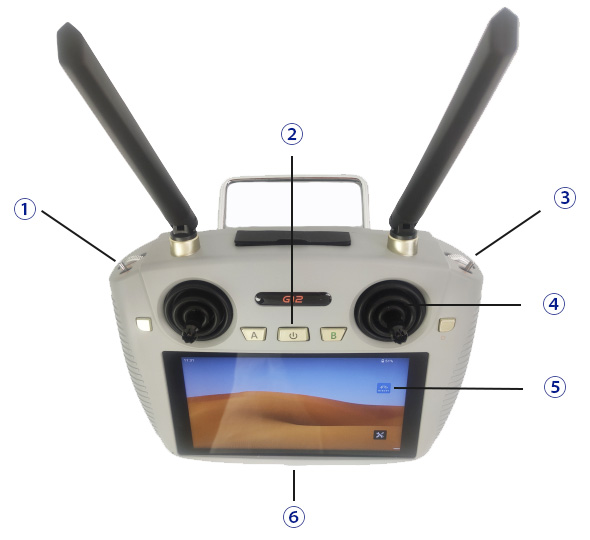
① Upper-left switch:
-Toggle switch: vehicle light switch;

-Scroll wheel: reserved function;
② Buttons;
-Middle power switch;

-Button A: reserved function

-Button B: whether to show the odometer

-Button C: take a photo

-Button D: record video
③ Upper-right switch
-Toggle switch: cruise control;

-Scroll wheel: camera digital zoom;
④ Joysticks;
-Left joystick: controls the vehicle

-Right joystick: controls the camera gimbal
⑤ Touch screen;
⑥ Bottom USB port: Type-C charging port/data interface;
4. Exporting Recordings
-
Plug a USB cable into the computer to connect to the remote controller;
-
Search for USB in the remote controller's settings and select file transfer, so that an extra drive letter appears on the computer;
-
Open that drive on the computer and find the DCIM folder; photos and recordings are stored under their corresponding date folders.
5. TV/Monitor Screen Mirroring
You need to purchase a screen mirroring device separately (about 500 RMB) and plug it into the remote controller to use it.
-
Wireless mirroring: supports TVs with wireless screen mirroring capability
-
Wired mirroring: in addition to the mirroring device, a receiver with an HDMI interface is plugged into a monitor or a TV without mirroring capability
6. Computer Screen Mirroring
You can use the tools below to mirror the screen to Windows and Mac computers; extract them and they are ready to use.
-
Wireless mirroring: the process is more complicated; if needed, please contact customer service for guidance. To keep the documentation concise, it is not described here;
-
Wired mirroring: it is recommended to use your phone's original data cable to connect the computer and the remote controller, then launch the mirroring software.
In the remote controller's settings, search for USB and select file transfer for the USB purpose; otherwise the computer may not have permission to read the remote controller's data.
Mac aarch64 screen mirroring tool
Linux X86 screen mirroring tool
7. Thermal Imaging
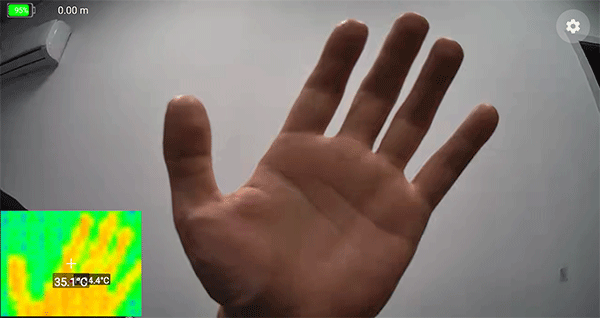
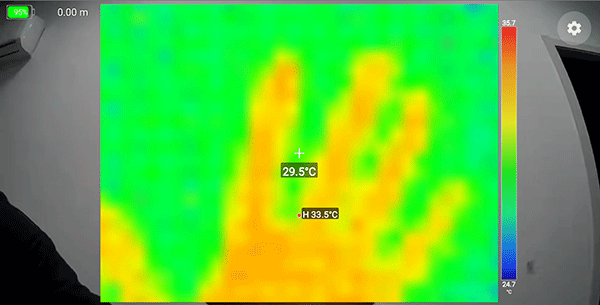
This feature is optional. If the device integrates a thermal imaging module, the system will automatically recognize it and display the thermal image in the lower-left area of the screen by default.
This feature uses infrared dot-matrix sensor technology to detect heat sources in devices or the environment and help locate potential fault points. The effective detection temperature range is from -10°C to 300°C.