Python Tutorial
Project 01 Hello World
1. Project Introduction:
For ESP32 beginners, we will start with something simple. In this project, you only need an ESP32 board, a USB cable, and a computer to complete the "Hello World!" project. It is not only a communication test between the ESP32 board and the computer, but also a beginner-level project for the ESP32.
2. Project Components:
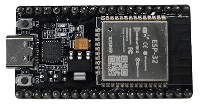 |
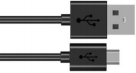 |
|---|---|
| ESP32*1 | USB Cable*1 |
3. Project Wiring:
In this project, we connect the ESP32 and the computer with a USB cable.
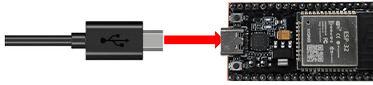
4. Run Code Online:
To run the ESP32 online, you need to connect the ESP32 to the computer. Then you can use the Thonny software to compile or debug the program.
Advantages:
- You can use the Thonny software to compile or debug the program.
- Through the "Shell" window, you can view error messages and output results generated during the program's running, and query related function information online to help improve the program.
Disadvantages:
- To run the ESP32 online, you must connect the ESP32 to a computer and run it together with the Thonny software.
- If the ESP32 is disconnected from the computer, when they reconnect, the program will not run again.
Basic Operations:
- Open the Thonny software and click
 "Open...".

- In the newly popped-up window, click "This PC".

In the new dialog box, select "Project_01_HelloWorld.py" and click "Open".


Note:
The code used in this tutorial is saved in the path: "..\program-code\python-code".
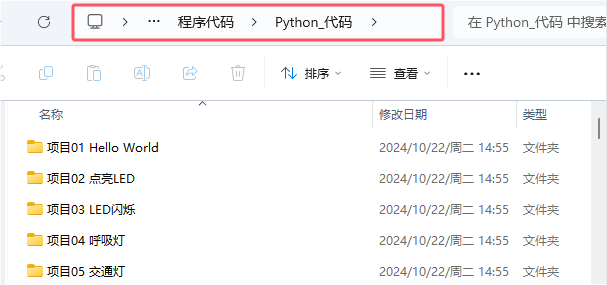
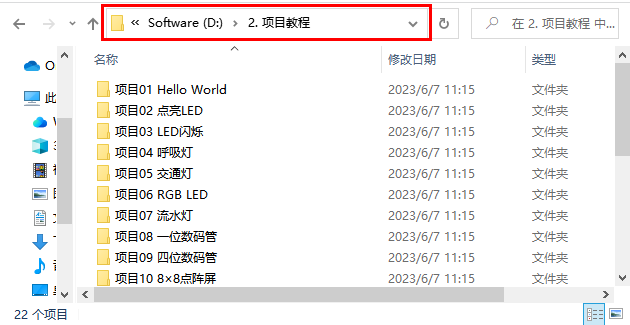
You can move the code anywhere. For example, we saved the code in Drive D, with the path D:\2. Project Tutorials.
- Click
 to run the program "Hello World!", "Welcome Keyestudio" and it will be printed in the "Shell" window.

5. Exit Online Running
When running online, click  on the Thonny software or press Ctrl+C to exit the program.

Project 02 Light Up an LED
1. Project Introduction:
In this project, we will show you how to light up an LED. We use the ESP32's digital pin to turn on the LED so that the LED lights up.
2. Project Components:
|
 |
 |
|---|---|---|
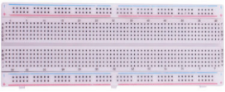
| ESP32*1 | Breadboard*1 | Red LED*1 |
 |
 |
|
| 220Ω Resistor*1 | Jumper Wire*2 | USB Cable*1 |
3. Component Knowledge:
(1) LED
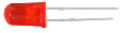
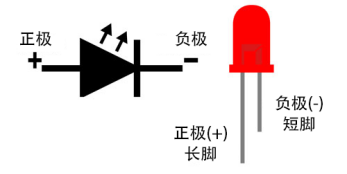
An LED is a semiconductor known as a "light-emitting diode". It is an electronic device made of semiconductor materials (silicon, selenium, germanium, etc.). It has a positive terminal and a negative terminal. The short leg is the negative terminal, connected to GND, and the long leg is the positive terminal, connected to 3.3V or 5V.
(2) Five-band Resistor
A resistor is an electronic component that limits or regulates the flow of current in a circuit. On the left is the appearance of a resistor, and on the right is the symbol used to represent a resistor in a circuit. The unit of resistance (R) is ohm (Ω), 1 mΩ = 1000 kΩ, 1 kΩ = 1000 Ω.
We can use resistors to protect sensitive components such as LEDs. The strength of the resistor (in Ω) is marked on the body of the resistor with small color bands. Each color represents a number, which you can look up with a resistor reference card.
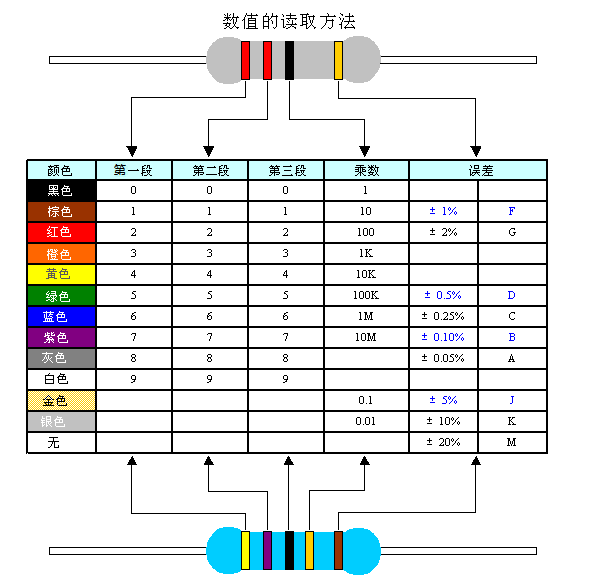
In this kit, we provide 3 five-band resistors with different resistance values. Here we use 3 five-band resistors as examples:
220Ω Resistor ×10
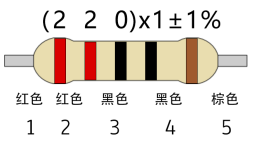
10KΩ Resistor ×10
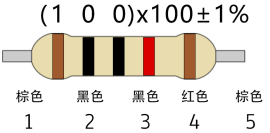
1KΩ Resistor ×10
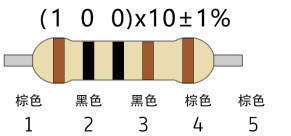
At the same voltage, there will be less current and larger resistance. The relationship among current, voltage, and resistance can be expressed by the formula: I=U/R. In the figure below, the current currently flowing through R1 is: I = U / R = 3 V / 10 KΩ = 0.0003 A = 0.3 mA.
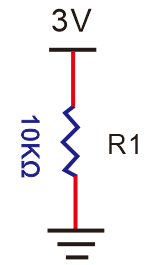
Do not connect a resistor with a very low resistance value directly across the two poles of the power supply, as this will cause the current to be too high and damage electronic components. Resistors have no positive or negative terminals.
(3) Breadboard
The breadboard is an important tool used in the laboratory to build circuits. There are many holes on the breadboard into which circuit elements such as integrated circuits and resistors can be inserted. Mastering the use of the breadboard is one of the important foundations for improving experimental efficiency and reducing the probability of experimental failures. The following is a brief introduction to the structure and usage of the breadboard. A typical breadboard is shown below:
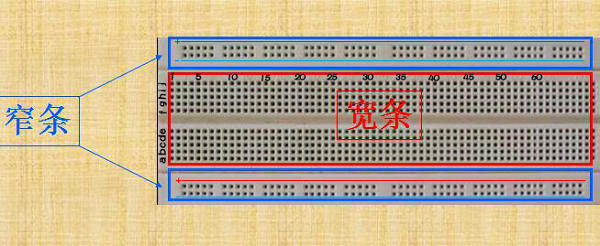
The appearance and internal structure of the breadboard are shown in the figure above. A common minimal-unit breadboard is divided into three parts: upper, middle, and lower. The upper and lower parts are generally narrow strips consisting of one or two rows of jacks, and the middle part consists of an isolation groove in the middle and strips with 5 rows of jacks above and below it.
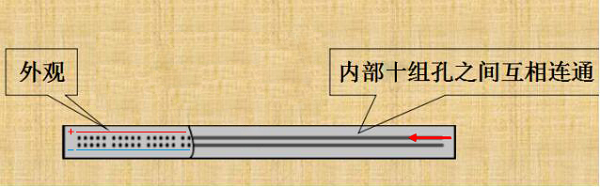
The two narrow strips of the breadboard each have two rows of jacks, and the two rows are not connected to each other; they are generally used as power supply paths. The first row marked with "+" has 10 groups of jacks (all internally connected), all of which are positive; the second row marked with "-" has 10 groups of jacks (internally connected), all of which are ground. The first and second rows at the bottom of the breadboard have the same structure as above. If you need to use the entire breadboard, you usually connect "+" to "+" with wires and "-" to "-" with wires.
The wide strip in the middle consists of an isolation groove in the middle and 5 rows of jacks above and below it. The 5 jacks in the same column are connected to each other, while columns and columns, as well as the parts above and below the groove, are not connected. The appearance and structure are as shown in the figure below:
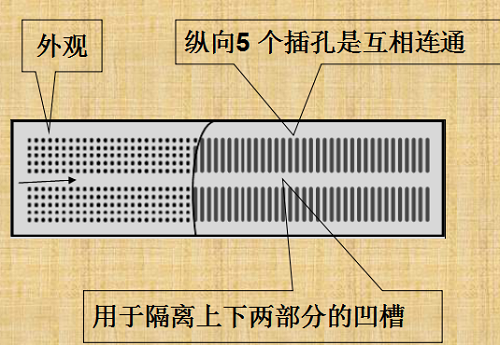
The connection holes of the middle wide strip are divided into upper and lower parts, which is the main working area of the breadboard, used for inserting components and jumper wires. The 5 jacks in the same column (i.e. a-b-c-d-e, f-g-h-i-j) are connected to each other; columns and columns, as well as the parts above and below the groove, are not connected. When doing experiments, a small unit consisting of two narrow strips and one wide strip is usually used. The main part of the circuit is built in the wide strip, one row of the upper narrow strip is used as power, and one row of the lower narrow strip is used as ground. The middle wide strip is used to connect the circuit. Since the parts above and below the groove are not connected, the integrated circuit is generally inserted across the groove.
(4) Power Supply
The ESP32 requires a 3.3V-5V power supply. In this project, we connect the ESP32 and the computer with a USB cable.
4. Project Wiring Diagram:
First, cut off all power to the ESP32. Then build the circuit according to the wiring diagram. After the circuit is built and verified to be correct, connect the ESP32 to the computer with a USB cable.
Note: Avoid any possible short circuit (especially connecting 3.3V and GND)!
Warning: A short circuit may cause large current in the circuit, causing components to overheat and permanently damage the hardware.
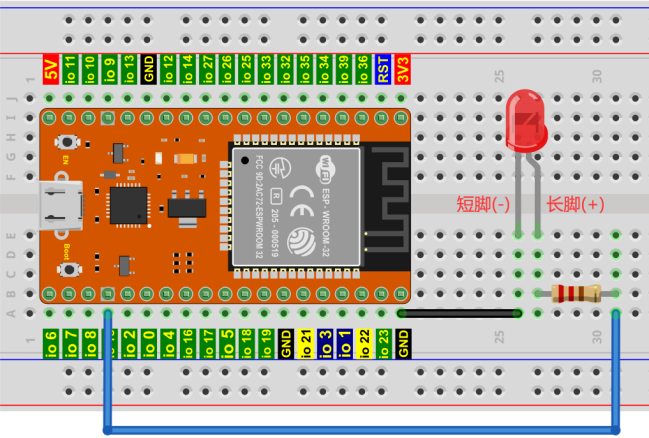
Note:
How to connect the LED
How to identify the five-band 220Ω resistor
5. Project Code:
The code used in this tutorial is saved in the path: "..\program-code\python-code".
You can move the code anywhere. For example, we saved the code in Drive D, with the path D:\2. Project Tutorials.
Open the "Thonny" software, click "This PC" → "D:" → "2. Project Tutorials" → "Project 02 Light Up an LED". And double-click "Project_02_Turn_On_LED.py" with the left mouse button.

from machine import Pin
import time

led = Pin(15, Pin.OUT)   # 创建引脚15为LED对象,设置引脚15为输出

led.value(1)    # led点亮
Make sure the ESP32 is already connected to the computer, and click  .

Click  , and the code starts to run. The phenomenon you will see is: the LED in the circuit is lit. Press "Ctrl+C" or click to exit the program.


Project 03 LED Blinking
1. Project Introduction:
In this project, we will show you the LED blinking effect. We use the ESP32's digital pin to turn on the LED and make it blink.
2. Project Components:
|
|
|
|---|---|---|
| ESP32*1 | Breadboard*1 | Red LED*1 |
|
|
|
| 220Ω Resistor*1 | Jumper Wire*2 | USB Cable*1 |
3. Project Wiring Diagram:
First, cut off all power to the ESP32. Then build the circuit according to the circuit diagram and wiring diagram. After the circuit is built and verified to be correct, connect the ESP32 to the computer with a USB cable.
Note: Avoid any possible short circuit (especially connecting 3.3V and GND)!
Warning: A short circuit may cause large current in the circuit, causing components to overheat and permanently damage the hardware.
Note:
How to connect the LED
How to identify the five-band 220Ω resistor
4. Project Code:
The code used in this tutorial is saved in the path: "..\program-code\python-code".
You can move the code anywhere. For example, we saved the code in Drive D, with the path D:\2. Project Tutorials.
Open the "Thonny" software, click "This PC" → "D:" → "2. Project Tutorials" → "Project 03 LED Blinking". And double-click "Project_03_LED_Flashing.py" with the left mouse button.

from machine import Pin
import time

led = Pin(15, Pin.OUT)   # 创建引脚15为LED对象,设置引脚15为输出

try:
    while True:
        led.value(1)    # LED点亮
        time.sleep(0.5) # 延时 0.5s
        led.value(0)    # LED熄灭
        time.sleep(0.5) # 延时 0.5s
except:
    pass
Make sure the ESP32 is already connected to the computer, and click .

Click "", and the code starts to run. The phenomenon you will see is: the LED in the circuit starts to blink. Press "Ctrl+C" or click "" to exit the program.


Project 04 Breathing LED
1. Project Introduction:
In previous studies, we learned that an LED has on/off states. So how do we enter an intermediate state? How do we output an intermediate state to make the LED "half bright"? That is what we are going to learn. A breathing LED, that is, the LED goes from off to bright and then from bright to off, just like "breathing". So how do we control the brightness of the LED? We will use the ESP32's PWM to achieve this goal.
2. Project Components:
|
|
|
|---|---|---|
| ESP32*1 | Breadboard*1 | Red LED*1 |
|
|
|
| 220Ω Resistor*1 | Jumper Wire*2 | USB Cable*1 |
3. Component Knowledge:

Analog Signal & Digital Signal
An analog signal is a signal that is continuous in both time and value. In contrast, a digital signal or discrete-time signal is a time sequence composed of a series of numbers. Most signals in life are analog signals. A familiar example of an analog signal is: the temperature throughout the day changes continuously, rather than changing instantly from 0 to 10. However, the value of a digital signal can change instantly, and this change is represented by the digits 1 and 0 (the basis of binary code). As shown in the figure below, we can see the differences between them more easily.
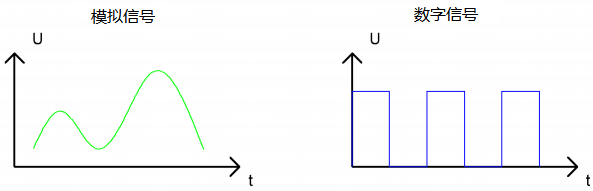
In practical applications, we often use binary as a digital signal, that is, a series of 0s and 1s. Because a binary signal has only two values (0 or 1), it has great stability and reliability. Finally, analog signals and digital signals can be converted into each other.
PWM: Pulse Width Modulation (PWM) is an effective method of using digital signals to control analog circuits. Ordinary processors cannot directly output analog signals. PWM technology makes this conversion (converting digital signals to analog signals) very convenient. PWM technology uses a digital pin to send a square wave of a certain frequency, that is, high-level and low-level outputs, alternating for a certain period of time. The total time of each group of high level and low level is generally fixed and is called the period (Note: the reciprocal of the period is the frequency). The time of high-level output is usually called the pulse width, and the duty cycle is the percentage of the ratio of the pulse width (PW) to the total period (T) of the waveform. The longer the high-level output duration, the longer the duty cycle, and the higher the corresponding voltage in the analog signal. The figure below shows the change of the analog signal voltage between 0V-3.3V (high level is 3.3V) corresponding to a pulse width of 0%-100%.
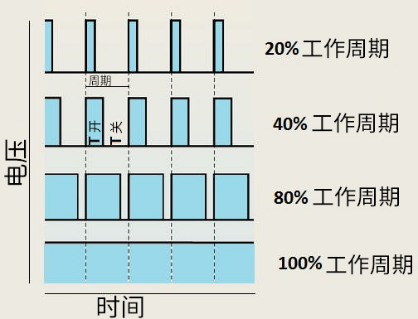
The longer the PWM duty cycle, the higher the output power. Since we understand this relationship, we can use PWM to control the brightness of the LED or the speed of the DC motor, etc. As can be seen above, PWM is not a real analog signal, and the effective value of the voltage is equal to the corresponding analog signal. Therefore, we can control the output power of LEDs and other output modules to achieve different effects.
ESP32 and PWM
Almost all ESP32 input/output pins can be used for PWM (Pulse Width Modulation). These pins can be used to control motors, LED lights, and so on.
4. Project Wiring Diagram:
5. Project Code:
The code used in this tutorial is saved in the path: "..\program-code\python-code".
You can move the code anywhere. For example, we saved the code in Drive D, with the path D:\2. Project Tutorials.
Open the "Thonny" software, click "This PC" → "D:" → "2. Project Tutorials" → "Project 04 Breathing LED". And double-click "Project_04_Breathing_LED.py" with the left mouse button.

import time
from machine import Pin,PWM

# ESP32 PWM引脚输出的方式与传统控制器不同。
# 它可以改变频率和占空比通过配置PWM的参数在初始化阶段。
# 定义GPIO15的输出频率为10000Hz,分配给PWM。

pwm =PWM(Pin(15,Pin.OUT),10000)

try:
    while True:
# 占空比范围为0-1023,因此我们使用第一个for回路控制PWM改变占空比值,使PWM输出0% -100%;
# 使用第二个for回路使PWM输出100%-0%。
        for i in range(0,1023):
            pwm.duty(i)
            time.sleep_ms(1)

        for i in range(0,1023):
            pwm.duty(1023-i)
            time.sleep_ms(1)
except:
# 每次使用PWM时,硬件定时器将打开以配合它。
# 因此,每次使用PWM后,都需要调用deinit()来关闭定时器。否则,下次PWM可能无法工作.
    pwm.deinit()
6. Project Phenomenon:
Make sure the ESP32 is already connected to the computer, and click .

Click , and the code starts to run. The phenomenon you will see is: the LED in the circuit gradually becomes brighter from dark, and then gradually becomes darker from bright, just like breathing. Press "Ctrl+C" or click to exit the program.

Project 05 Traffic Lights
1. Project Introduction:
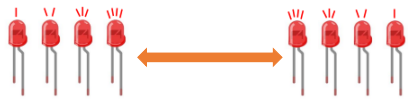
Traffic lights are very common in our daily lives. According to a certain time pattern, traffic lights are composed of three colors: red, yellow, and green. Everyone should obey the traffic rules, which can avoid many traffic accidents. In this project, we will use the ESP32 and some LEDs (red, yellow, green) to simulate traffic lights.
2. Project Components:
|
|
|
 |
|---|---|---|---|
| ESP32*1 | Breadboard*1 | Red LED*1 | Yellow LED*1 |
 |
|
|
|
| Green LED*1 | 220Ω Resistor*3 | Several Jumper Wires | USB Cable*1 |
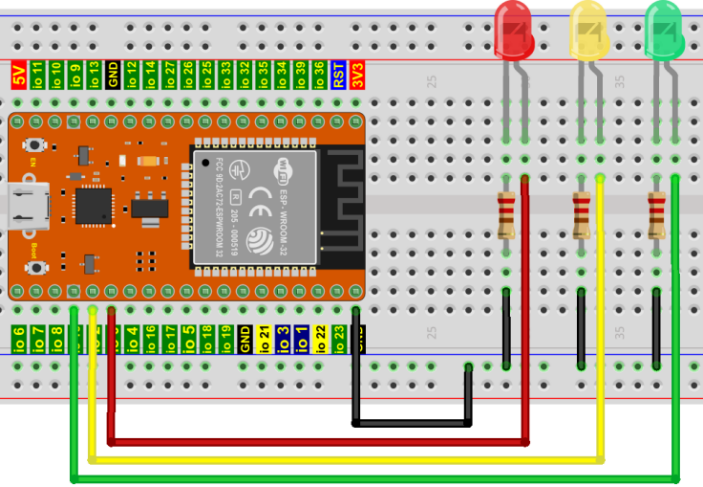
3. Project Wiring Diagram:
4. Project Code:
The code used in this tutorial is saved in the path: "..\program-code\python-code".
You can move the code anywhere. For example, we saved the code in Drive D, with the path D:\2. Project Tutorials.
Open the "Thonny" software, click "This PC" → "D:" → "2. Project Tutorials" → "Project 05 Traffic Lights". And double-click "Project_05_Traffic_Lights.py" with the left mouse button.

from machine import Pin
import time

led_red = Pin(0, Pin.OUT)  # 创建引脚0为红色led对象,设置引脚0为输出
led_yellow = Pin(2, Pin.OUT)  # 创建引脚2为黄色led对象,设置引脚2为输出
led_green = Pin(15, Pin.OUT) # 创建引脚15为绿色led对象,设置引脚15为输出

while True:
    led_red.value(1)  # 红色LED点亮
    time.sleep(5)   # 延时 5s
    led_red.value(0) # 红色LED熄灭
    led_yellow.value(1)
    time.sleep(0.5)
    led_yellow.value(0)
    time.sleep(0.5)
    led_yellow.value(1)
    time.sleep(0.5)
    led_yellow.value(0)
    time.sleep(0.5)
    led_yellow.value(1)
    time.sleep(0.5)
    led_yellow.value(0)
    time.sleep(0.5)
    led_green.value(1)
    time.sleep(5)
    led_green.value(0)
Make sure the ESP32 is already connected to the computer, and click .

Click , and the code starts to run. The phenomenon you will see is: 1. First, the red light will stay on for 5 seconds and then go out; 2. Second, the yellow light will blink 3 times and then go out; 3. Then, the green light will stay on for 5 seconds and then go out; 4. Continue running steps 1-3 above. Press "Ctrl+C" or click to exit the program.

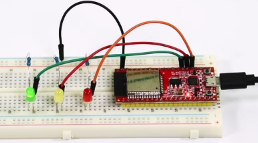
Project 06 RGB LED
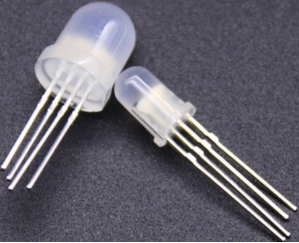
1. Project Introduction:
The RGB LED is composed of three colors (red, green, blue), and can emit different colors by mixing these three basic colors. In this project, we will introduce the RGB LED and show you how to use the ESP32 to control the RGB LED to emit different colors of light. Even though the RGB LED is very basic, it is also a great way to introduce yourself or others to the basics of electronics and coding.
2. Project Components:
|
|
 |
|---|---|---|
| ESP32*1 | Breadboard*1 | RGB LED*1 |
|
|
|
| 220Ω Resistor*3 | Several Jumper Wires | USB Cable*1 |
3. Component Knowledge:
Displays mostly follow the RGB color standard. All colors on a computer screen are produced by mixing red, green, and blue in different proportions.
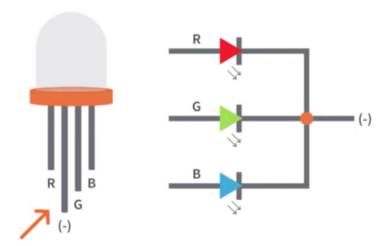
This RGB LED has 4 pins, one for each color (red, green, blue) and a common cathode. To change the brightness of the RGB LED, we can use the ESP's PWM pins. The PWM pins give the RGB LED signals with different duty cycles to obtain different colors.
If we use 3 10-bit PWMs to control the RGB LED, in theory we can create 2^10 × 2^10 × 2^10 = 1,073,741,824 (1 billion) colors through different combinations.
4. Project Wiring Diagram:
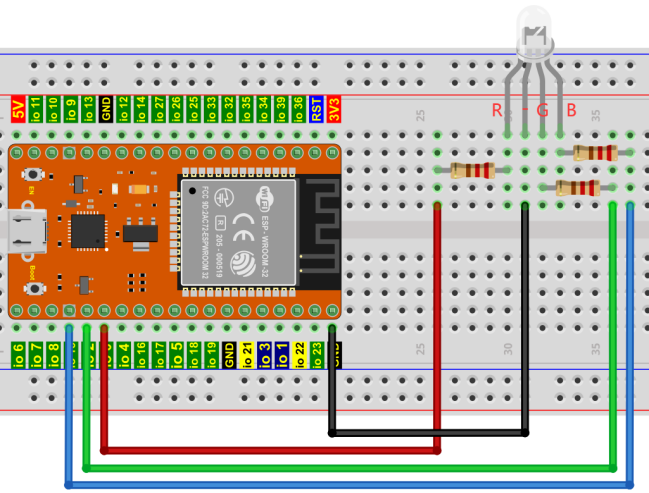
5. Project Code:
The code used in this tutorial is saved in the path: "..\program-code\python-code".
You can move the code anywhere. For example, we saved the code in Drive D, with the path D:\2. Project Tutorials.
Open the "Thonny" software, click "This PC" → "D:" → "2. Project Tutorials" → "Project 06 RGB LED". And double-click "Project_06_RGB_LED.py" with the left mouse button.

# 导入Pin、PWM和random库.
from machine import Pin, PWM
from random import randint
import time

# 配置GPIO15, GPIO2, GPIO0的输出方式为PWM输出,PWM频率为10000Hz.
pins = [0, 2, 15]

pwm0 = PWM(Pin(pins[0]),10000)
pwm1 = PWM(Pin(pins[1]),10000)
pwm2 = PWM(Pin(pins[2]),10000)

#定义一个函数来设置RGBLED的颜色.
def setColor(r, g, b):
    pwm0.duty(1023-r)
    pwm1.duty(1023-g)
    pwm2.duty(1023-b)

try:
    while True:
        red   = randint(0, 1023)
        green = randint(0, 1023)
        blue  = randint(0, 1023)
        setColor(red, green, blue)
        time.sleep_ms(200)
except:
    pwm0.deinit()
    pwm1.deinit()
    pwm2.deinit()
Make sure the ESP32 is already connected to the computer, and click .

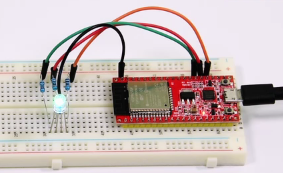
Click , and the code starts to run. The phenomenon you will see is: the RGB LED starts to display random colors. Press "Ctrl+C" or click to exit the program.

Project 07 Flowing Water Light
1. Project Introduction:
In daily life, we can see many billboards composed of LEDs of different colors. They keep changing the lights (like flowing water) to attract the attention of customers. In this project, we will use the ESP32 to control 10 LEDs to achieve a flowing water effect.
2. Project Components:
|
|
|
|---|---|---|
| ESP32*1 | Breadboard*1 | Red LED*10 |
|
|
|
| 220Ω Resistor*10 | Several Jumper Wires | USB Cable*1 |
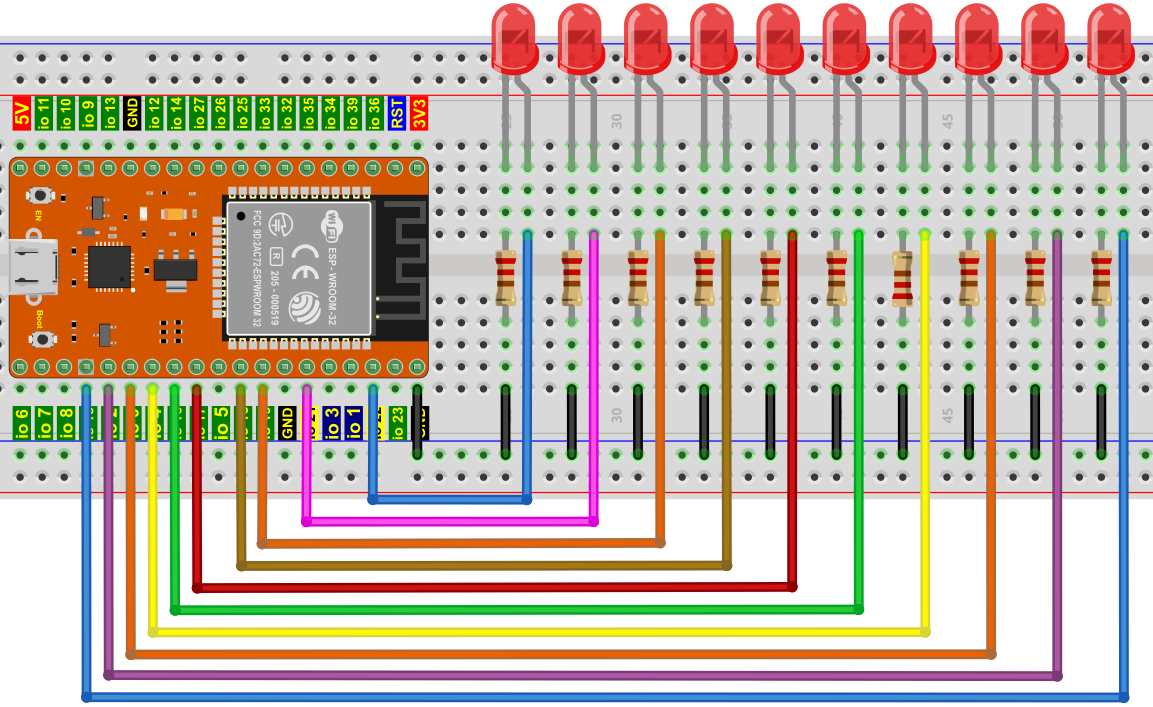
3. Project Wiring Diagram:
4. Project Code:
This project is to design and make a flowing water light. These are the actions: first turn on LED #1, then turn it off. Then turn on LED #2, then turn it off... and repeat the same operation for all 10 LEDs until the last LED is turned off. This process repeats continuously to achieve the "movement" of flowing water.
The code used in this tutorial is saved in the path: "..\program-code\python-code".
You can move the code anywhere. For example, we saved the code in Drive D, with the path D:\2. Project Tutorials.
Open the "Thonny" software, click "This PC" → "D:" → "2. Project Tutorials" → "Project 07 Flowing Water Light". And double-click "Project_07_Flowing_Water_Light.py" with the left mouse button.

from machine import Pin
import time

# 使用阵列定义10个连接点阵屏的GPIO端口,便于操作。.
pins = [22, 21, 19, 18, 17, 16, 4, 0, 2, 15]
# 使用两个for循环分别从左到右打开led,然后从右到左打开led
def showLed():
    for pin in pins:
        print(pin)
        led = Pin(pin, Pin.OUT)
        led.value(1)
        time.sleep_ms(100)
        led.value(0)
        time.sleep_ms(100)
    for pin in reversed(pins):
        print(pin)
        led = Pin(pin, Pin.OUT)
        led.value(1)
        time.sleep_ms(100)
        led.value(0)
        time.sleep_ms(100)

while True:
    showLed()
Make sure the ESP32 is already connected to the computer, and click .

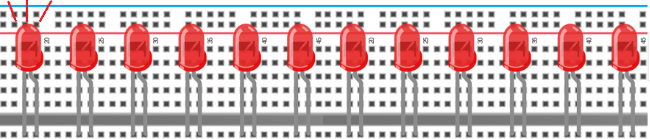
Click , and the code starts to run. The phenomenon you will see is: 10 LEDs will light up from left to right, and then return from right to left. Press "Ctrl+C" or click to exit the program.

Project 08 One-Digit Digital Tube
1. Project Introduction:
The seven-segment display is an electronic display device that displays decimal digits. It is widely used in digital clocks, electronic instruments, basic calculators, and other electronic devices that display numeric information. Even the bombs we see in movies have seven-segment displays. Perhaps seven-segment displays do not look modern enough, but they are an alternative to more complex dot matrix displays and are easy to use in both limited light conditions and strong sunlight. In this project, we will use the ESP32 to control a one-digit display to show digits.
2. Project Components:
|
|
 |
|---|---|---|
| ESP32*1 | Breadboard*1 | One-Digit Digital Tube*1 |
|
|
|
| 220Ω Resistor*8 | Several Jumper Wires | USB Cable*1 |
3. Component Knowledge:
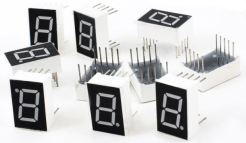
One-digit digital tube display principle: The digital tube display is a semiconductor light-emitting device. Its basic unit is a light-emitting diode (LED). According to the number of segments, the digital tube display can be divided into a 7-segment display and an 8-segment display. The 8-segment display has one more LED unit (used for decimal point display) than the 7-segment one. Each segment of the seven-segment LED display is a separate LED. According to the wiring of the LED units, the digital tube can be divided into a common anode digital tube and a common cathode digital tube.
In a common cathode 7-segment display, all the cathodes (or negative terminals) of the segment LEDs are connected together. You should connect the common cathode to GND. To light up a segment LED, you can set its associated pin to HIGH.
In a common anode 7-segment display, all the anodes (positive terminals) of the segment LEDs are connected together. You should connect the common anode to +5V. To light up a segment LED, you can set its associated pin to LOW.
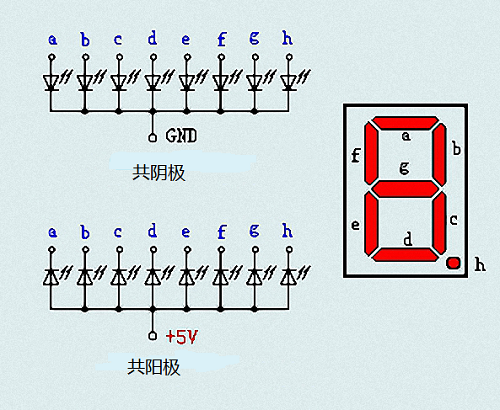
Each segment of the digital tube consists of one LED. So when you use it, you also need to use a current-limiting resistor. Otherwise, the LED will be burned out. In this experiment, we used a common common cathode one-digit digital tube. As we mentioned above, you should connect the common cathode to GND. To light up a segment LED, you can set its associated pin to HIGH.
4. Project Wiring Diagram:
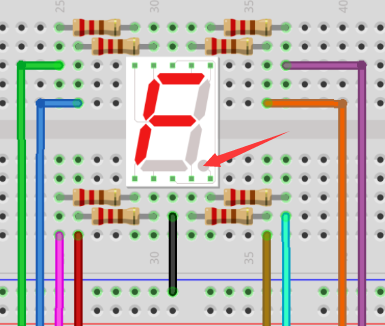
Note: The direction of the seven-segment display inserted into the breadboard should be consistent with the wiring diagram, with one extra dot at the lower right corner.
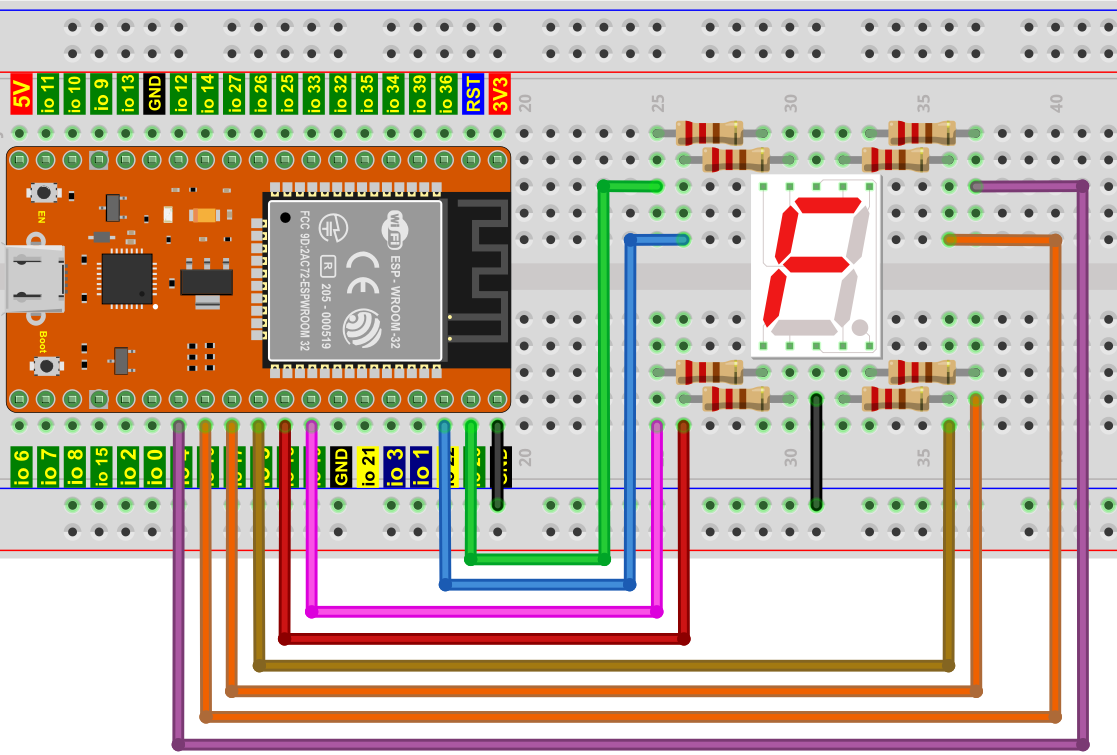
5. Project Code:
The digit display is divided into 7 segments, and the decimal point display is divided into 1 segment. When displaying certain digits, the corresponding segments will be lit. For example, when displaying the digit 1, the b and c segments will be turned on.
The code used in this tutorial is saved in the path: "..\program-code\python-code".
You can move the code anywhere. For example, we saved the code in Drive D, with the path D:\2. Project Tutorials.
Open the "Thonny" software, click "This PC" → "D:" → "2. Project Tutorials" → "Project 08 One-Digit Digital Tube". And double-click "Project_08_One_Digit_Digital_Tube.py" with the left mouse button.

from machine import Pin
import time

a = Pin(16, Pin.OUT)
b = Pin(4, Pin.OUT)
c = Pin(5, Pin.OUT)
d = Pin(18, Pin.OUT)
e = Pin(19, Pin.OUT)
f = Pin(22, Pin.OUT)
g = Pin(23, Pin.OUT)
dp = Pin(17, Pin.OUT)

pins = [Pin(id,Pin.OUT) for id in [16, 4, 5, 18, 19, 22, 23, 17]]

def show(code):
    for i in range(0, 8):
        pins[i].value(~code & 1)
        code = code >> 1

# 选择0 ~ 9之间的编码
mask_digits = [0xc0, 0xf9, 0xa4, 0xb0, 0x99, 0x92, 0x82, 0xf8,0x80, 0x90]
for code in reversed(mask_digits):
    show(code)
    time.sleep(1)
6. Project Phenomenon:
Make sure the ESP32 is already connected to the computer, and click .

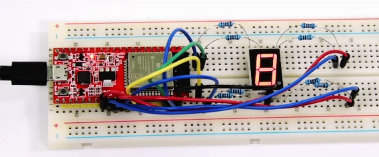
Click , and the code starts to run. The phenomenon you will see is: the one-digit digital tube will display digits from 9 to 0. Press "Ctrl+C" or click to exit the program.

Project 09 Four-Digit Digital Tube
1. Project Introduction:
The four-digit digital tube is a very practical display device. The display of electronic clocks, the scorekeepers on courts, and the number of people in parks all need it. Due to its low price and ease of use, more and more projects will use the 4-digit digital tube. In this project, we use the ESP32 to control a four-digit digital tube to display four digits.
2. Project Components:
|
|
 |
|---|---|---|
| ESP32*1 | Breadboard*1 | Four-Digit Digital Tube*1 |
|
|
|
| 220Ω Resistor*8 | Several Jumper Wires | USB Cable*1 |
3. Component Knowledge:
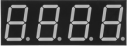
Four-digit digital tube: There are two types of four-digit digital tubes: common anode and common cathode. The display principle is similar to that of a one-digit digital tube; both use 8 GPIO ports to control the display segments of the digital tube, that is, 8 LED lights. However, here there are 4 digits, so 4 more GPIO ports are needed to control the digit-select terminals, that is, to select which single digit tube lights up. The digits switch very quickly, so the naked eye cannot distinguish them, making it look as if multiple digital tubes are displaying at the same time.
Our four-digit digital tube is common cathode.
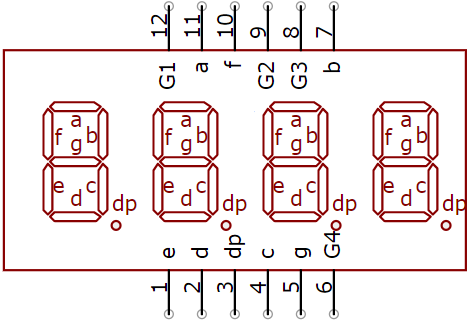
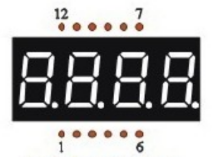
The figure below is the pin diagram of the 4-digit digital tube. G1, G2, G3, and G4 are the pins that control the digits
.
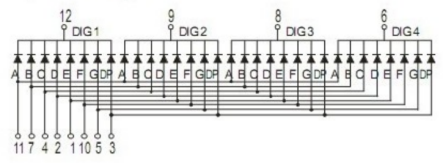
The figure below is the internal wiring principle diagram of the 4-digit digital tube
4. Project Wiring Diagram:
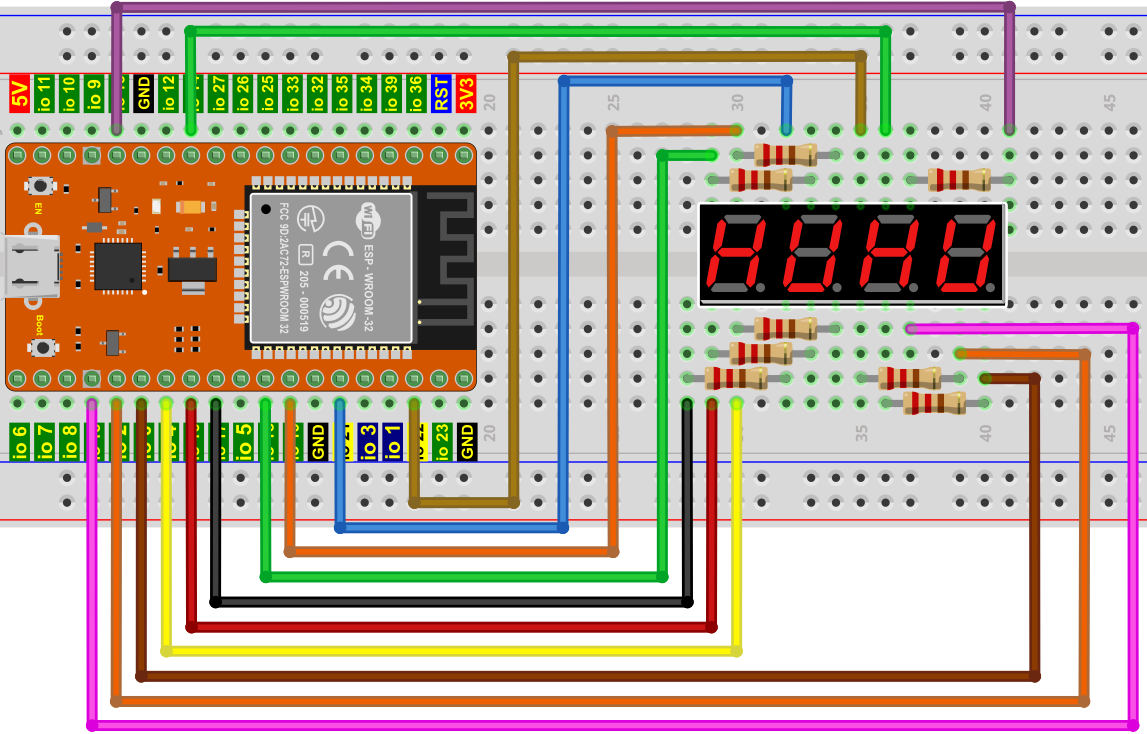
5. Project Code:
The code used in this tutorial is saved in the path: "..\program-code\python-code".
You can move the code anywhere. For example, we saved the code in Drive D, with the path D:\2. Project Tutorials.
Open the "Thonny" software, click "This PC" → "D:" → "2. Project Tutorials" → "Project 09 Four-Digit Digital Tube". And double-click "Project_09_Four_Digit_Digital_Tube.py" with the left mouse button.

from machine import Pin
import time

# 数码管每个数字引脚
a = Pin(18, Pin.OUT)
b = Pin(13, Pin.OUT)
c = Pin(2, Pin.OUT)
d = Pin(16, Pin.OUT)
e = Pin(17, Pin.OUT)
f = Pin(19, Pin.OUT)
g = Pin(0, Pin.OUT)
dp = Pin(4, Pin.OUT)

# 位选引脚
G1 = Pin(21, Pin.OUT)
G2 = Pin(22, Pin.OUT)
G3 = Pin(14, Pin.OUT)
G4 = Pin(15, Pin.OUT)

# 数码管a到dp对应的引脚
d_Pins = [a, b, c, d, e, f, g, dp]
# 数码管位选引脚
w_Pins = [G1, G2, G3, G4]

# 数码管0-F码值
number = [
    [1, 1, 1, 1, 1, 1, 0, 0],  # 0
    [0, 1, 1, 0, 0, 0, 0, 0],  # 1
    [1, 1, 0, 1, 1, 0, 1, 0],  # 2
    [1, 1, 1, 1, 0, 0, 1, 0],  # 3
    [0, 1, 1, 0, 0, 1, 1, 0],  # 4
    [1, 0, 1, 1, 0, 1, 1, 0],  # 5
    [1, 0, 1, 1, 1, 1, 1, 0],  # 6
    [1, 1, 1, 0, 0, 0, 0, 0],  # 7
    [1, 1, 1, 1, 1, 1, 1, 0],  # 8
    [1, 1, 1, 1, 0, 1, 1, 0],  # 9
    [1, 1, 1, 0, 1, 1, 1, 1],  # A
    [1, 1, 1, 1, 1, 1, 1, 1],  # B
    [1, 0, 0, 1, 1, 1, 0, 1],  # C
    [1, 1, 1, 1, 1, 1, 0, 1],  # D
    [1, 0, 0, 1, 1, 1, 1, 1],  # E
    [1, 0, 0, 0, 1, 1, 1, 1],  # F
    [0, 0, 0, 0, 0, 0, 0, 1]   # .
]

def display(g, n):
    """
    显示功能:g的取值范围是1~4,n的取值范围是0~9
    """
    # 关闭所有段
    for pin in d_Pins:
        pin.value(0)

    # 选择要显示的位
    for i in range(len(w_Pins)):
        if i + 1 == g:
            w_Pins[i].value(0)  # 选中对应位(低电平有效)
        else:
            w_Pins[i].value(1)  # 其他位关闭

    # 显示数字的各个段
    for i in range(8):
        d_Pins[i].value(number[n][i])

def show_number(num):
    """
    显示一个4位数(0-9999)
    """
    # 将数字分解为千位、百位、十位、个位
    thousands = num // 1000
    hundreds = (num % 1000) // 100
    tens = (num % 100) // 10
    ones = num % 10

    # 动态扫描显示
    display(1, thousands)
    time.sleep_ms(2)
    display(2, hundreds)
    time.sleep_ms(2)
    display(3, tens)
    time.sleep_ms(2)
    display(4, ones)
    time.sleep_ms(2)

def setup():
    """
    初始化所有引脚
    """
    # 引脚已经在创建时设置为OUTPUT,这里只是确认
    for pin in d_Pins:
        pin.init(Pin.OUT)
    for pin in w_Pins:
        pin.init(Pin.OUT)

def loop():
    """
    主循环:从0到9999循环显示
    """
    while True:
        # 从0到9999循环
        for num in range(10000):
            # 每个数字显示125个周期,总共约1秒
            # 每个显示周期是4个位 * 2ms = 8ms
            # 125 * 8ms = 1000ms = 1秒
            for _ in range(125):
                show_number(num)

# 程序入口
if __name__ == "__main__":
    setup()
    loop()
Make sure the ESP32 is already connected to the computer, and click .

Click , and the code starts to run. The phenomenon you will see is: the four-digit digital tube displays digits and repeats these actions in an infinite loop. Press "Ctrl+C" or click to exit the program.

Project 10 8×8 Dot Matrix Display
1. Project Introduction:
The dot matrix display is an electronic digital display device that can display information on machines, clocks, public transit departure indicators, and many other devices. In this project, we will use the ESP32 to control an 8x8 dot matrix display to gradually light up the LEDs on the dot matrix display.
2. Project Components:
|
|
 |
|---|---|---|
| ESP32*1 | Breadboard*1 | 8×8 Dot Matrix Display*1 |
|
|
|
| 220Ω Resistor*8 | Several Jumper Wires | USB Cable*1 |
3. Component Knowledge:
8×8 Dot Matrix: It is composed of 64 LED lights, and there are two types: common row anode and common row cathode. Our module is common row anode, meaning that each row has a line connecting the positive terminals of the LEDs together, and each column connects the negative terminals of the LEDs together. See the figure below:
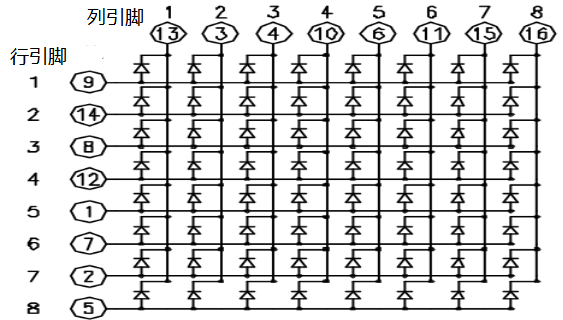
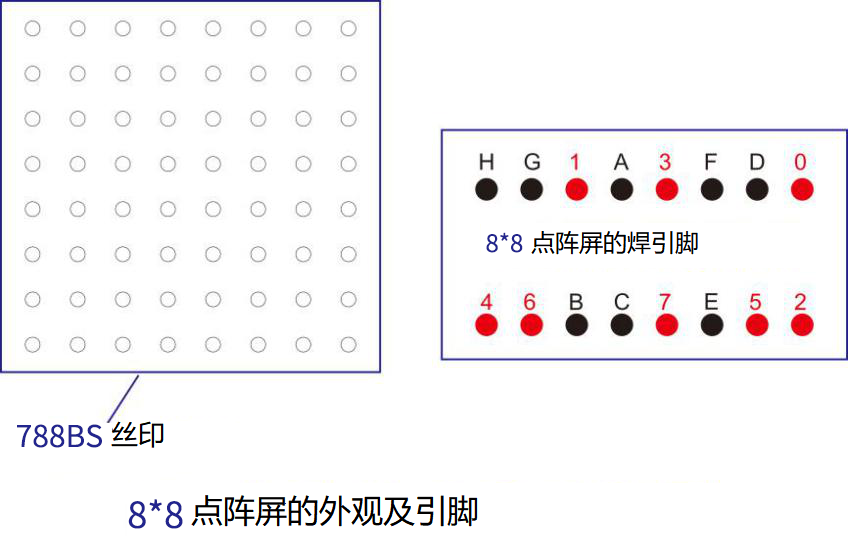
Each LED is placed at the intersection of a row and a column. When the level of a certain row is 1 and the level of a certain column is 0, the corresponding LED will light up. If you want to light up the LED at the first dot, you should set pin 9 to high level and pin 13 to low level. If you want to light up the LEDs in the first row, you should set pin 9 to high level and set pins 13, 3, 4, 10, 6, 11, 15, and 16 to low level. If you want to light up the LEDs in the first column, set pin 13 to low level and set pins 9, 14, 8, 12, 1, 7, 2, and 5 to high level.
The external view of the 8×8 dot matrix display is shown below:
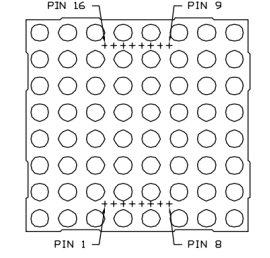
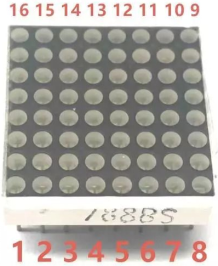
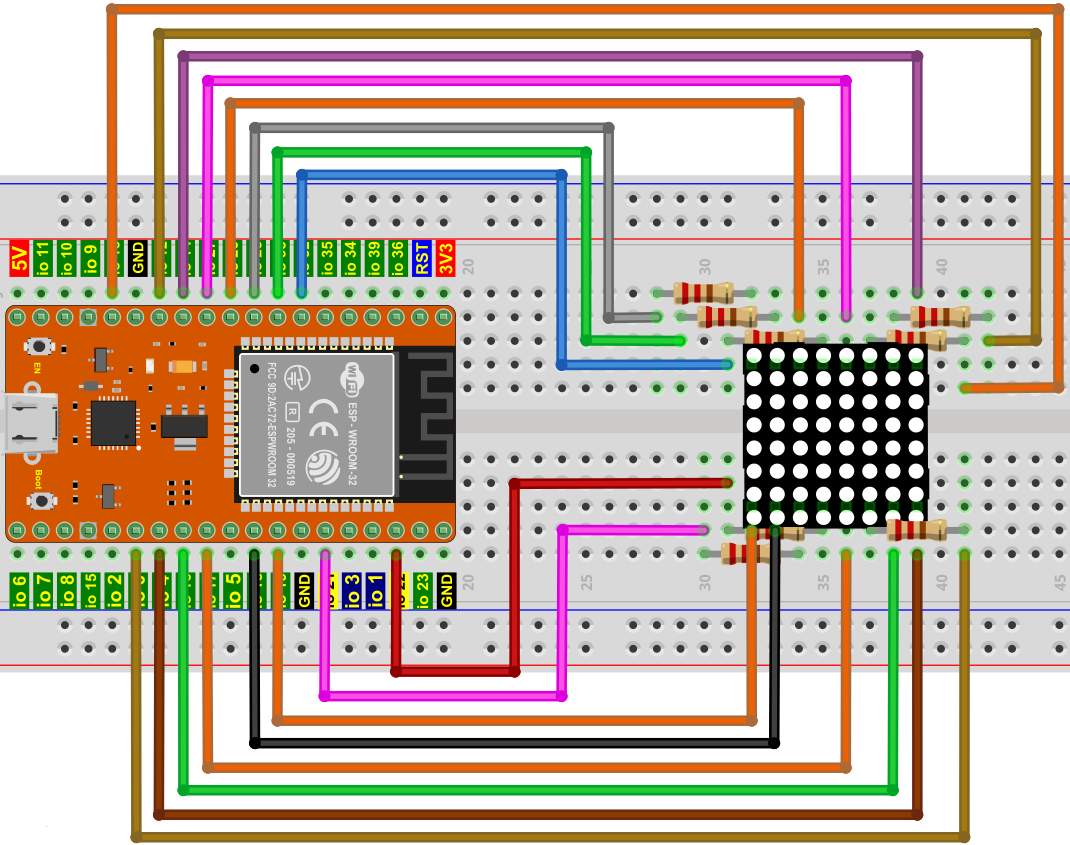
4. Project Wiring Diagram:
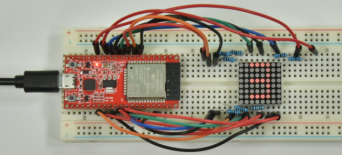
5. Project Code:
The code used in this tutorial is saved in the path: "..\program-code\python-code".
You can move the code anywhere. For example, we saved the code in Drive D, with the path D:\2. Project Tutorials.
Open the "Thonny" software, click "This PC" → "D:" → "2. Project Tutorials" → "Project 10 8×8 Dot Matrix Display". Then double-click "Project_09_Four_Digit_Digital_Tube.py" with the left mouse button.

from machine import Pin
import time

#定义行引脚并设置为输出.
row1 = Pin(14, Pin.OUT)
row2 = Pin(26, Pin.OUT)
row3 = Pin(4, Pin.OUT)
row4 = Pin(27, Pin.OUT)
row5 = Pin(19, Pin.OUT)
row6 = Pin(16, Pin.OUT)
row7 = Pin(18, Pin.OUT)
row8 = Pin(17, Pin.OUT)
#定义列的引脚并设置为输出
col1 = Pin(32, Pin.OUT)
col2 = Pin(21, Pin.OUT)
col3 = Pin(22, Pin.OUT)
col4 = Pin(12, Pin.OUT)
col5 = Pin(0, Pin.OUT)
col6 = Pin(13, Pin.OUT)
col7 = Pin(33, Pin.OUT)
col8 = Pin(25, Pin.OUT)

#将列的引脚设置为低电平
col1.value(0)
col2.value(0)
col3.value(0)
col4.value(0)
col5.value(0)
col6.value(0)
col7.value(0)
col8.value(0)

#由于点阵的列被设置为低电平,因此当该行的引脚处于高电平时,点阵的对应行将亮起
def Row(d):
    if(d ==1):
        row1.value(1)  #点亮第一条线
    if(d ==2):
        row2.value(1)  #点亮第二条线
    if(d ==3):
        row3.value(1)
    if(d ==4):
        row4.value(1)
    if(d ==5):
        row5.value(1)
    if(d ==6):
        row6.value(1)
    if(d ==7):
        row7.value(1)
    if(d ==8):
        row8.value(1)

#关闭格子
def off():
    row1.value(0)
    row2.value(0)
    row3.value(0)
    row4.value(0)
    row5.value(0)
    row6.value(0)
    row7.value(0)
    row8.value(0)

try:
    print("test...")
    while True:
         for num in range(1,10):  #逐行点亮格子
             Row(num)
             if(num == 9):  #因为晶格只有8行,我在这里限定一下,等于9
                off()      #关闭格子
             time.sleep(0.2)

except:
    pass
6. Project Phenomenon:
Make sure the ESP32 is already connected to the computer, and click .

Click , and the code starts to run. The phenomenon you will see is: the 8x8 dot matrix display gradually lights up. Press "Ctrl+C" or click to exit the program.

Project 11 Shift Register Controlling 8 LEDs
1. Project Introduction:
In the previous projects, we have learned how to light up an LED.
Usually the number of IO ports on a development board is limited. If you need to control a large number of devices, there will be a situation where there are not enough IO ports. For example, in Project 2, each lamp requires one IO port to control; if you need to control many lamps, the IO ports will be exhausted. To deal with this scenario, we introduce the shift register to expand the IO ports. In this project, we will use the ESP32, the 74HC595 chip, and LEDs to make a flowing water light to understand the function of the 74HC595 chip.
2. Project Components:
|
|
 |
 |
|---|---|---|---|
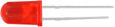
| ESP32*1 | Breadboard*1 | 74HC595N Chip*1 | Red LED*8 |
|
|
|
|
| 220Ω Resistor*8 | Several Jumper Wires | USB Cable*1 |
3. Component Knowledge:
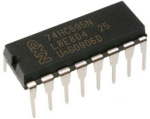
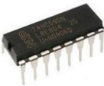
74HC595N Chip: This chip has an 8-bit shift register and a memory, as well as a three-state output function. Simply put, its biggest role is to "use a small number of I/O ports to expand multiple output ports". Normally, controlling 8 LEDs requires 8 GPIO pins of the ESP32. But through the 74HC595N, you only need to occupy 3 GPIO pins to easily control 8 outputs, and it can also be expanded indefinitely through cascading.
If you want to learn more, you can look at the relevant materials Click to jump

Pin Description:
| Pin: | Pin Description: |
|---|---|
| Pin 13 OE | It is an output enable pin, used to ensure whether the latch's data is input to the Q0-Q7 pins. At low level, it does not output high level. In this experiment, we directly connect it to GND to keep low level and output data. |
| Pin 14 SI/DS | This is the pin where the 74HC595 receives data, that is, the serial data input. Only one bit can be input at a time, so 8 consecutive inputs form a byte. |
| Pin 10 SCLR/MR | A pin that initializes the storage register. At low level, it initializes the internal storage register. In this experiment, we connect it to VCC to keep high level. |
| Pin 11 SCK/SH_CP | The clock pin of the shift register. On the rising edge, the data in the shift register shifts backward as a whole and receives new data input. |
| Pin 12 RCK/ST_CP | The clock input pin of the storage register. On the rising edge, the data is transferred from the shift register to the storage register. At this time, the data is output in parallel from the Q0~Q7 ports. |
| Pin 9 SQH | The pin is a serial output pin, specifically used for chip cascading, connected to the SI end of the next 74HC595. |
| Q0--Q7 (Pin 15, Pins 1-7) | Eight-bit parallel output terminals that can directly control the 8 segments of a digital tube. |
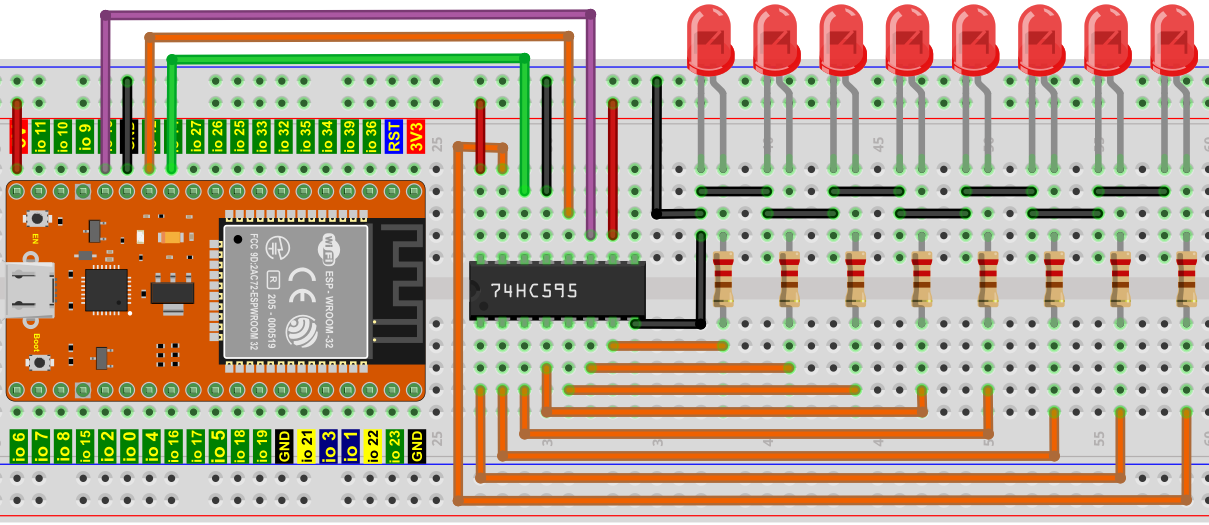
4. Project Wiring Diagram:
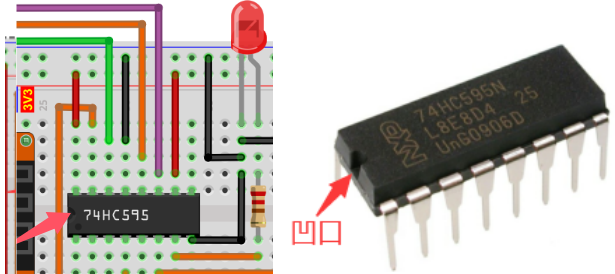
Note: You need to pay attention to the insertion direction of the 74HC595N chip.
5. Project Code:
The code used in this tutorial is saved in the path: "..\program-code\python-code".
You can move the code anywhere. For example, we saved the code in Drive D, with the path D:\2. Project Tutorials.
Open the "Thonny" software, click "This PC" → "D:" → "2. Project Tutorials" → "Project 11 Shift Register Controlling 8 LEDs". Select "my74HC595.py", right-click the mouse and select "Upload to /", wait for "my74HC595.py" to be uploaded to the ESP32, then double-click "Project_11_74HC595N_Controls_8_LEDs.py" with the left mouse button.


# 导入time和my74HC595库.
from my74HC595 import Chip74HC595
import time

# 创建Chip74HC595对象并配置引脚
chip = Chip74HC595(14, 12, 13)
# ESP32-14: 74HC595-DS(14)
# ESP32-12: 74HC595-STCP(12)
# ESP32-13: 74HC595-SHCP(11)

#第一个for循环使LED从左到右分别点亮
#而第二个for循环使它从右向左分别点亮.
while True:
    x = 0x01
    for count in range(8):
        chip.shiftOut(1, x)
        x = x<<1;
        time.sleep_ms(300)
    x = 0x01
    for count in range(8):
        chip.shiftOut(0, x)
        x = x<<1
        time.sleep_ms(300)
Make sure the ESP32 is already connected to the computer, and click .

Click , and the code starts to run. The phenomenon you will see is: 8 LEDs start to blink in a flowing pattern. Press "Ctrl+C" or click to exit the program.

Project 12 Active Buzzer
1. Project Introduction:
The active buzzer is a sound-producing component. It is widely used as the sound-producing element of computers, printers, alarms, electronic toys, telephones, timers, and so on. It has a built-in vibration source, and only needs to be connected to a 5V power supply to continuously emit a buzzing sound. In this project, we will use the ESP32 to control the active buzzer to emit a "beep-beep" sound.
2. Project Components:
|
|
 |
 |
|---|---|---|---|
| ESP32*1 | Breadboard*1 | Active Buzzer*1 | NPN Transistor (S8050)*1 |
|
|
|
|
| 1KΩ Resistor*1 | Several Jumper Wires | USB Cable*1 |
3. Component Knowledge:
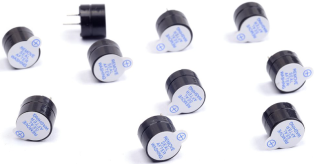
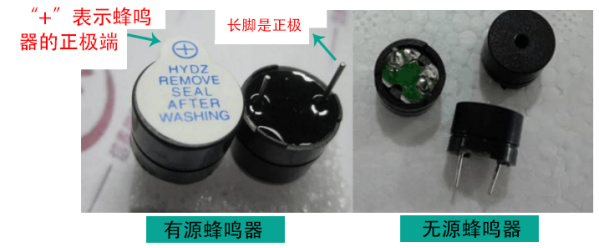
Active buzzer: It has a simple oscillator circuit inside that can convert constant direct current into a pulse signal of a specific frequency. Once the active buzzer receives a high level, it will produce sound. The passive buzzer, in contrast, is an integrated electronic buzzer without an internal vibration source, and it must be driven by a 2K-5K square wave rather than a DC signal. The appearance of these two buzzers is very similar, but the one with a green circuit board is a passive buzzer, while the one with black tape is an active buzzer. The passive buzzer cannot distinguish polarity, while the active buzzer can. As shown below:
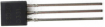
Transistor: Because the buzzer requires a large current, the GPIO output capability of the ESP32 cannot meet the requirement, so an NPN transistor is needed here to amplify the current. A transistor, full name: semiconductor transistor, is a semiconductor device that controls current. A transistor can be used to amplify weak signals and can also be used as a switch. It has three electrodes (pins): base (b), collector (c), and emitter (e). When current passes through "be", "ce" will allow several times the current to pass through (transistor amplification). At this time, the transistor works in the amplification region. When the current between "be" exceeds a certain value, "ce" will no longer allow the current to increase, and the transistor works in the saturation region. There are two types of transistors as shown below: PNP and NPN.
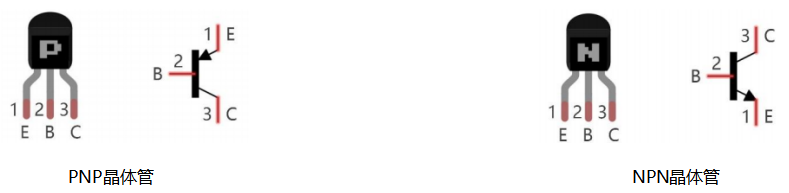
In our kit, the PNP transistor is marked 8550, and the NPN transistor is marked 8050.
Based on the characteristics of the transistor, it is often used as a switch in digital circuits. Because the current output capability of the microcontroller is weak, we will use the transistor to amplify the current and drive high-current components. When using an NPN transistor to drive the buzzer, the following method is generally used: if the GPIO outputs a high level, current will flow through R1, the transistor will conduct, and the buzzer will sound. If the GPIO outputs a low level, no current flows through R1, the transistor will not conduct, and the buzzer will not sound. When using a PNP transistor to drive the buzzer, the following method is generally used: if the GPIO outputs a low level, current will flow through R1, the transistor will conduct, and the buzzer will sound. If the GPIO outputs a high level, no current flows through R1, the transistor will not conduct, and the buzzer will not sound.
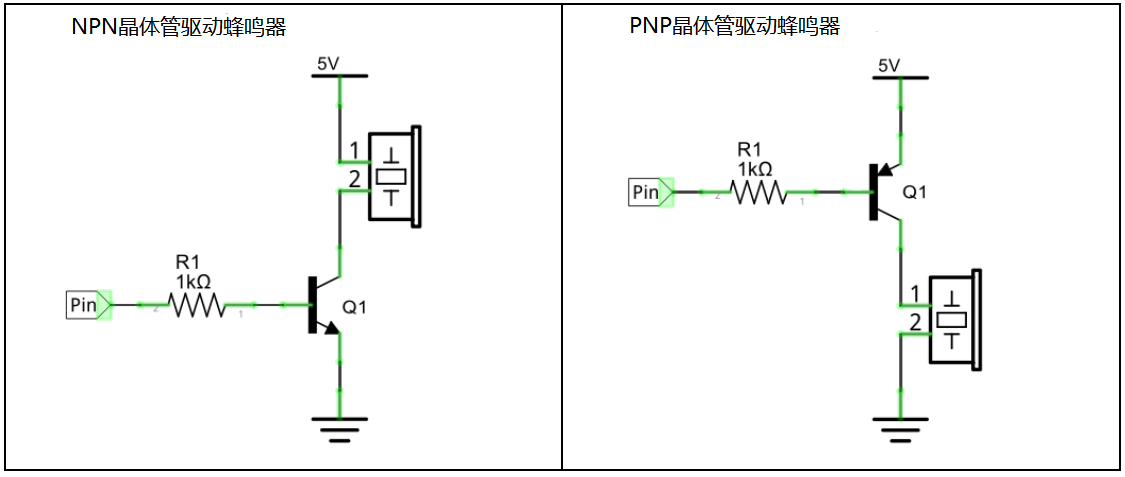
4. Project Wiring Diagram:
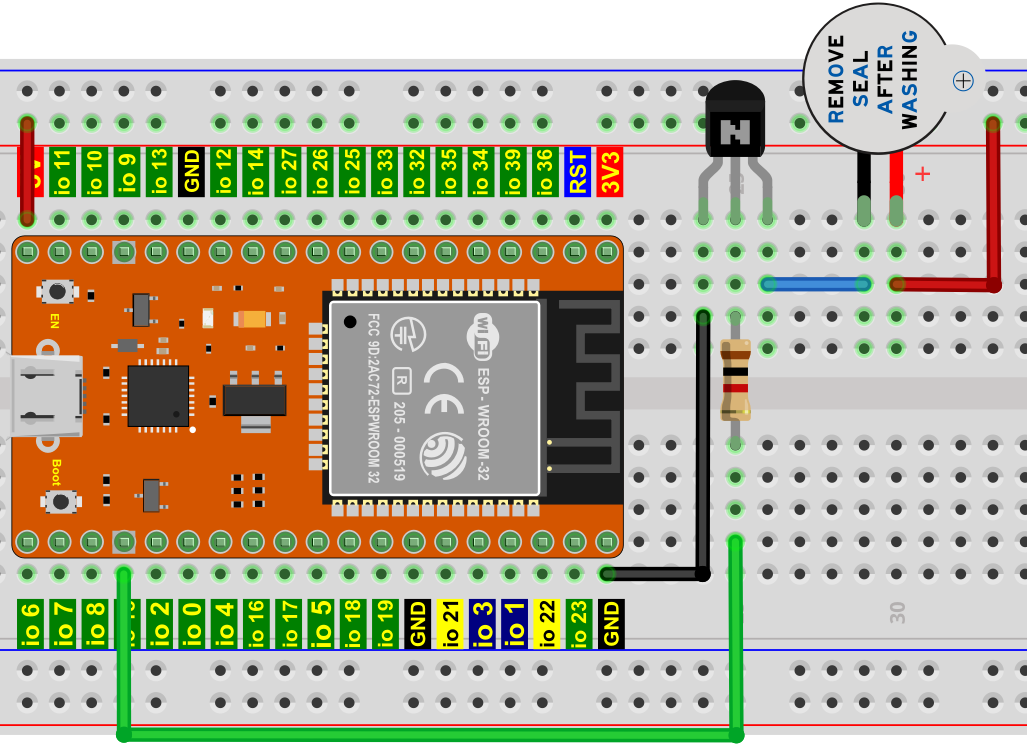
Note: The power supply of the buzzer in this circuit is 5V. Under a 3.3V power supply, the buzzer can work but the loudness will be reduced.
5. Project Code:
The code used in this tutorial is saved in the path: "..\program-code\python-code".
You can move the code anywhere. For example, we saved the code in Drive D, with the path D:\2. Project Tutorials.
Open the "Thonny" software, click "This PC" → "D:" → "2. Project Tutorials" → "Project 12 Active Buzzer". And double-click "Project_12_Active_Buzzer.py" with the left mouse button.

from machine import Pin
import time

buzzer = Pin(15, Pin.OUT)   # 创建引脚15为蜂鸣器对象,设置引脚15为输出

try:
    while True:
        buzzer.value(1)    # 蜂鸣器鸣叫
        time.sleep(0.5) # 延时 0.5s
        buzzer.value(0)    # 蜂鸣器关闭
        time.sleep(0.5) # 延时 0.5s
except:
    pass
Make sure the ESP32 is already connected to the computer, and click .

Click , and the code starts to run. The phenomenon you will see is: the active buzzer emits a "beep-beep" sound. Press "Ctrl+C" or click to exit the program.

Project 13 Passive Buzzer
1. Project Introduction
In the previous project, we studied the active buzzer, which can only emit one kind of sound, which may feel monotonous to you. This project will learn about another kind of buzzer, the passive buzzer. Unlike the active buzzer, the passive buzzer can emit sounds of different frequencies. In this project, you will use the ESP32 to control the passive buzzer to work.
2. Project Components:
|
|
 |
|
|---|---|---|---|
| ESP32*1 | Breadboard*1 | Passive Buzzer*1 | NPN Transistor (S8050)*1 |
|
|
|
|
| 1KΩ Resistor*1 | Several Jumper Wires | USB Cable*1 |
3. Component Knowledge:
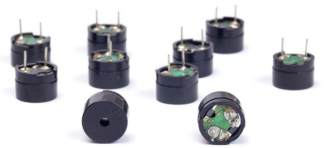
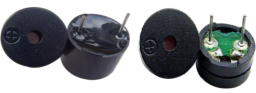
Passive buzzer: It is an integrated electronic buzzer without an internal vibration source. It must be driven by a 2K-5K square wave rather than a DC signal. Its appearance is very similar to that of the active buzzer, but the one with a green circuit board is a passive buzzer, while the one with black tape is an active buzzer. The passive buzzer cannot distinguish polarity, while the active buzzer can, as shown in the figure below:
Transistor: Please refer to Project 12.
4. Project Wiring Diagram:
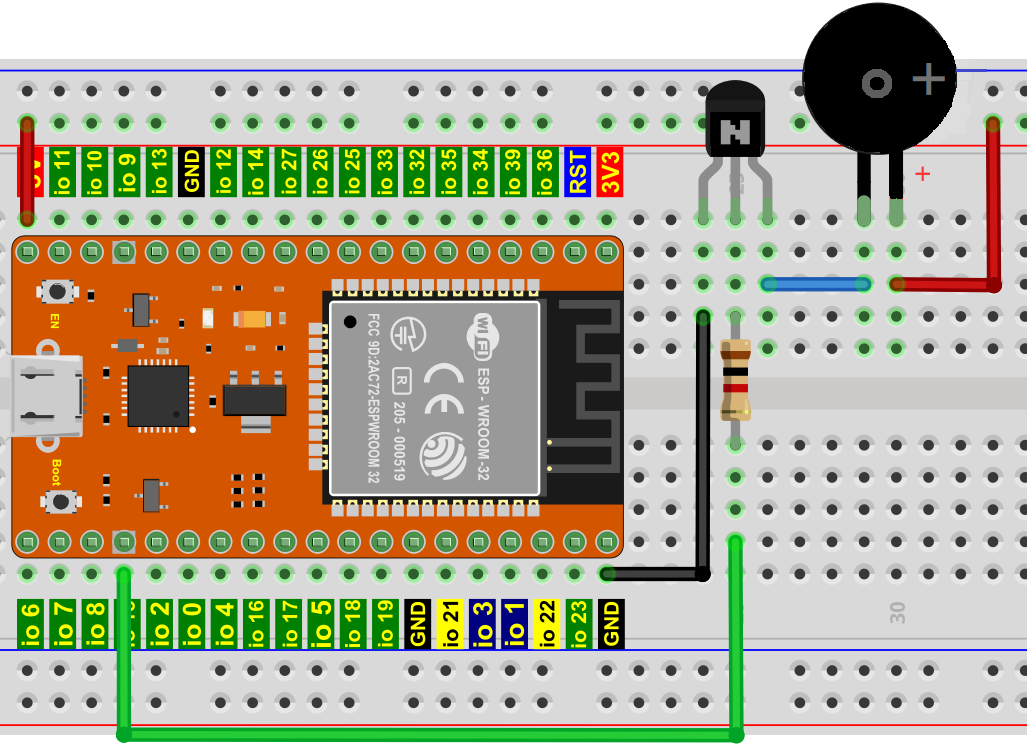
5. Project Code:
The code used in this tutorial is saved in the path: "..\program-code\python-code".
You can move the code anywhere. For example, we saved the code in Drive D, with the path D:\2. Project Tutorials.
Open the "Thonny" software, click "This PC" → "D:" → "2. Project Tutorials" → "Project 13 Passive Buzzer". And double-click "Project_13_Passive_Buzzer.py" with the left mouse button.

from machine import Pin, PWM
import time

# 初始化无源蜂鸣器(GPIO15,硬件PWM输出精确方波)
buzzer = PWM(Pin(15), freq=500, duty=512)

while True:
    #输出500HZ频率声音,持续约160ms(80次×2ms)
    buzzer.freq(500)
    time.sleep(0.16)
    #输出250HZ频率声音,持续约400ms(100次×4ms)
    buzzer.freq(250)
    time.sleep(0.4)
Make sure the ESP32 is already connected to the computer, and click .

Click , and the code starts to run. The phenomenon you will see is: the passive buzzer emits an alarm sound. Press "Ctrl+C" or click to exit the program.


Project 14 Mini Table Lamp
1. Project Introduction:
Did you know that the ESP32 can light up an LED when you press an external button? In this project, we will use the ESP32, a button switch, and an LED to make a mini table lamp.
2. Project Components:
|
|
 |
|---|---|---|
| ESP32*1 | Breadboard*1 | Button*1 |
 |
 |
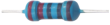 |
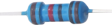
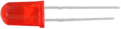
| 10KΩ Resistor*1 | Red LED*1 | 220Ω Resistor*1 |
 |
|
|
| Button Cap*1 | Several Jumper Wires | USB Cable*1 |
3. Component Knowledge:
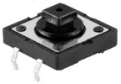
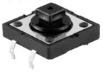
Button: The button can control the on/off of a circuit. When the button is connected to a circuit, the circuit is disconnected when the button is not pressed, and it is connected as soon as the button is pressed, but it is disconnected again after being released. So why does it only conduct when pressed? This has to be explained from the internal structure of the button. Before it is pressed, current cannot pass from one end of the button to the other; when pressed, the metal piece inside the button connects the two sides to let the current pass.
The internal structure of the button is shown in the figure: 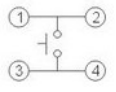 , before the button is pressed, 1 and 2 are conductive, and 3 and 4 are also conductive, but 1-3 or 1-4 or 2-3 or 2-4 are disconnected (non-conductive); only when the button is pressed, 1-3 or 1-4 or 2-3 or 2-4 are conductive.
When designing circuits, the button switch is one of the most commonly used components.
Schematic diagram of the button:
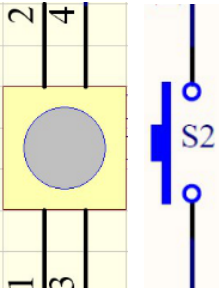
What is button bounce?
The switch circuit we imagine is "press the button - instantly conduct", "press again - instantly disconnect", but in reality this is not the case.
Buttons usually use mechanical elastic switches, and when the mechanical contacts disconnect/close (usually around 10ms), the elastic effect produces a series of jitters, causing the button switch not to connect the circuit stably immediately when closed, and not to disconnect instantly and completely when opened.
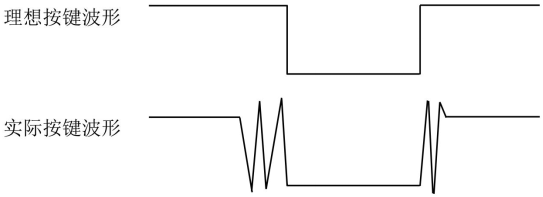
So how to eliminate button bounce?
There are two common debounce methods: software methods and hardware methods. Here we focus on the convenient and simple software method. We already know that the jitter time caused by elastic inertia is about 10ms, and using a delay command to postpone the execution time of the command can achieve the debounce effect.
So we add a 0.02-second delay in the code to implement the button debounce function.

4. Project Wiring Diagram:
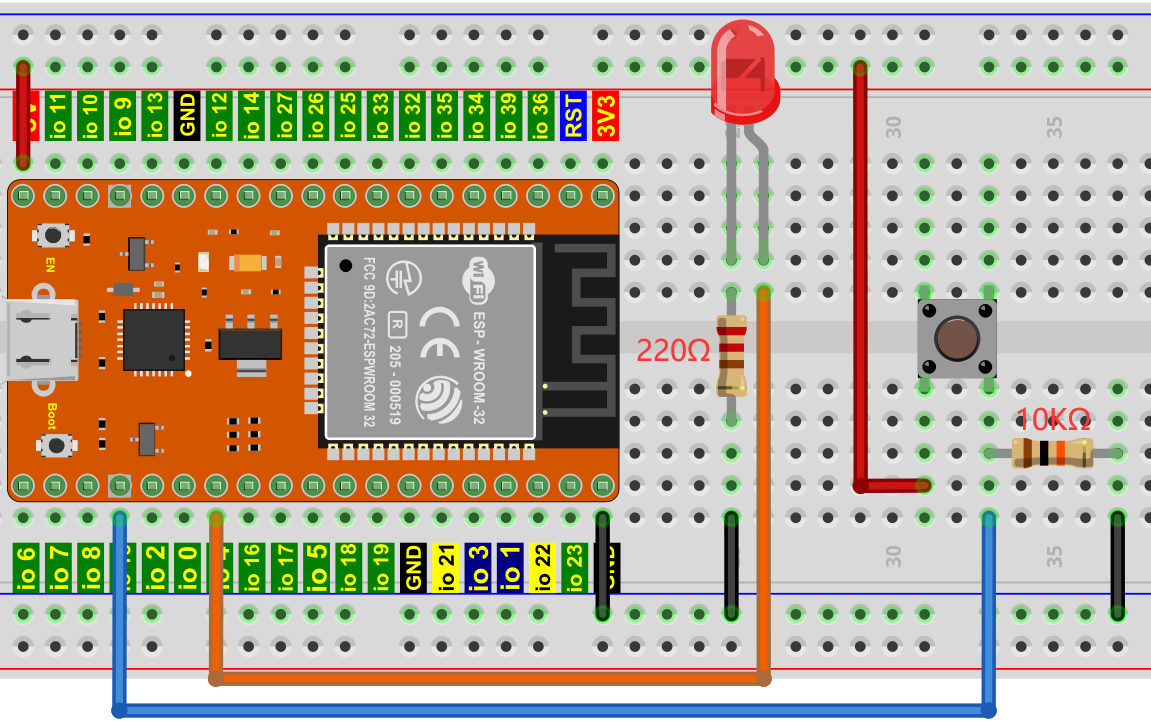
Note:
How to connect the LED
How to identify the five-band 220Ω resistor and the five-band 10KΩ resistor
5. Project Code:
The code used in this tutorial is saved in the path: "..\program-code\python-code".
You can move the code anywhere. For example, we saved the code in Drive D, with the path D:\2. Project Tutorials.
Open the "Thonny" software, click "This PC" → "D:" → "2. Project Tutorials" → "Project 14 Mini Table Lamp". And double-click "Project_14_Mini_Table_Lamp.py" with the left mouse button.

from machine import Pin
import time

led = Pin(4, Pin.OUT) # 创建引脚4为LED对象,设置引脚4为输出
button = Pin(15, Pin.IN, Pin.PULL_UP) #Pin15创建引脚15按钮对象,设置GP15为输入

#定义一个函数并将其命名为reverseGPIO(),用于反转LED的输出电平
def reverseGPIO():
    if led.value():
        led.value(0)     #LED熄灭
    else:
        led.value(1)     #LED点亮

try:
    while True:
        if not button.value():
            time.sleep_ms(20)
            if not button.value():
                reverseGPIO()
                while not button.value():
                    time.sleep_ms(20)
except:
    pass
Make sure the ESP32 is already connected to the computer, and click .

Click , and the code starts to run. The phenomenon you will see is: press the button, and the LED lights up; when the button is released, the LED is still on. Press the button again, and the LED goes out; when the button is released, the LED stays off. Isn't it like a small table lamp? Press "Ctrl+C" or click to exit the program.

Project 15 Simulated Hourglass
1. Project Introduction:
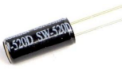
Ancient people had no electronic clocks, so they invented the hourglass to measure time. The hourglass has a relatively large capacity on both sides, with fine sand in one side and a very small channel in the middle. Stand the hourglass upright with the side containing the fine sand on top. Due to gravity, the fine sand flows down through the channel to the other side of the hourglass. When all the fine sand has flowed to the bottom, it is turned upside down, and the number of times it repeats in a day is recorded. The next day, the approximate time of the day can be known from the number of times the sand flows back and forth. In this lesson, we will use the ESP32 to control a tilt switch and LED lights to simulate an hourglass and make an electronic hourglass.
2. Project Components:
|
|
 |
|
|---|---|---|---|
| ESP32*1 | Breadboard*1 | Tilt Switch*1 | 10KΩ Resistor*1 |
|
|
|
|
| Red LED*4 | 220Ω Resistor*1 | Several Jumper Wires | USB Cable*1 |
3. Component Knowledge:
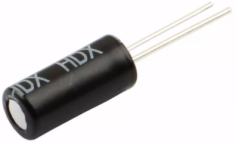
The tilt switch is also called a digital switch or ball switch, and there is a metal ball inside it. It is used to detect small-angle tilting.
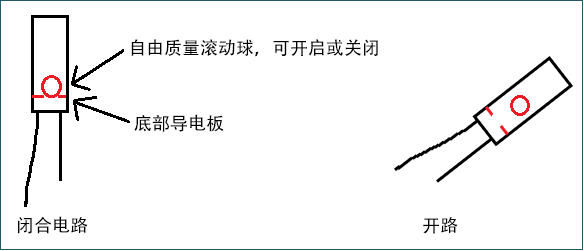
The principle is very simple: when the switch tilts at a certain angle, the ball inside rolls down and touches the two contacts connected to the external pins, thereby triggering the circuit. Otherwise, the ball stays away from the contacts, thereby disconnecting the circuit.
The internal structure of the tilt switch is used here to illustrate how it works, shown in the figure below:
4. Project Wiring Diagram:
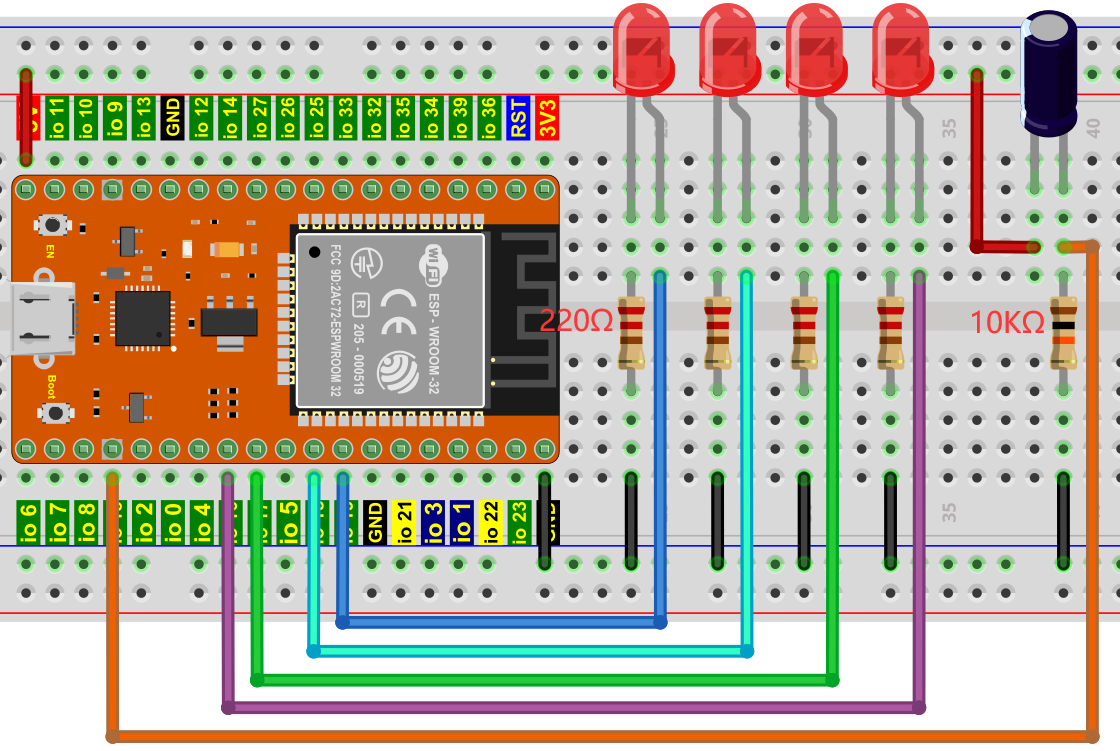
Note:
How to connect the LED
How to identify the five-band 220Ω resistor and the five-band 10KΩ resistor
5. Project Code:
The code used in this tutorial is saved in the path: "..\program-code\python-code".
You can move the code anywhere. For example, we saved the code in Drive D, with the path D:\2. Project Tutorials.
Open the "Thonny" software, click "This PC" → "D:" → "2. Project Tutorials" → "Project 15 Simulated Hourglass". And double-click "Project_15_Tilt_And_LED.py" with the left mouse button.

from machine import Pin
import time

led1 = Pin(16, Pin.OUT) # 创建引脚2为LED对象,设置引脚2为输出
led2 = Pin(17, Pin.OUT) # 创建引脚17为LED对象,设置引脚17为输出
led3 = Pin(18, Pin.OUT) # 创建引脚18为LED对象,设置引脚18为输出
led4 = Pin(19, Pin.OUT) # 创建引脚19为LED对象,设置引脚19为输出
Tilt_Sensor = Pin(15,Pin.IN) #创建引脚15倾斜传感器对象,设置GP15为输入

while True:
    if(Tilt_Sensor.value() == 0) : #如果倾斜传感器的值为0时
        led1.value(1) # led1 点亮
        time.sleep_ms(200)#延时
        led2.value(1) # led2 点亮
        time.sleep_ms(200)#延时
        led3.value(1) # led3 点亮
        time.sleep_ms(200)#延时
        led4.value(1) # led4 点亮
        time.sleep_ms(200)#延时
    else :           #如果倾斜传感器的值为1时
        led4.value(0) # led4 熄灭
        time.sleep_ms(200)#延时
        led3.value(0) # led3 熄灭
        time.sleep_ms(200)#延时
        led2.value(0) # led2 熄灭
        time.sleep_ms(200)#延时
        led1.value(0) # led1 熄灭
        time.sleep_ms(200)#延时
6. Project Phenomenon:
Make sure the ESP32 is already connected to the computer, and click .

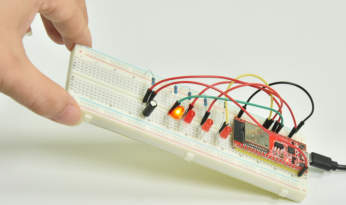
Click , and the code starts to run. The phenomenon you will see is: tilt the breadboard to a certain angle, and the LEDs will light up one by one. When it returns to the previous angle, the LEDs will turn off one by one. Just like an hourglass, as time passes, the sand leaks out. Press "Ctrl+C" or click to exit the program.

Project 16 Burglar Alarm
1. Project Introduction:
The PIR (Passive Infrared) sensor measures the infrared (IR) rays emitted by moving objects. This sensor can detect the movement of people, animals, and cars, thereby triggering security alarms and lighting. They are used to detect movement and are ideal for security, such as anti-theft alarms and security lighting systems. In this project, we will use the ESP32 to control a PIR sensor, a buzzer, and an LED to simulate an anti-theft alarm.
2. Project Components:
|
|
 |
|
|---|---|---|---|
| ESP32*1 | Breadboard*1 | PIR Sensor*1 | NPN Transistor (S8050)*1 |
 |
|
|
|
| Active Buzzer*1 | Red LED*1 | 220Ω Resistor*1 | 1KΩ Resistor*1 |
 |
|
|
|
| 3P to Dupont Wire (male, single)*1 | Several Jumper Wires | USB Cable*1 |
3. Component Knowledge:
PIR sensor: It is a PIR sensor based on the pyroelectric effect that can detect the infrared rays emitted by people or animals. Combined with the Fresnel lens, the sensor's detection range can be farther and wider. It mainly uses the RE200B-P sensor element. When a person or animal is moving nearby, the module outputs a high level 1; otherwise, it outputs a low level 0. Special attention: this sensor can detect people, animals, and cars in motion, but cannot detect stationary people, animals, and cars, and the farthest detection distance is about 7 meters.
Note: The PIR sensor should avoid direct sunlight, car headlights, and incandescent lamp illumination, and should not face heat sources (such as radiators, heaters) or air conditioners, to avoid false alarms caused by large changes in ambient temperature. It is also susceptible to interference from RF radiation.
Sensor Technical Parameters:
Maximum input voltage: DC 5-15V
Maximum operating current: 50MA
Maximum power: 0.3W
Quiescent current: <50uA
Operating temperature: -20 ~ 85℃
Control signal: digital signal (1/0)
Delay time: about 2.3 to 3 seconds
Sensing angle: less than 100-degree cone angle
Farthest detection distance: about 7 meters
Sensor Schematic Diagram:

4. Project Wiring Diagram:

5. Project Code:
The code used in this tutorial is saved in the path: "..\program-code\python-code".
You can move the code anywhere. For example, we saved the code in Drive D, with the path D:\2. Project Tutorials.
Open the "Thonny" software, click "This PC" → "D:" → "2. Project Tutorials" → "Project 16 Burglar Alarm". And double-click "Project_16_Burglar_Alarm.py" with the left mouse button.

# 导入 Pin and time 库.
from machine import Pin
import time

# 定义人体红外传感器,led和有源蜂鸣器的引脚.
sensor_pir = Pin(15, Pin.IN)
led = Pin(0, Pin.OUT)
buzzer = Pin(2, Pin.OUT)

while True:
      if sensor_pir.value():
          buzzer.value(1)
          led.value(1)
          time.sleep(0.2)
          buzzer.value(0)
          led.value(0)
          time.sleep(0.2)
      else:
          buzzer.value(0)
          led.value(0)
Make sure the ESP32 is already connected to the computer, and click .

Click , and the code starts to run. The phenomenon you will see is: if the PIR sensor detects a person moving nearby, the buzzer will continuously emit an alarm, and the LED will continuously blink. Press "Ctrl+C" or click to exit the program.


Project 17 OLED Display
1. Project Introduction:
In life, we can use modules such as displays to do various experiments. You can also DIY all kinds of small objects. For example, use a temperature sensor and a display to make a temperature tester, or use an ultrasonic module and a display to make a distance tester. Next, we will use the LCD_128X32_DOT module as the display and connect it to the ESP32 control board. We will use the ESP32 board to control the LCD_128X32_DOT display to display various English text, common symbols, and digits.
Note: For accessories, we have upgraded the LCD screen to the more commonly used OLED screen. The documentation is being updated progressively. If you find errors in the code, please contact customer service to fix them.
2. Project Components:
|
|
 |
|---|---|---|
| ESP32*1 | Breadboard*1 | OLED Screen*1 |
 |
|
|
| Male-to-Female Dupont Wire*4 | USB Cable*1 |
3. Component Knowledge:
LCD_128X32_DOT: An LCD screen module with 128*32 pixels, and its driver chip is ST7567A. The module uses IIC communication. It can display not only English letters and symbols, but also Chinese characters and patterns. When using it, you can also set it in the code to display English letters and symbols in different sizes.
LCD_128X32_DOT Schematic Diagram:
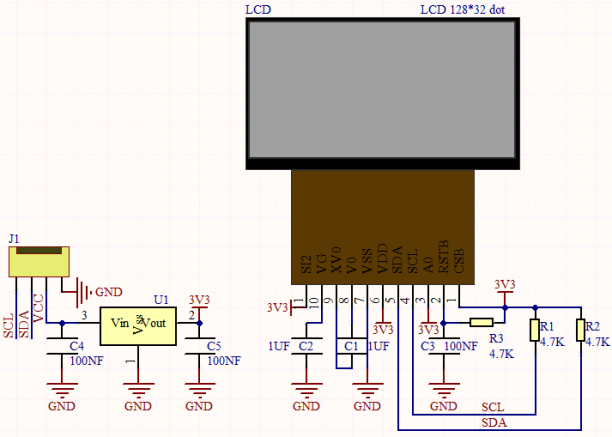
LCD_128X32_DOT Technical Parameters:
Display pixels: 128*32 characters
Operating voltage: DC 5V
Operating current: 100mA (5V)
Optimal operating voltage of the module: 5V
Brightness and contrast can be controlled by program instructions
4. Project Wiring Diagram:
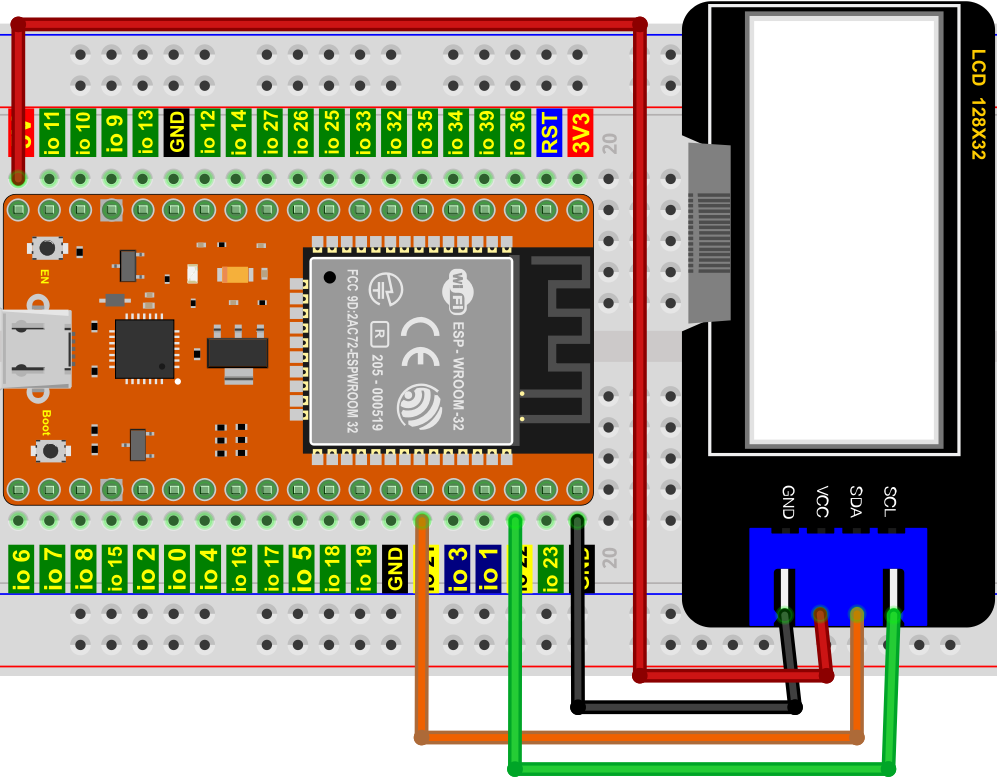
5. Project Code:
The code used in this tutorial is saved in the path: "..\program-code\python-code".
You can move the code anywhere. For example, we saved the code in Drive D, with the path D:\2. Project Tutorials.
Open the "Thonny" software, click "This PC" → "D:" → "2. Project Tutorials" → "Project 17 OLED Display". Right-click the mouse and select the two Python files to upload to the ESP32, then double-click "Project_16_I2C_128_64_OLED.py" with the left mouse button.

from machine import Pin, SoftI2C
import ssd1306
import time

# 初始化 I2C 和 OLED
i2c = SoftI2C(scl=Pin(22), sda=Pin(21), freq=400000)
display = ssd1306.SSD1306_I2C(128, 64, i2c)

# 清除显示
display.fill(0)
display.show()

# 显示文本
display.text('Hello World!', 0, 0, 1)
display.text('0123456789', 0, 16, 1)
display.text('Using SoftI2C', 0, 32, 1)
display.show()
Make sure the ESP32 is already connected to the computer, and click .

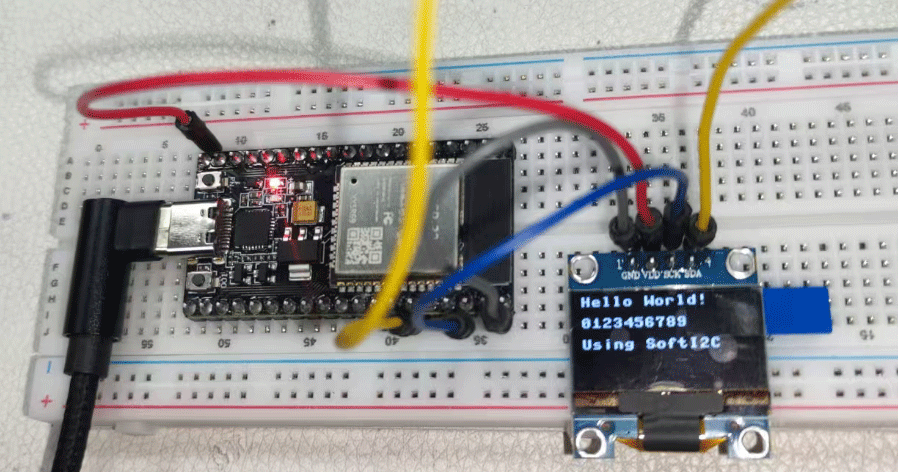
Click , and the code starts to run. The phenomenon you will see is: the first line displays "Hello World!", the second line displays "0123456789", and the third line displays "Using SoftI2C".
Press "Ctrl+C" or click to exit the program.

Project 18 Small Fan
1. Project Introduction:
In the hot summer, we need an electric fan to cool us down. So in this project, we will use the ESP32 to control a DC motor and a small fan blade to make a small electric fan.
2. Project Components:
|
|
 |
 |
 |
|---|---|---|---|---|
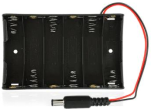
| ESP32*1 | Breadboard*1 | DC Motor*1 | Breadboard Power Supply Module*1 | 6-cell AA Battery Box*1 |
 |
 |
|
 |
|
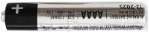
| IC L293D*1 | Fan Blade*1 | Several Jumper Wires | AA Battery (self-provided)*6 | USB Cable*1 |
3. Component Knowledge:
L293D Chip: L293D is a DC motor driver IC, which can be used to drive DC motors or stepper motors in some robot projects. It has a total of 16 pins and can drive two DC motors at the same time. Input voltage range: 4.5 V ~ 36 V, output current per channel: MAX 600mA, and it can drive inductive loads. In particular, its input terminals can be directly connected to the control board, so it can be conveniently controlled by the control board. When driving small DC motors, it can directly control two motors and can realize forward and reverse rotation of the motor, which is achieved simply by changing the high/low levels of the input terminals. There are many motor driver boards using the L293D chip on the market, and of course we can also use it by simple connection ourselves.
L293D Pin Diagram:

| Pin Number | Pin Name | Description |
|---|---|---|
| 1 | Enable1 | This pin enables input pins Input 1(2) and Input 2(7) |
| 2 | In1 | Directly controls output pin 1, controlled by digital circuits |
| 3 | Out1 | Connected to one end of motor 1 |
| 4 | 0V | Ground pin connected to the circuit's ground (0V) |
| 5 | 0V | Ground pin connected to the circuit's ground (0V) |
| 6 | Out2 | Connected to the other end of motor 1 |
| 7 | In2 | Directly controls output pin 2, controlled by digital circuits |
| 8 | +V motor | Connected to the voltage pin for running the motor (4.5V to 36V) |
| 9 | Enable2 | This pin enables input pins Input 3(10) and Input 4(15) |
| 10 | In3 | Directly controls output pin 3, controlled by digital circuits |
| 11 | Out3 | Connected to one end of motor 2 |
| 12 | 0V | Ground pin connected to the circuit's ground (0V) |
| 13 | 0V | Ground pin connected to the circuit's ground (0V) |
| 14 | Out4 | Connected to the other end of motor 2 |
| 15 | In4 | Directly controls output pin 4, controlled by digital circuits |
| 16 | +V | Connected to +5V to enable the IC function |
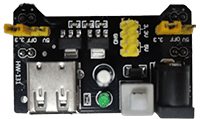
Breadboard Power Supply Module:
Description:
This module can conveniently provide 3.3V and 5V power to the breadboard, with DC2.1 input (DC7-12V), and also has a USB Type C interface for power input.
Specifications:
Input voltage: DC jack: 7-12V; Type C USB: 5V
Current: 3.3V: max 500mA; 5V: max 500mA;
Maximum power: 2.5W
Dimensions: 53mmx26.3mm
Environmental attribute: ROHS
Interface Description:
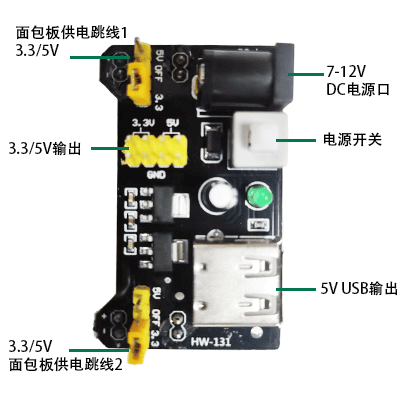
Motor Wiring Description:
Because the current batch of motors uses a standard interface that cannot be directly inserted into the breadboard, please use two Dupont wires to insert into the white interface to complete this experiment.

Schematic Diagram:
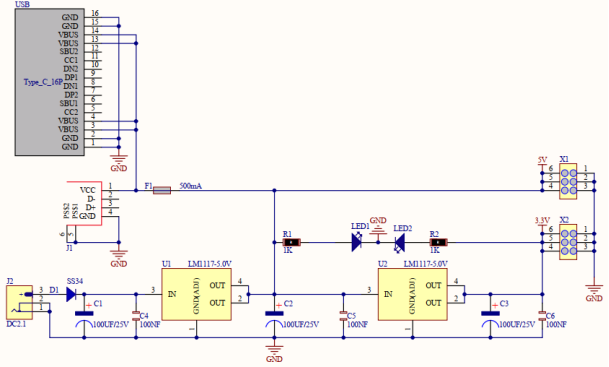
4. Project Wiring Diagram:

(Note: First connect the wires, then install a small fan blade on the DC motor.)
5. Project Code:
The code used in this tutorial is saved in the path: "..\program-code\python-code".
You can move the code anywhere. For example, we saved the code in Drive D, with the path D:\2. Project Tutorials.
Open the "Thonny" software, click "This PC" → "D:" → "2. Project Tutorials" → "Project 18 Small Fan". And double-click "Project_18_ Small_Fan.py" with the left mouse button.

from machine import Pin,PWM
import time

#L293D对应引脚,设为输出
IN1_Pin = 2
IN2_Pin = 15
ENA_Pin = 0 #控制电机的速度

# speed:速度为0 - 100
# direction:旋转方向,1为顺时针,0为停止,-1为逆时针
# speed_pin:控制电机启动和停止的引脚编号
def motorRun(speed, direction, speed_pin, clockwise_pin, anti_clockwise_pin):
    if speed > 100: speed=100
    if speed < 0: speed=0
    in1 = Pin(anti_clockwise_pin, Pin.OUT)
    in2 = Pin(clockwise_pin, Pin.OUT)
    pwm = PWM(Pin(speed_pin))
    pwm.freq(50)
    pwm.duty(int(speed/100*4096))
    if direction < 0:
        in2.value(0)
        in1.value(1)
    if direction == 0:
        in2.value(0)
        in1.value(0)
    if direction > 0:
        in2.value(1)
        in1.value(0)

while True:
    motorRun(100, 1, ENA_Pin, IN2_Pin, IN1_Pin)
    time.sleep(5)
    motorRun(100, 0, ENA_Pin, IN2_Pin, IN1_Pin)
    time.sleep(2)
    motorRun(100, -1, ENA_Pin, IN2_Pin, IN1_Pin)
    time.sleep(5)
    motorRun(100, 0, ENA_Pin, IN2_Pin, IN1_Pin)
    time.sleep(2)
6. Project Phenomenon:
Make sure the ESP32 is already connected to the computer, and click .

Click , and the code starts to run. The phenomenon you will see is: the small fan first rotates counterclockwise for 5 seconds, stops for 2 seconds, then rotates clockwise for 5 seconds, stops for 2 seconds, and repeats in this pattern. Press "Ctrl+C" or click to exit the program.


Project 19 Servo
1. Project Introduction:
The servo is a motor that can rotate very precisely. It has been widely used in toy cars, remote control helicopters, airplanes, robots, and other fields. In this project, we will use the ESP32 to control the servo to rotate.
2. Project Components:
|
|
 |
|---|---|---|
| ESP32*1 | Breadboard*1 | Servo*1 |
 |
|
|
| Several Jumper Wires | USB Cable*1 |
3. Component Knowledge:
Servo: The servo is a position-servo driver, mainly composed of a housing, a circuit board, a coreless motor, gears, and a position detector. Its working principle is that the receiver or microcontroller sends a signal to the servo, which has an internal reference circuit that generates a reference signal with a period of 20ms and a width of 1.5ms. It compares the obtained DC bias voltage with the voltage of the potentiometer to obtain the voltage difference output. The IC on the circuit board determines the rotation direction, then drives the coreless motor to start rotating, transmits power to the swing arm through reduction gears, and at the same time the position detector sends back a signal to determine whether the position has been reached. It is suitable for control systems that require the angle to change continuously and be maintained. When the motor speed is constant, the cascade reduction gears drive the potentiometer to rotate so that the voltage difference becomes 0 and the motor stops rotating. Generally, the rotation angle range of the servo is 0 degrees to 180 degrees.
The pulse period for controlling the servo is 20ms, and the pulse width is 0.5ms ~ 2.5ms, corresponding to positions of -90° ~ +90°. Below is an example using a servo with a 180° angle:

Servos come in various specifications, but they all have three connection wires: brown, red, and orange (different brands may have different colors). Brown is GND, red is the positive power supply, and orange is the signal wire.

4. Project Wiring Diagram:
When powering the servo, please note that the power supply voltage should be 3.3V-5V. Make sure there are no errors when connecting the servo to the power supply.

5. Project Code:
The code used in this tutorial is saved in the path: "..\program-code\python-code".
You can move the code anywhere. For example, we saved the code in Drive D, with the path D:\2. Project Tutorials.
Open the "Thonny" software, click "This PC" → "D:" → "2. Project Tutorials" → "Project 19 Servo". And double-click "Project_19_Servo_Sweep.py" with the left mouse button.

from machine import Pin, PWM
import time


p2 = PWM(Pin(15))  # 从引脚15创建PWM对象
p2.freq(50)  # 设置PWM频率从1Hz到40MHz
p2.duty(256)  # 将占空比从0到1023设置为占空比/1023,(现在是25%)

# 0度   P2.duty_u16(1638) #设置占空比从0到65535作为duty_u16/65535的比值
# 90度  p2.duty_u16(4915)
# 180度 p2.duty_u16(8192)

p2.duty_u16(1638)  # 0度
time.sleep(1)
p2.duty_u16(4915)  # 90度
time.sleep(1)
p2.duty_u16(8100)  # 180度  # 真实舵机MG90S可以设为8192
time.sleep(1)

for i in range(1638, 8100, 10):
    p2.duty_u16(i)
    time.sleep_ms(10)


p2.duty_u16(1638)
time.sleep(1)

p2.deinit()              # 在引脚上关闭PWM
Make sure the ESP32 is already connected to the computer, and click .

Click , and the code starts to run. The phenomenon you will see is: the servo will rotate. Press "Ctrl+C" or click to exit the program.


Project 20 Stepper Motor
1. Project Introduction:
The stepper motor is positioned accurately and is the most important component in mechanical equipment such as industrial robots, 3D printers, and large lathes. In this project, we will use the ESP32 to control the ULN2003 stepper motor driver board to drive the stepper motor to rotate.
2. Project Components:
|
|
 |
|---|---|---|
| ESP32*1 | Breadboard*1 | ULN2003 Stepper Motor Driver Board*1 |
|
|
 |
| Breadboard Power Supply Module*1 | 6-cell AA Battery Box*1 | Stepper Motor*1 |
|
|
|
| Several Male-to-Female Dupont Wires | AA Battery (self-provided)*6 | USB Cable*1 |
3. Project Knowledge:
Stepper motor: It is a motor controlled by a series of electromagnetic coils. It can rotate a precise number of degrees (or steps) as needed, allowing you to move it to a precise position and hold that position. It does this by energizing the coils inside the motor for a very short time, but you must keep the motor energized to keep it in the position you want. There are two basic types of stepper motors, unipolar stepper and bipolar stepper. In this project, we use the unipolar stepper motor 28-BYJ48.

28BYJ-48 Stepper Motor Working Principle:
The stepper motor mainly consists of a stator and a rotor. The stator is fixed, as shown in the figure below, the parts around the A, B, C, D coil groups. When the coil group is energized, a magnetic field is generated. The rotor is the rotating part, as shown in the figure below, the part in the middle of the stator, whose two poles are permanent magnets.
The rotation principle of the single-step 4-beat: at the beginning, the A coil group is energized, and the two poles of the rotor face the A coil group directly; then the A coil group is disconnected, the B coil group is energized, and the rotor rotates clockwise to the B coil group, and the rotor rotates one step; B is disconnected, C is energized, and the rotor rotates to the C group; C is disconnected, D is energized, and the rotor rotates to the D group; the D group is disconnected, the A group is energized, and the rotor rotates to the A coil group. In this way, the rotor rotates half a circle, 180 degrees, and then repeats again, B-C-D-A, and the rotor rotates back to the A coil group. In this way, the rotor rotates one full circle, with a total of 8 steps. As shown in the figure below, this is the principle of single-beat rotation of the stepper motor A - B - C - D - A ....
If you want the stepper motor to rotate counterclockwise, you only need to reverse the beat order, D - C - B - A - D ....

The rotation principle of the half-step 8-beat: 8 beats, using the single-double beat form, A - AB - B - BC - C - CD - D - DA - A .... In this way, for each beat, the rotor only rotates half a step. For example, the A coil group is energized, and the rotor rotates to face the A coil group directly; then A and B are energized together, so the place with the strongest magnetic field is in the middle of the AB coil group, and the two poles of the rotor rotate to the middle of the AB coil group, that is, it rotates half a step clockwise.
Stepper Motor Parameters:
The stepper motor we provide requires 32 steps for the rotor to rotate one full circle, and it also passes through a 1:64 reduction gear set to drive the output shaft, so the output shaft needs: 32 * 64 = 2048 steps to rotate one full circle.
Voltage 5V, 4-phase stepper motor, the step angle in 4-beat mode is 11.25, the step angle in 8-beat mode is 5.625, and the reduction ratio is 1:64.
ULN2003 Stepper Motor Driver Board: The ULN2003 stepper motor driver converts weak signals into stronger control signals to drive the stepper motor.
The schematic diagram below shows how to use the ULN2003 stepper motor driver board interface to connect a unipolar stepper motor to the pins of the ESP32, and shows how to use four TIP120 interfaces.

4. Project Wiring Diagram:
Jumper the power module to 5V, connect the VCC of the stepper motor driver board to the breadboard 5V, and connect GND to the breadboard GND;
Connect the 5V pin of the development board to the breadboard 5V, connect GND to the breadboard GND, or power it directly via USB.
| Development Board Pin | Motor Driver Board Pin |
|---|---|
| 15 | IN1 |
| 16 | IN2 |
| 17 | IN3 |
| 18 | IN4 |

5. Project Code:
The code used in this tutorial is saved in the path: "..\program-code\python-code".
You can move the code anywhere. For example, we saved the code in Drive D, with the path D:\2. Project Tutorials.
Open the "Thonny" software, click "This PC" → "D:" → "2. Project Tutorials" → "Project 20 Stepper Motor". And double-click "Project_20_Stepping_Motor.py" with the left mouse button.

from machine import Pin
import time

# 引脚初始化
in1 = Pin(15, Pin.OUT)
in2 = Pin(16, Pin.OUT)
in3 = Pin(17, Pin.OUT)
in4 = Pin(18, Pin.OUT)

# 延时
delay = 1

# 电机旋转一圈所需的步数,(约360°),会有轻微偏差.
ROUND_VALUE = 509

# 四相八拍步进电机顺序值:A-AB-B-BC-C-CD-D-DA-A.
STEP_VALUE = [
    [1, 0, 0, 0],
    [1, 1, 0, 0],
    [0, 1, 0, 0],
    [0, 1, 1, 0],
    [0, 0, 1, 0],
    [0, 0, 1, 1],
    [0, 0, 0, 1],
    [1, 0, 0, 1],
]

# 引脚输出电平低
def reset():
    in1(0)
    in2(0)
    in3(0)
    in4(0)

# 如果count是正整数,则顺时针旋转,如果count是负整数,则逆时针旋转
def step_run(count):
    direction = 1     # 顺时针转
    if count < 0:
        direction = -1  # 逆时针旋转
        count = -count
    for x in range(count):
        for bit in STEP_VALUE[::direction]:
            in1(bit[0])
            in2(bit[1])
            in3(bit[2])
            in4(bit[3])
            time.sleep_ms(delay)
    reset()

# 如果a是正整数,则顺时针旋转,如果a是负整数,则逆时针旋转
def step_angle(a):
    step_run(int(ROUND_VALUE * a / 360))

# 循环:顺时针转一圈,再逆时针转一圈.
while True:
    step_run(509)
    step_run(-509)
    step_angle(360)
    step_angle(-360)
Make sure the ESP32 is already connected to the computer, and click .

Click , and the code starts to run. The phenomenon you will see is: the four LEDs D1, D2, D3, D4 on the ULN2003 driver module light up, and the stepper motor first rotates counterclockwise, then clockwise, and keeps cycling in this state. Press "Ctrl+C" or click to exit the program.


Project 21 Relay
1. Project Introduction:
In daily life, we generally use alternating current to drive electrical devices, and sometimes we use switches to control electrical appliances. If the switch is directly connected to the AC circuit, once there is an electric leakage, people will be in danger. From the perspective of safety, we specially designed this relay module with NO (normally open) and NC (normally closed) terminals. In this lesson, we will learn about a special and useful switch, the relay module.
2. Project Components:
|
|
 |
|
|---|---|---|---|
| ESP32*1 | Breadboard*1 | Relay Module*1 | Red LED*1 |
|
|
|
|
| 3P to Dupont Wire (male, single)*1 | USB Cable*1 | 220Ω Resistor*1 | Several Jumper Wires |
3. Component Knowledge:
Relay: It mainly uses the HK4100F-DC 5V-SHC relay component. The relay has 3 terminals for external circuits, namely the NO, COM, and NC terminals (silkscreened on the back).
Normally open (NO): This pin is normally open unless a signal is provided to the signal pin of the relay module. Therefore, the normal contact pin disconnects its connection through the NC pin and establishes a connection through the NO pin.
Common contact (COM): This pin is used to connect other modules/components, such as the LED.
LED:
Normally closed (NC): This NC pin is connected through the COM pin to form a closed circuit. You can control the relay module through a development board such as the ESP32 to switch between closed and open.
When the relay has no control signal, the COM terminal and the NC terminal are connected, and the COM terminal and the NO terminal are disconnected. When controlling, connect G to the GND of the control board, V to the 5V of the control board, and S to the digital port of the control board. When the S signal terminal is set to high level, the relay is turned on, the COM terminal and the NC terminal of the relay are disconnected, and the COM terminal and the NO terminal are connected; when the S signal terminal is set to low level, the relay is turned off, the COM terminal and the NC terminal of the relay are connected, and the COM terminal and the NO terminal are disconnected.
- Operating voltage: 5V (DC)
- Operating current: ≤50MA
- Maximum power: 0.25W
- Input signal: digital signal
- Contact current: <3A
Relay Schematic Diagram:

4. Project Wiring Diagram:

5. Project Code:
The code used in this tutorial is saved in the path: "..\program-code\python-code".
You can move the code anywhere. For example, we saved the code in Drive D, with the path D:\2. Project Tutorials.
Open the "Thonny" software, click "This PC" → "D:" → "2. Project Tutorials" → "Project 21 Relay". And double-click "Project_21_Relay.py" with the left mouse button.

from machine import Pin
import time

# 创建引脚15为继电器对象,将引脚15设置为输出
relay = Pin(15, Pin.OUT)

# 继电器打开,继电器COM和NO连接,COM和NC断开.
def relay_on():
    relay(1)

# 继电器闭合,继电器COM和NO断开,COM和NC接通.
def relay_off():
    relay(0)

# 循环,继电器开一秒,关一秒
while True:
    relay_on()
    time.sleep(1)
    relay_off()
    time.sleep(1)
Make sure the ESP32 is already connected to the computer, and click .

Click , and the code starts to run. The phenomenon you will see is: the relay will cycle on and off; when on for 1 second the LED lights up for 1 second, and when off for 1 second the LED goes out for 1 second. At the same time, you can hear the sound of the relay switching on and off, and you can also see the indicator light on the relay indicating the change of state. Press "Ctrl+C" or click to exit the program.


Project 22 Dimming Light
1. Project Introduction:
The potentiometer is a three-terminal resistor with a sliding or rotating contact, which forms an adjustable voltage divider. Its working principle is to change the position of the sliding contact on a uniform resistor. In a potentiometer, the entire input voltage is applied to the entire length of the resistor, and the output voltage is the voltage value between the fixed contact and the sliding contact. In this project, we will learn to use the ESP32 to read the value of a potentiometer and combine it with an LED to make a dimming light.
2. Project Components:
|
|
 |
|
|---|---|---|---|
| ESP32*1 | Breadboard*1 | Adjustable Potentiometer*1 | Red LED*1 |
|
|
 |
|
| 220Ω Resistor*1 | USB Cable*1 | Several Jumper Wires |
3. Component Knowledge:
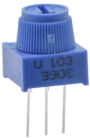
Adjustable potentiometer: The adjustable potentiometer is a kind of resistor and analog electronic component, with two states 0 and 1 (high level and low level). Its analog value is different, and its data state presents a linear state of 1 ~ 1024 and so on.
ADC: ADC is an electronic integrated circuit used to convert analog signals (such as voltage) into a digital or binary form composed of 1s and 0s. The range of the ADC on our ESP32 is 12 bits, which means the resolution is 2^12=4096, which means a range (3.3V) will be divided into 4096 parts on average, and the range of analog values corresponds to the ADC values. Therefore, the more bits the ADC has, the denser the analog division, and the higher the precision of the final conversion.
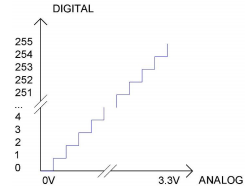
Section 1: The analog quantity in the range of 0V—(3.3/4095)V corresponds to the digital 0;
Section 2: The analog quantity in the range of (3.3/4095)V—2*(3.3/4095)V corresponds to the digital 1;
......
The following analogs will be divided accordingly. The conversion formula is as follows:

DAC: The reversibility of this process requires a DAC, a digital-to-analog converter. Digital I/O ports can output high level and low level (0 or 1), but cannot output intermediate voltage values, which is where the DAC is useful. The ESP32 has two DAC output pins GPIO25 and GPIO26 with 8-bit precision, which can divide VCC (here 3.3V) into 2^8=256 parts. For example, when the digital quantity is 1, the output voltage value is 3.3/256×1V; when the digital quantity is 128, the output voltage value is 3.3/256 ×128=1.65V. The higher the precision of the DAC, the higher the precision of the output voltage value.
The conversion formula is as follows:

ADC on the ESP32 Board:
The ESP32 has 16 pins that can be used to measure analog signals. The GPIO pin serial numbers and analog pin definitions are shown in the table below:
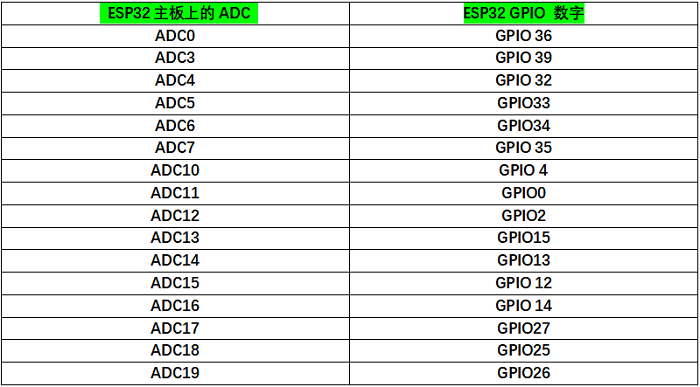
DAC on the ESP32 Board:

4. Read the ADC Value, DAC Value, and Voltage Value of the Potentiometer:
We will connect the potentiometer to the analog IO port of the ESP32 to read the ADC value, DAC value, and voltage value of the potentiometer. Please refer to the following wiring diagram for wiring:
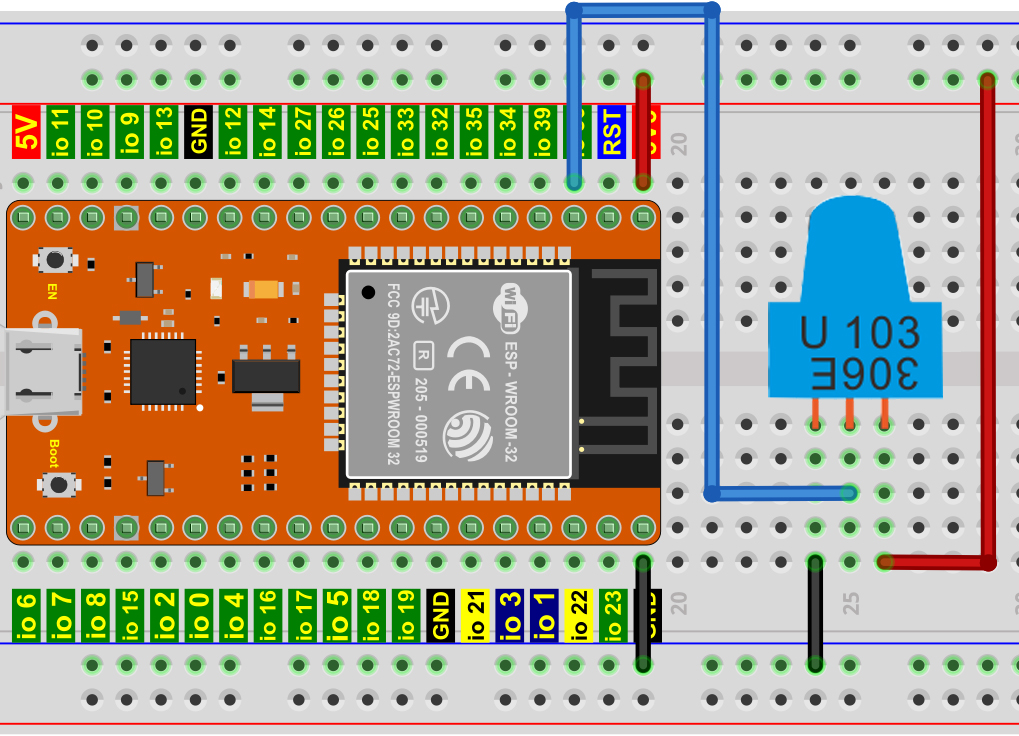
The code used in this tutorial is saved in the path: "..\program-code\python-code".
You can move the code anywhere. For example, we saved the code in Drive D, with the path D:\2. Project Tutorials.
Open the "Thonny" software, click "This PC" → "D:" → "2. Project Tutorials" → "Project 22 Dimming Light". And double-click "Project_22.1_Read_Potentiometer_Analog_Value.py" with the left mouse button.

# 导入 Pin, ADC 和DAC 库.
from machine import ADC,Pin,DAC
import time

# 打开并配置0-3.3V的ADC
adc=ADC(Pin(36))
adc.atten(ADC.ATTN_11DB)
adc.width(ADC.WIDTH_12BIT)

#每0.1秒读取一次ADC值,将ADC值转换为DAC值并输出,
#并将这些数据打印到“Shell”.
try:
    while True:
        adcVal=adc.read()
        dacVal=adcVal//16
        voltage = adcVal / 4095.0 * 3.3
        print("ADC Val:",adcVal,"DACVal:",dacVal,"Voltage:",voltage,"V")
        time.sleep(0.1)
except:
    pass

Click , and the code starts to run. The phenomenon you will see is: the "Shell" window under the Thonny IDE will print the ADC value, DAC value, and voltage value of the potentiometer. When you turn the potentiometer handle, the ADC value, DAC value, and voltage value change. Press "Ctrl+C" or click to exit the program.


5. Wiring Diagram of the Dimming Light:
In the previous step, we read the ADC value, DAC value, and voltage value of the potentiometer. Now we need to convert the ADC value of the potentiometer into the brightness of the LED to make a brightness-adjustable lamp. See the wiring diagram shown below:
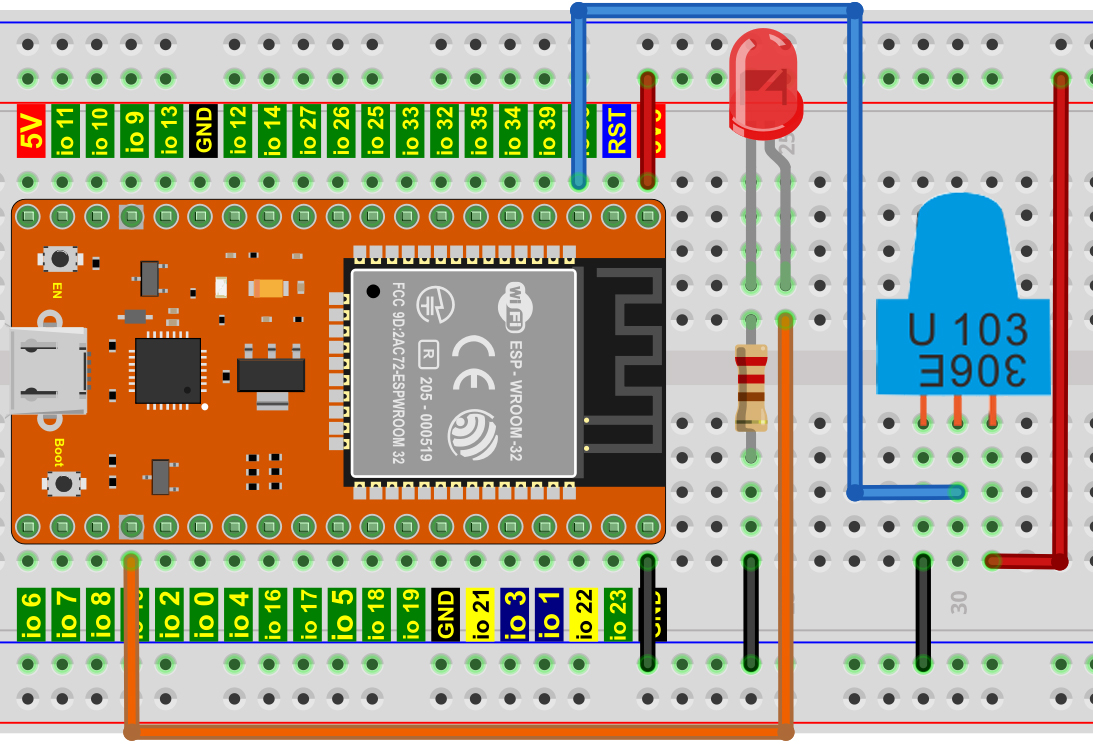
6. Project Code:
The code used in this tutorial is saved in the path: "..\program-code\python-code".
You can move the code anywhere. For example, we saved the code in Drive D, with the path D:\2. Project Tutorials.
Open the "Thonny" software, click "This PC" → "D:" → "2. Project Tutorials" → "Project 22 Dimming Light". And double-click "Project_22.2_Dimming_Light.py" with the left mouse button.

from machine import Pin,PWM,ADC
import time

pwm =PWM(Pin(15,Pin.OUT),1000)
adc=ADC(Pin(36))
adc.atten(ADC.ATTN_11DB)
adc.width(ADC.WIDTH_10BIT)

try:
    while True:
        adcValue=adc.read()
        pwm.duty(adcValue)
        print(adc.read())
        time.sleep_ms(100)
except:
    pwm.deinit()
Make sure the ESP32 is already connected to the computer, and click .

Click , and the code starts to run. The phenomenon you will see is: turn the potentiometer handle, and the brightness of the LED will change accordingly. Press "Ctrl+C" or click to exit the program.

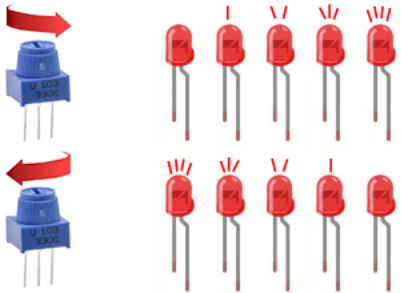
Project 23 Flame Alarm
1. Project Introduction:
Fire is a terrible disaster, and fire alarm systems are very useful in houses, commercial buildings, and factories. In this project, we will use the ESP32 to control a flame sensor, a buzzer, and an LED to simulate a fire alarm device. This is a meaningful maker activity.
2. Project Components:
|
|
 |
|
|---|---|---|---|
| ESP32*1 | Breadboard*1 | Flame Sensor*1 | Red LED*1 |
|
|
 |
|
| Active Buzzer*1 | 220Ω Resistor*1 | 10KΩ Resistor*1 | Several Jumper Wires |
|
 |
 |
|
| NPN Transistor (S8050)*1 | 1kΩ Resistor*1 | USB Cable*1 |
3. Component Knowledge:
Flame sensor (infrared receiving triode): The flame emits a certain amount of IR light, which is invisible to the human eye, but our infrared receiving triode can detect it and remind the microcontroller (such as the ESP32) that a fire has been detected. The infrared receiving triode can detect flames and then convert the flame brightness into a fluctuating level signal. The short pin of the infrared receiving triode is the negative terminal, and the other long pin is the positive terminal. We should connect the short pin (negative) to 5V, and connect the long pin (positive) to the analog pin, a resistor, and GND. As shown in the figure below:
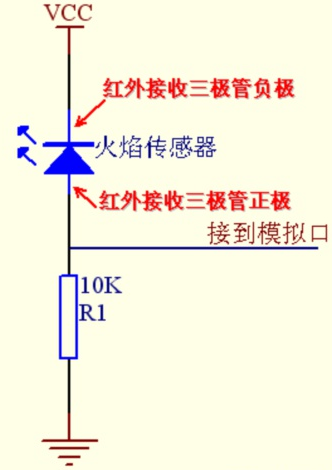
Note: The flame sensor should avoid direct sunlight, car headlights, and incandescent lamp illumination, and should not face heat sources (such as radiators, heaters) or air conditioners, to avoid false alarms caused by large changes in ambient temperature. It is also susceptible to interference from RF radiation.
4. Read the ADC Value, DAC Value, and Voltage Value of the Flame Sensor:
We first use a simple code to read the ADC value, DAC value, and voltage value of the flame sensor and print them out. Please refer to the following wiring diagram for wiring:
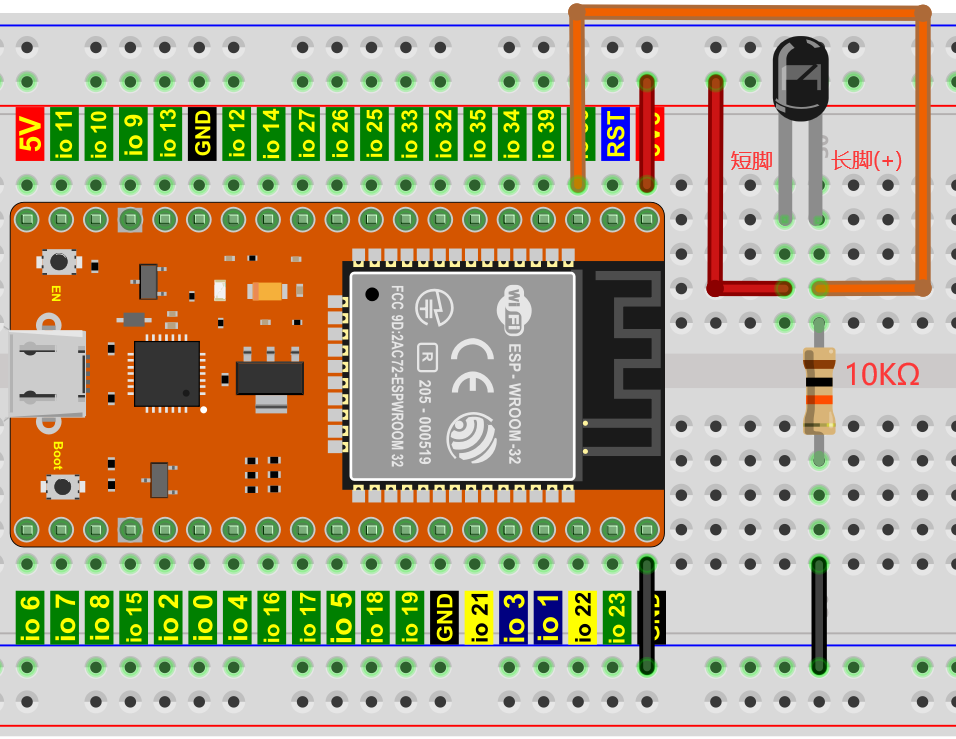
The code used in this tutorial is saved in the path: "..\program-code\python-code".
You can move the code anywhere. For example, we saved the code in Drive D, with the path D:\2. Project Tutorials.
Open the "Thonny" software, click "This PC" → "D:" → "2. Project Tutorials" → "Project 23 Flame Alarm". And double-click "Project_23.1_Read_Analog_Value_Of_Flame_Sensor.py" with the left mouse button.

# 导入 Pin, ADC and DAC 库.
from machine import ADC,Pin,DAC
import time

# 打开并配置0-3.3V的ADC
adc=ADC(Pin(36))
adc.atten(ADC.ATTN_11DB)
adc.width(ADC.WIDTH_12BIT)

# 每0.1秒读取一次ADC值,将ADC值转换为DAC值并输出,
# 并将这些数据打印到“Shell”.
try:
    while True:
        adcVal=adc.read()
        dacVal=adcVal//16
        voltage = adcVal / 4095.0 * 3.3
        print("ADC Val:",adcVal,"DACVal:",dacVal,"Voltage:",voltage,"V")
        time.sleep(0.1)
except:
    pass

Click , and the code starts to run. The phenomenon you will see is: the "Shell" window under the Thonny IDE will print the ADC value, DAC value, and voltage value read by the flame sensor. When the flame approaches the flame sensor, the ADC value, DAC value, and voltage value increase; conversely, the ADC value, DAC value, and voltage value decrease. Press "Ctrl+C" or click to exit the program.

5. Wiring Diagram of the Flame Alarm:
Next, we will use the flame sensor, the buzzer, and the LED to make an interesting project - a fire alarm device. When the flame sensor detects a flame, the LED blinks and the buzzer alarms.
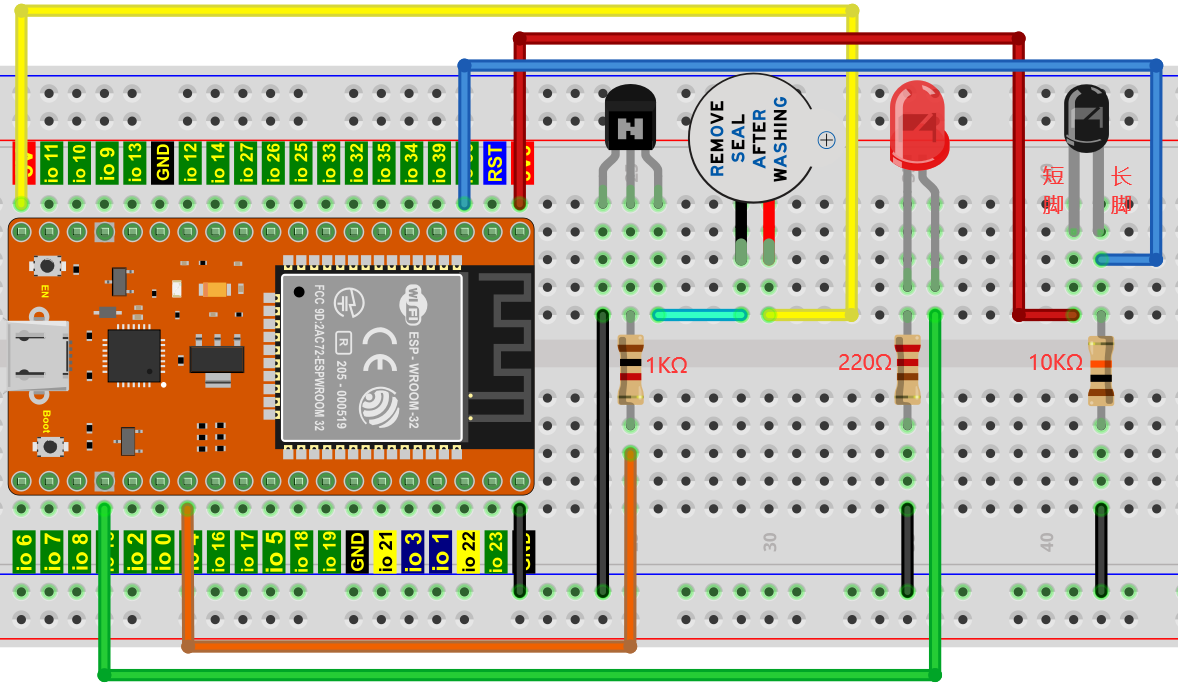
6. Project Code:
(Note: The threshold value 500 in the code can be reset by yourself according to the actual situation.)
The code used in this tutorial is saved in the path: "..\program-code\python-code".
You can move the code anywhere. For example, we saved the code in Drive D, with the path D:\2. Project Tutorials.
Open the "Thonny" software, click "This PC" → "D:" → "2. Project Tutorials" → "Project 23 Flame Alarm". And double-click "Project_23.2_Flame_Alarm.py" with the left mouse button.

from machine import ADC, Pin
import time

# 打开并配置0-3.3V的ADC
adc=ADC(Pin(36))
adc.atten(ADC.ATTN_11DB)
adc.width(ADC.WIDTH_12BIT)
# 创建引脚15为LED对象,设置引脚15为输出
led = Pin(15, Pin.OUT)
# 创建引脚4为蜂鸣器对象,设置引脚4为输出
buzzer = Pin(4, Pin.OUT)

# 如果火焰传感器检测到火焰,蜂鸣器将发出蜂鸣声
#,当模拟值大于500时,LED闪烁
# 否则,蜂鸣器不响,LED熄灭

while True:
    adcVal=adc.read()
    if adcVal >500:
        buzzer.value(1) # 蜂鸣器鸣叫
        led.value(1)    # LED点亮
        time.sleep(0.5) # 延时 0.5s
        buzzer.value(0) # 蜂鸣器关闭
        led.value(0)
        time.sleep(0.5) # 延时 0.5s
    else:
        buzzer.value(0) # 蜂鸣器关闭
        led.value(0)    # LED熄灭
Make sure the ESP32 is already connected to the computer, and click .

Click , and the code starts to run. The phenomenon you will see is: when the flame sensor detects a flame, the LED blinks and the buzzer alarms; otherwise, the LED does not light up and the buzzer does not sound. Press "Ctrl+C" or click to exit the program.

Project 24 Night Lamp
1. Project Introduction:
Sensors or components are ubiquitous in our daily lives. For example, some public street lamps automatically light up at night and automatically go out during the day. Why? In fact, these all use a kind of photosensitive component that can sense the intensity of external ambient light. At night, when the outdoor brightness decreases, the street lamp automatically turns on; during the day, the street lamp automatically turns off. The principle is very simple. In this experiment, we use the ESP32 to control an LED to achieve the effect of this street lamp.
2. Project Components:
|
|
 |
|
|---|---|---|---|
| ESP32*1 | Breadboard*1 | Photoresistor*1 | Red LED*1 |
|
|
|
|
| 220Ω Resistor*1 | 10KΩ Resistor*1 | Several Jumper Wires | USB Cable*1 |
3. Component Knowledge:
Photoresistor: It is a photosensitive resistor. Its principle is that the brightness (light) received on the surface of the photoresistor reduces the resistance. The resistance value of the photoresistor changes with the strength of the detected ambient light. With this characteristic, we can use the photoresistor to detect light intensity. The photoresistor and its electronic symbol are as follows:
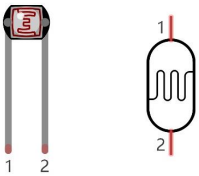
The following circuit is used to detect the change in the resistance value of the photoresistor:
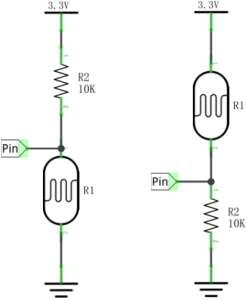
In the above circuit, when the resistance of the photoresistor changes due to the change in light intensity, the voltage between the photoresistor and resistor R2 also changes. Therefore, the light intensity can be obtained by measuring this voltage. This project uses the circuit on the left side of the above figure for wiring.
4. Read the ADC Value, DAC Value, and Voltage Value of the Photoresistor:
We first use a simple code to read the ADC value, DAC value, and voltage value of the photoresistor and print them out. Please refer to the following wiring diagram for wiring:
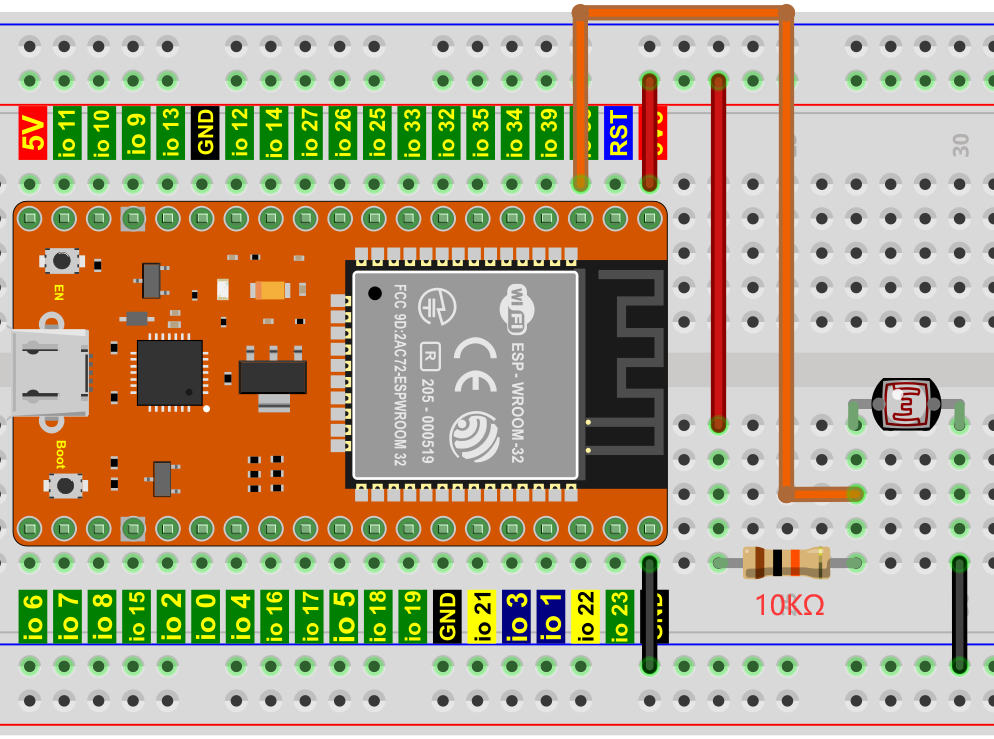
The code used in this tutorial is saved in the path: "..\program-code\python-code".
You can move the code anywhere. For example, we saved the code in Drive D, with the path D:\2. Project Tutorials.
Open the "Thonny" software, click "This PC" → "D:" → "2. Project Tutorials" → "Project 24 Night Lamp". And double-click "Project_24.1_Read_Photosensitive_Analog_Value.py" with the left mouse button.

# 导入 Pin, ADC 和 DAC 库.
from machine import ADC,Pin,DAC
import time

# 打开并配置0-3.3V的ADC
adc=ADC(Pin(36))
adc.atten(ADC.ATTN_11DB)
adc.width(ADC.WIDTH_12BIT)

#每0.1秒读取一次ADC值,将ADC值转换为DAC值并输出,
#并将这些数据打印到“Shell”.
try:
    while True:
        adcVal=adc.read()
        dacVal=adcVal//16
        voltage = adcVal / 4095.0 * 3.3
        print("ADC Val:",adcVal,"DACVal:",dacVal,"Voltage:",voltage,"V")
        time.sleep(0.1)
except:
    pass

Click , and the code starts to run. The phenomenon you will see is: the "Shell" window under the Thonny IDE will print the ADC value, DAC value, and voltage value read by the photoresistor. When the light intensity in the environment of the photoresistor is gradually reduced, the ADC value, DAC value, and voltage value gradually increase; conversely, the ADC value, DAC value, and voltage value gradually decrease. Press "Ctrl+C" or click to exit the program.


5. Wiring Diagram of the Light-Controlled Lamp:
We made a small dimming light earlier, and now we will make a light-controlled lamp. Their principles are the same, that is, obtain the analog value of the sensor through the ESP32, and then adjust the brightness of the LED.
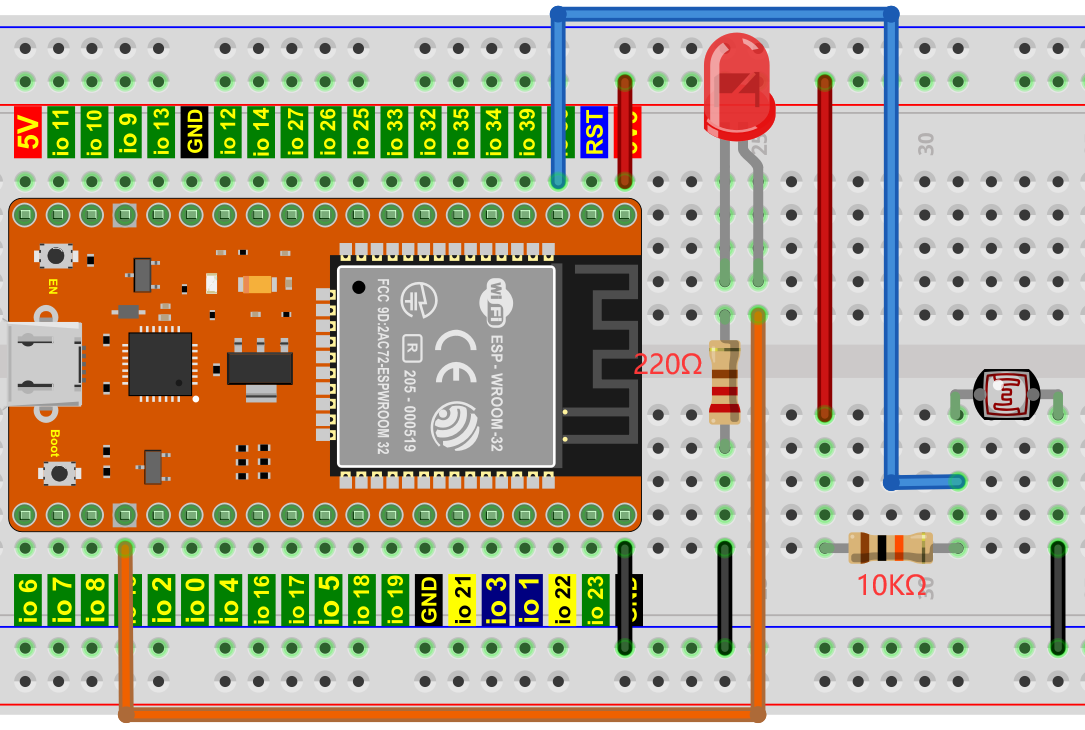
6. Project Code:
The code used in this tutorial is saved in the path: "..\program-code\python-code".
You can move the code anywhere. For example, we saved the code in Drive D, with the path D:\2. Project Tutorials.
Open the "Thonny" software, click "This PC" → "D:" → "2. Project Tutorials" → "Project 24 Night Lamp". And double-click "Project_24.2_Night_Lamp.py" with the left mouse button.

from machine import Pin,PWM,ADC
import time

pwm =PWM(Pin(15,Pin.OUT),1000)
adc=ADC(Pin(36))
adc.atten(ADC.ATTN_11DB)
adc.width(ADC.WIDTH_10BIT)

try:
    while True:
        adcValue=adc.read()
        pwm.duty(adcValue)
        print(adc.read())
        time.sleep_ms(100)
except:
    pwm.deinit()
Make sure the ESP32 is already connected to the computer, and click .

Click , and the code starts to run. The phenomenon you will see is: when the light intensity in the environment of the photoresistor is reduced, the LED becomes brighter; conversely, the LED becomes darker. Press "Ctrl+C" or click to exit the program.

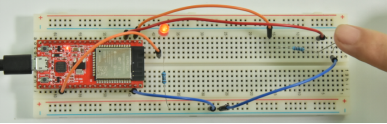
Project 25 Human Induction Lamp
1. Project Introduction:
Human induction lamps are generally used in dark corridor areas. With the development of technology, the use of human induction lamps is very common in our real life. Corridors in residential areas, bedrooms in rooms, garages in underground cities, bathrooms, and other areas all use human induction lamps. The human induction lamp in real life is generally composed of a PIR sensor, a lamp, a photoresistor sensor, and so on. In this project, we will learn how to use a PIR sensor, an LED, and a photoresistor to make a human induction lamp.
2. Project Components:
|
|
|
|
|---|---|---|---|
| ESP32*1 | Breadboard*1 | Photoresistor*1 | Red LED*1 |
|
|
|
|
| 220Ω Resistor*1 | 10KΩ Resistor*1 | Several Jumper Wires | USB Cable*1 |
|
|
||
| PIR Sensor*1 | 3P to Dupont Wire (male, single)*1 |
3. Project Wiring Diagram:

4. Project Code:
The code used in this tutorial is saved in the path: "..\program-code\python-code".
You can move the code anywhere. For example, we saved the code in Drive D, with the path D:\2. Project Tutorials.
Open the "Thonny" software, click "This PC" → "D:" → "2. Project Tutorials" → "Project 25 Human Induction Lamp". And double-click "Project_25_Human_Induction_Lamp.py" with the left mouse button.

from machine import Pin, ADC
import time

# 人体红外传感器引脚
human = Pin(15, Pin.IN)

# 初始化光敏光传感器引脚到GP36 (ADC函数)
adc=ADC(Pin(36))
adc.atten(ADC.ATTN_11DB)
adc.width(ADC.WIDTH_10BIT)
#创建引脚4为LED对象,设置引脚4为输出
led = Pin(4, Pin.OUT)

def detect_someone():
    if human.value() == 1:
        return True
    return False

abc = 0

while True:
    adcVal=adc.read()
    if adcVal >= 500:
        if detect_someone() == True:
            abc += 1
            led.value(1)
            print("value=", abc)
            time.sleep(1)
        else:
            if abc != 0:
                abc = 0
                led.value(0)
    else:
        led.value(0)

    time.sleep(0.1)
Make sure the ESP32 is already connected to the computer, and click .

Click , and the code starts to run. The phenomenon you will see is: when your hand covers the photosensitive part of the photoresistor to simulate a dark state, and then you wave the other hand in front of the PIR sensor, the LED lights up, and after a few seconds of delay the LED automatically turns off. At the same time, the "Shell" window under the Thonny IDE will print the delay time for which the LED is lit. If the photosensitive part of the photoresistor is not covered, waving your hand in front of the PIR sensor will leave the LED in the off state. Press "Ctrl+C" or click to exit the program.


Project 26 Joystick Controlling RGB Light
1. Project Introduction:
The joystick module is a component with two analog inputs and one digital input. It is widely used in game operations, robot control, drone control, and other fields. In this project, we use the ESP32 and the joystick module to control RGB. In this way, you can gain a deeper understanding of the principle and operation of the joystick module in practice.
2. Project Components:
|
|
 |
|
|---|---|---|---|
| ESP32*1 | Breadboard*1 | Joystick Module*1 | RGB LED*1 |
|
|
|
|
| 220Ω Resistor*3 | Several Jumper Wires | USB Cable*1 | Male-to-Female Dupont Wire*5 |
3. Component Knowledge:
Joystick module: It mainly uses the PS2 joystick component. In fact, the joystick module has 3 signal pins, simulating 3-dimensional space. The pins of the joystick module are GND, VCC, and signal terminals (VRx, VRy, SW). Among them, the signal terminals X and Y simulate the X-axis and Y-axis of space. When controlling, the X and Y signal terminals of the module are connected to the analog ports of the control board, and the coordinates of the object in the X and Y axes of space are controlled by controlling the two analog input values. The signal terminal SW simulates the Z-axis of space, and it is generally connected to a digital port and used as a button.
Connect VCC to the power output terminal V/VCC (3.3/5V) of the control board, and connect GND to G/GND of the control board. In the original state, the read voltage is about 1.65V/2.5V. For the X-axis direction, when gradually moving in the direction of the arrow, the read voltage value increases and can reach the maximum voltage; when gradually moving in the opposite direction of the arrow, the read voltage value gradually decreases and decreases to the minimum voltage. For the Y-axis direction, when gradually pressing in the direction of the arrow on the module, the read voltage value increases and can reach the maximum voltage; when gradually pressing in the opposite direction of the arrow, the read voltage value gradually decreases and decreases to the minimum voltage. For the Z-axis direction, the signal terminal B is connected to a digital port; in the original state it outputs 0, and when pressed it outputs 1. In this way, we can read the two analog values and the high/low level of one digital port to determine the working state of the joystick on the module.
Module Parameters:
- Input voltage: DC 3.3V ~ 5V
- Output signal: X/Y dual-axis analog values + Z-axis digital signal
- Applicable scope: suitable for controlling the movement of control point coordinates in a plane, the control of two-degree-of-freedom servos, etc.
- Product features: exquisite appearance, superior joystick feel, simple operation, sensitive response, long service life.
4. Read the Values of the Joystick Module:
We must use the analog IO port of the ESP32 to read the values from the X/Y pins of the joystick module, and use a digital IO port to read the digital signal of the button. Please follow the wiring diagram below for wiring (due to the replacement of accessories, B=SW in the figure below):

The code used in this tutorial is saved in the path: "..\program-code\python-code".
You can move the code anywhere. For example, we saved the code in Drive D, with the path D:\2. Project Tutorials.
Open the "Thonny" software, click "This PC" → "D:" → "2. Project Tutorials" → "Project 26 Joystick Controlling RGB Light". And double-click "Project_26.1_Read_Rocker_Value.py" with the left mouse button.

from machine import Pin, ADC
import time
# 初始化摇杆模块(ADC函数)
rocker_x=ADC(Pin(36))
rocker_y=ADC(Pin(39))
button_z=Pin(14,Pin.IN,Pin.PULL_UP)

# 将两个ADC通道的电压采集范围设置为0-3.3V,
#,数据采集宽度为0-4095.
rocker_x.atten(ADC.ATTN_11DB)
rocker_y.atten(ADC.ATTN_11DB)
rocker_x.width(ADC.WIDTH_12BIT)
rocker_y.width(ADC.WIDTH_12BIT)

# 在代码中,将Z_Pin配置为上拉输入模式。
# 在loop()中,使用Read()读取X轴和Y轴的值
# 和使用value()来读取Z轴的值,然后显示它们.
while True:
    print("X,Y,Z:",rocker_x.read(),",",rocker_y.read(),",",button_z.value())
    time.sleep(0.5)

Click , and the code starts to run. The phenomenon you will see is: the "Shell" window under the Thonny IDE will print the current analog values and digital value of the joystick. Moving the joystick or pressing the joystick cap will change the analog values and digital value in the "Shell". Press "Ctrl+C" or click to exit the program.


5. Wiring Diagram of the Joystick Module Controlling RGB:
We just read the values of the joystick module. Here we need to do something with the joystick module and the RGB. Connect them according to the figure below:

6. Project Code:
The code used in this tutorial is saved in the path: "..\program-code\python-code".
You can move the code anywhere. For example, we saved the code in Drive D, with the path D:\2. Project Tutorials.
Open the "Thonny" software, click "This PC" → "D:" → "2. Project Tutorials" → "Project 26 Joystick Controlling RGB Light". And double-click "Project_26.2_Rocker_Control_Light.py" with the left mouse button.

from machine import Pin, ADC,PWM
import time
#设置RGB的接口和频率
rgb_r = PWM(Pin(4))
rgb_g = PWM(Pin(0))
rgb_b = PWM(Pin(2))
rgb_b.freq(1000)
rgb_r.freq(1000)
rgb_g.freq(1000)
#Set rocker pin
rocker_x=ADC(Pin(36))
rocker_y=ADC(Pin(39))
# 将两个ADC通道的电压采集范围设置为0-3.3V,
# 数据采集宽度为0-4095.
rocker_x.atten(ADC.ATTN_11DB)
rocker_y.atten(ADC.ATTN_11DB)
rocker_x.width(ADC.WIDTH_12BIT)
rocker_y.width(ADC.WIDTH_12BIT)

while True:
    y = rocker_y.read()#得到摇杆模块的Y值
    x = rocker_x.read()#得到摇杆模块的X值
    if x < 1000:    #左
        rgb_b.duty(0)
        rgb_r.duty(1023)
        rgb_g.duty(0)
    elif x > 3000:    #右
        rgb_b.duty(0)
        rgb_r.duty(0)
        rgb_g.duty(1023)
    elif y < 1000:    #下
        rgb_b.duty(1023)
        rgb_r.duty(0)
        rgb_g.duty(0)
    elif y > 3000:    #上
        rgb_b.duty(1023)
        rgb_r.duty(1023)
        rgb_g.duty(1023)
    time.sleep(0.01)
Make sure the ESP32 is already connected to the computer, and click .

Click , and the code starts to run. The phenomenon you will see is: ① if the joystick moves to the far left in the X direction, the RGB light turns red; ② if the joystick moves to the far right in the X direction, the RGB light turns green; ③ if the joystick moves to the far top in the Y direction, the RGB light turns white; ④ if the joystick moves to the far bottom in the Y direction, the RGB light turns blue. Press "Ctrl+C" or click to exit the program.


Project 27 Temperature and Humidity Meter
1. Project Introduction:
In winter, the humidity in the air is very low, that is, the air is very dry, and combined with the cold, the human skin is prone to being too dry and cracking. So a humidifier is needed to increase the humidity of the air at home, but how do you know that the air is too dry? Then you need a device to detect air humidity. In this lesson, we will learn the use of the temperature and humidity sensor. We use the temperature and humidity sensor to make a temperature and humidity meter, and also combine it with the LCD 128X32 DOT to display the temperature and humidity values.
2. Project Components:
|
|
|
 |
|---|---|---|---|
| ESP32*1 | Breadboard*1 | OLED Screen*1 | Temperature and Humidity Sensor*1 |
|
|
||
| Several Dupont Wires | USB Cable*1 |
3. Component Knowledge:
Temperature and humidity sensor: It is a temperature and humidity composite sensor containing a calibrated digital signal output, with a humidity accuracy of ±5%RH, temperature accuracy of ±2℃, a humidity range of 20-90%RH, and a temperature range of 0~50℃. The temperature and humidity sensor uses dedicated digital module acquisition technology and temperature and humidity sensing technology to ensure that the product has extremely high reliability and excellent long-term stability. The temperature and humidity sensor includes a resistive humidity-sensing element and an NTC temperature-measuring element, and is very suitable for temperature and humidity measurement occasions that do not require high precision and real-time performance. The operating voltage is in the range of 3.3V-5.5V.
The temperature and humidity sensor has three pins, namely VCC, GND, and S. S is the data output pin. Serial communication is used.
Depending on the batch, it may also have three pins of +, -, and out: + connects to the power supply, - connects to GND, and OUT is the data output pin.
Single-bus format definition of the temperature and humidity sensor:
| Name | Single-bus format definition |
|---|---|
| Start signal | The microprocessor pulls the data bus (SDA) low for a period of at least 18ms (maximum must not exceed 30ms) to notify the sensor to prepare data. |
| Response signal | The sensor pulls the data bus (SDA) low for 83µs, and then pulls it high for 87µs to respond to the host's start signal. |
| Humidity | The humidity high bits are the integer part of the humidity data, and the humidity low bits are the fractional part of the humidity data |
| Temperature | The temperature high bits are the integer part of the temperature data, and the temperature low bits are the fractional part of the temperature data. In addition, if Bit8 of the temperature low bits is 1, it indicates a negative temperature, otherwise a positive temperature |
| Checksum | Checksum = humidity high bits + humidity low bits + temperature high bits + temperature low bits |
Data timing diagram of the temperature and humidity sensor:
After the user host (MCU) sends a start signal once, the temperature and humidity sensor switches from low-power mode to high-speed mode. After the host's start signal ends, the temperature and humidity sensor sends a response signal, sends 40 bits of data, and triggers one signal acquisition. The signal sending is shown in the figure below.

The temperature and humidity sensor can easily add temperature and humidity data to your DIY electronic projects. It is perfect for remote weather stations, home environment control systems, and farm or garden monitoring systems.
Parameters of the temperature and humidity sensor:
- Operating voltage: +5 V
- Temperature range: 0-50 °C, error: ± 2 °C
- Humidity range: 20-90% RH, error: ± 5% RH
- Digital interface
Schematic diagram of the temperature and humidity sensor:

4. Read the Temperature and Humidity Values:

The code used in this tutorial is saved in the path: "..\program-code\python-code".
You can move the code anywhere. For example, we saved the code in Drive D, with the path D:\2. Project Tutorials.
Open the "Thonny" software, click "This PC" → "D:" → "2. Project Tutorials" → "Project 27 Temperature and Humidity Meter". And double-click "Project_27.1_Detect_Temperature_Humidity.py" with the left mouse button.

# 导入 machine, time 和 dht 库.
import machine
import time
import dht

#关联DHT11引脚(13).
DHT = dht.DHT11(machine.Pin(13))

# 每秒获取一次温湿度数据,并打印出来.
while True:
    DHT.measure() # 启动DHT11一次测量数据.
   # 调用DHT的内置函数来获取温度
   # 和湿度数据并打印在“Shell”中.
    print('temperature:',DHT.temperature(),'℃','humidity:',DHT.humidity(),'%')
    time.sleep_ms(1000)

Click . If your temperature and humidity sensor is connected incorrectly, the following information will be printed in the "Shell" window. Please make sure your circuit is connected correctly, then click again, and the code starts to run. The phenomenon you will see is: the "Shell" window under the Thonny IDE will print the current temperature and humidity data in the environment, as shown in the figure below.

Click again, and the code starts to run. The phenomenon you will see is: the "Shell" window under the Thonny IDE will print the analog value read by the sound sensor. When you clap your hands toward the sensor, the analog value of the sound sensor changes significantly. Press "Ctrl+C" or click to exit the program.


5. Wiring Diagram of the Temperature and Humidity Meter:
Now we start to print the values of the temperature and humidity sensor with the LCD_128X32_DOT. We will see the corresponding values on the LCD_128X32_DOT screen. Let's start this project. Please follow the wiring diagram below for wiring:

6. Project Code:
The code used in this tutorial is saved in the path: "..\program-code\python-code".
You can move the code anywhere. For example, we saved the code in Drive D, with the path D:\2. Project Tutorials.
Open the "Thonny" software, click "This PC" → "D:" → "2. Project Tutorials" → "Project 27 Temperature and Humidity Meter". Select "lcd128_32.py" and "lcd128_32_fonts.py" respectively, right-click the mouse and select "Upload to /", wait for "lcd128_32.py" and "lcd128_32_fonts.py" to be uploaded to the ESP32, then double-click "Project_27.2_Temperature_Humidity_Meter.py" with the left mouse button.


from machine import Pin
import machine
import dht
import time
import lcd128_32_fonts
from lcd128_32 import lcd128_32

temp = 0
humi = 0

#关联DHT11引脚(13).
DHT = dht.DHT11(Pin(13))

#i2c配置
clock_pin = 22
data_pin = 21
bus = 0
i2c_addr = 0x3f
use_i2c = True

def scan_for_devices():
    i2c = machine.I2C(bus,sda=machine.Pin(data_pin),scl=machine.Pin(clock_pin))
    devices = i2c.scan()
    if devices:
        for d in devices:
            print(hex(d))
    else:
        print('no i2c devices')

try:
    while True:
        DHT.measure()
        temp = int(DHT.temperature())
        humi = int(DHT.humidity())
        if use_i2c:
            scan_for_devices()
            lcd = lcd128_32(data_pin, clock_pin, bus, i2c_addr)
        lcd.Clear()
        lcd.Cursor(0, 0)
        lcd.Display("temper:")
        lcd.Cursor(0, 8)
        lcd.Display(str(temp))
        lcd.Cursor(0, 11)
        lcd.Display("C")
        lcd.Cursor(2, 0)
        lcd.Display("Humid:")
        lcd.Cursor(2, 7)
        lcd.Display(str(humi))
        lcd.Cursor(2, 10)
        lcd.Display("%")
        time.sleep(0.1)
except:
    pass
Make sure the ESP32 is already connected to the computer, and click .

Click , and the code starts to run. The phenomenon you will see is: the LCD 128X32 DOT screen displays the corresponding temperature value and humidity value in the environment detected by the temperature and humidity sensor. Press "Ctrl+C" or click to exit the program.


Project 28 Distance Meter
1. Project Introduction:
The HC-SR04 ultrasonic sensor is a very affordable distance sensor, mainly used for object avoidance in various robot projects. It is also used as a water level sensor, and even as a parking sensor. We treat the ultrasonic sensor as the eyes of a bat. In the dark, bats can still identify objects and directions ahead through ultrasound. In this project, we use the ESP32 to control the ultrasonic sensor and LEDs to simulate an ultrasonic rangefinder.
2. Project Components:
|
|
 |
|
|---|---|---|---|
| ESP32*1 | Breadboard*1 | Ultrasonic Sensor*1 | Several Dupont Wires |
|
|
|
|
| Red LED*4 | 220Ω Resistor*4 | Several Jumper Wires | USB Cable*1 |
3. Component Knowledge:
HC-SR04 ultrasonic sensor: Like a bat, it uses sonar to determine the distance to an object, providing precise non-contact range detection, high accuracy, and stable readings. Its operation is not affected by sunlight or black materials, just like a precision camera (acoustically, relatively soft materials like cloth are difficult to detect). It comes with an ultrasonic transmitter and receiver.

In front of the ultrasonic sensor are two metal cylinders, which are the transducers. The transducers convert mechanical energy into electrical signals. In the ultrasonic sensor, there are a transmitting transducer and a receiving transducer. The transmitting transducer converts electrical signals into ultrasonic pulses, and the receiving transducer converts the reflected ultrasonic pulses back into electrical signals. If you look at the back of the ultrasonic sensor, you will see an IC behind the transmitting transducer. This is the IC that controls the transmitting transducer. There is also an IC behind the receiving transducer, which is a quad operational amplifier that amplifies the signal generated by the receiving transducer into a signal strong enough to be transmitted to the microcontroller.
Timing Diagram:
The figure shows the timing diagram of the HC-SR04. To start the measurement, the Trig of the SR04 must receive a high (5V) pulse of at least 10us, which will start the sensor to emit 8 cycles of 40kHz ultrasonic pulses and wait for the reflected ultrasonic pulse. When the sensor detects ultrasound from the receiver, it will set the Echo pin to high (5V) and delay for a period (width) proportional to the distance. To obtain the distance, measure the width of the Echo pin.

Time = echo pulse width, in us (microseconds)
Distance in cm = time / 58
Distance (in inches) = time / 148
4. Read the Distance Value of the Ultrasonic Sensor
We will start with a simple ultrasonic ranging and print the measured distance.

The HC-SR04 ultrasonic sensor has four pins: Vcc, Trig, Echo, and GND. The Vcc pin provides the power to generate the ultrasonic pulse, connected to Vcc/+5V. The GND pin is connected to ground/GND. The Trig pin is where the control board sends the signal to start the ultrasonic pulse. The Echo pin is where the ultrasonic sensor sends information about the duration of the ultrasonic pulse's travel to the control board. Wire it as shown below:

The code used in this tutorial is saved in the path: "..\program-code\python-code".
You can move the code anywhere. For example, we saved the code in Drive D, with the path D:\2. Project Tutorials.
Open the "Thonny" software, click "This PC" → "D:" → "2. Project Tutorials" → "Project 28 Distance Meter". And double-click "Project_28.1_Ultrasonic_Ranging.py" with the left mouse button.

from machine import Pin
import time

# 定义超声波测距模块的控制引脚.
Trig = Pin(13, Pin.OUT, 0)
Echo = Pin(14, Pin.IN, 0)

distance = 0 # 定义初始距离为0.
soundVelocity = 340 #设置声速.

# getDistance()函数用于驱动超声波模块测量距离,Trig 引脚保持在高位10us以启动超声波模块。
# Echo.value()用于读取超声波模块Echo引脚的状态,
# 然后使用时间模块的时间戳函数计算Echo的持续时间
# 引脚的高电平,根据时间计算测量距离并返回值.
def getDistance():
    Trig.value(1)
    time.sleep_us(10)
    Trig.value(0)
    while not Echo.value():
        pass
    pingStart = time.ticks_us()
    while Echo.value():
        pass
    pingStop = time.ticks_us()
    pingTime = time.ticks_diff(pingStop, pingStart) // 2
    distance = int(soundVelocity * pingTime // 10000)
    return distance

# 延迟2秒,等待超声波模块稳定下来,从超声波模块获得的数据每500毫秒打印一次.
time.sleep(2)
while True:
    time.sleep_ms(500)
    distance = getDistance()
    print("Distance: ", distance, "cm")
Make sure the ESP32 is already connected to the computer, and click .

Click , and the code starts to run. The phenomenon you will see is: the "Shell" window under the Thonny IDE will print the distance value between the ultrasonic sensor and the object. Press "Ctrl+C" or click to exit the program.


5. Wiring Diagram of the Ultrasonic Rangefinder:
Next, we will use the ESP32 to control the ultrasonic sensor and 4 LEDs to simulate an ultrasonic rangefinder. Wire it as shown in the figure below:

6. Project Code:
The code used in this tutorial is saved in the path: "..\program-code\python-code".
You can move the code anywhere. For example, we saved the code in Drive D, with the path D:\2. Project Tutorials.
Open the "Thonny" software, click "This PC" → "D:" → "2. Project Tutorials" → "Project 28 Distance Meter". And double-click "Project_28.2_Ultrasonic_Ranger.py" with the left mouse button.

from machine import Pin
import time

# 定义四个led的引脚.
led1 = Pin(4, Pin.OUT)
led2 = Pin(0, Pin.OUT)
led3 = Pin(2, Pin.OUT)
led4 = Pin(15, Pin.OUT)

# 定义超声波测距模块的控制引脚.
Trig = Pin(13, Pin.OUT, 0)
Echo = Pin(14, Pin.IN, 0)

distance = 0 # 定义初始距离为0.
soundVelocity = 340 #设置声速.

# getDistance()函数用于驱动超声波模块测量距离,Trig 引脚保持在高位10us以启动超声波模块。
# Echo.value()用于读取超声波模块Echo引脚的状态,
# 然后使用时间模块的时间戳函数计算Echo的持续时间
# 引脚的高电平,根据时间计算测量距离并返回值.
def getDistance():
    Trig.value(1)
    time.sleep_us(10)
    Trig.value(0)
    while not Echo.value():
        pass
    pingStart = time.ticks_us()
    while Echo.value():
        pass
    pingStop = time.ticks_us()
    pingTime = time.ticks_diff(pingStop, pingStart) // 2
    distance = int(soundVelocity * pingTime // 10000)
    return distance

# 延迟2秒,等待超声波模块稳定下来,从超声波模块获得的数据每500毫秒打印一次.
time.sleep(2)
while True:
    time.sleep_ms(500)
    distance = getDistance()
    print("Distance: ", distance, "cm")
    if distance <= 5:
       led1.value(1)
    else:
       led1.value(0)
    if distance <= 10:
       led2.value(1)
    else:
       led2.value(0)
    if distance <= 15:
       led3.value(1)
    else:
       led3.value(0)
    if distance <= 20:
       led4.value(1)
    else:
       led4.value(0)
Make sure the ESP32 is already connected to the computer, and click .

Click , and the code starts to run. The phenomenon you will see is: the "Shell" window under the Thonny IDE will print the distance value between the ultrasonic sensor and the object. In addition, when we move our hand in front of the ultrasonic sensor, the corresponding LED will light up. Press "Ctrl+C" or click to exit the program.


Project 29 Temperature Meter
1. Project Introduction:
The thermistor is a resistor whose resistance depends on temperature and temperature changes, and it is widely used in devices such as gardening and home alarm systems. Therefore, we can use this characteristic to make a temperature meter.
2. Project Components:
|
|
|
 |
|---|---|---|---|
| ESP32*1 | Breadboard*1 | OLED Screen*1 | Thermistor*1 |
|
|
|
|
| 10KΩ Resistor*1 | Several Dupont Wires | USB Cable*1 | Several Jumper Wires |
3. Component Knowledge:
Thermistor: The thermistor is a temperature-sensitive resistor. When the thermistor senses a change in temperature, its resistance changes. We can use this characteristic of the thermistor to detect the temperature intensity. The thermistor and its electronic symbol are shown below.
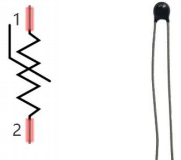
The relationship between the resistance value of the thermistor and the temperature is:
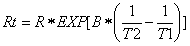 Where:
Rt is the resistance of the thermistor at temperature T2;
R is the nominal resistance value of the thermistor at temperature T1;
EXP[n] is the n-th power of e;
B is the temperature index;
T1 and T2 are Kelvin temperatures (absolute temperature), Kelvin temperature = 273.15 + Celsius temperature. For the parameters of the thermistor, we use: B=3950, R=10KΩ, T1=25℃. The circuit connection method of the thermistor is similar to that of the photoresistor, as shown below:
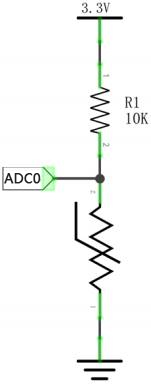
We can use the value measured by the ADC converter to obtain the resistance value of the thermistor, and then use the formula to obtain the temperature value. Therefore, the temperature formula can be derived as:
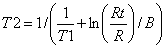
4. Read the Value of the Thermistor:
First, we learn to read the current ADC value, voltage value, and temperature value of the thermistor and print them out. Please wire it according to the wiring diagram below:
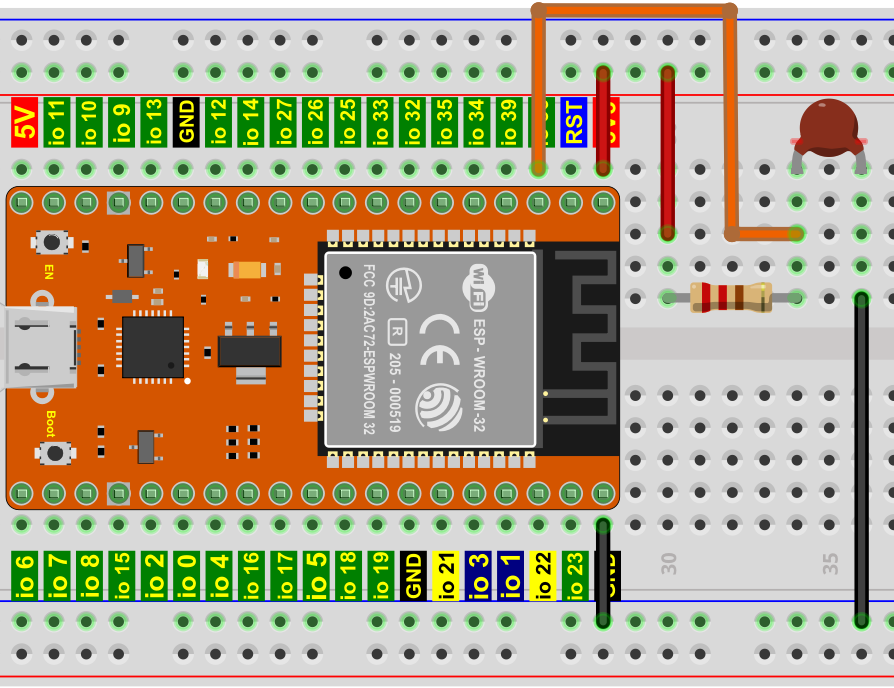
The code used in this tutorial is saved in the path: "..\program-code\python-code".
You can move the code anywhere. For example, we saved the code in Drive D, with the path D:\2. Project Tutorials.
Open the "Thonny" software, click "This PC" → "D:" → "2. Project Tutorials" → "Project 29 Temperature Meter". And double-click "Project_29.1_Read_the_thermistor_analog_value.py" with the left mouse button.

from machine import Pin, ADC
import time
import math

#设置 ADC
adc=ADC(Pin(36))
adc.atten(ADC.ATTN_11DB)
adc.width(ADC.WIDTH_12BIT)

try:
    while True:
        adcValue = adc.read()
        voltage = adcValue / 4095 * 3.3
        Rt = 10 * voltage / (3.3-voltage)
        tempK = (1 / (1 / (273.15+25) + (math.log(Rt/10)) / 3950))
        tempC = (tempK - 273.15)
        print("ADC value:",adcValue,"  Voltage:",voltage,"V","  Temperature: ",tempC,"C");
        time.sleep(1)
except:
    pass

Click , and the code starts to run. The phenomenon you will see is: the "Shell" window under the Thonny IDE will continuously display the current ADC value, voltage value, and temperature value of the thermistor. Try pinching the thermistor with your index finger and thumb (do not touch the wires) for a short period of time, and you should see the temperature value increase. Press "Ctrl+C" or click  to stop or restart the backend process to exit the program.


5. Wiring Diagram of the Temperature Meter:
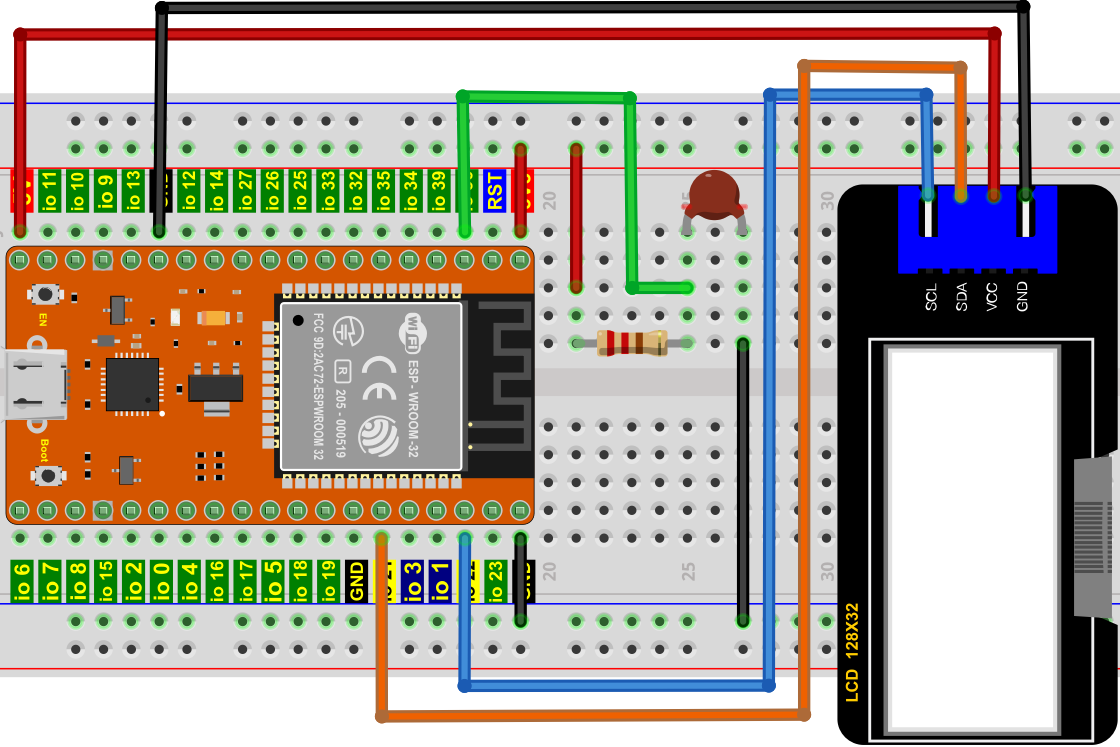
6. Project Code:
The code used in this tutorial is saved in the path: "..\program-code\python-code".
You can move the code anywhere. For example, we saved the code in Drive D, with the path D:\2. Project Tutorials.
Open the "Thonny" software, click "This PC" → "D:" → "2. Project Tutorials" → "Project 29 Temperature Meter". Select "lcd128_32.py" and "lcd128_32_fonts.py" respectively, right-click the mouse and select "Upload to /", wait for "lcd128_32.py" and "lcd128_32_fonts.py" to be uploaded to the ESP32. And double-click "Project_29.2_Temperature_Instrument.py" with the left mouse button.


from machine import Pin, ADC, I2C
import machine
import time
import math
import lcd128_32_fonts
from lcd128_32 import lcd128_32

#设置 ADC
adc=ADC(Pin(36))
adc.atten(ADC.ATTN_11DB)
adc.width(ADC.WIDTH_12BIT)

#i2c配置
clock_pin = 22
data_pin = 21
bus = 0
i2c_addr = 0x3f
use_i2c = True

def scan_for_devices():
    i2c = machine.I2C(bus,sda=machine.Pin(data_pin),scl=machine.Pin(clock_pin))
    devices = i2c.scan()
    if devices:
        for d in devices:
            print(hex(d))
    else:
        print('no i2c devices')

try:
    while True:
        adcValue = adc.read()
        voltage = adcValue / 4095 * 3.3
        Rt = 10 * voltage / (3.3-voltage)
        tempK = (1 / (1 / (273.15+25) + (math.log(Rt/10)) / 3950))
        tempC = int(tempK - 273.15)
        if use_i2c:
            scan_for_devices()
            lcd = lcd128_32(data_pin, clock_pin, bus, i2c_addr)
        lcd.Clear()
        lcd.Cursor(0, 0)
        lcd.Display("Voltage:")
        lcd.Cursor(0, 8)
        lcd.Display(str(voltage))
        lcd.Cursor(0, 20)
        lcd.Display("V")
        lcd.Cursor(2, 0)
        lcd.Display("Temperature:")
        lcd.Cursor(2, 12)
        lcd.Display(str(tempC))
        lcd.Cursor(2, 15)
        lcd.Display("C")
        time.sleep(0.5)
except:
    pass
Make sure the ESP32 is already connected to the computer, and click .

Click , and the code starts to run. The phenomenon you will see is: the LCD 128X32 DOT screen displays the voltage value of the thermistor and the temperature value in the current environment. Press "Ctrl+C" or click to exit the program.

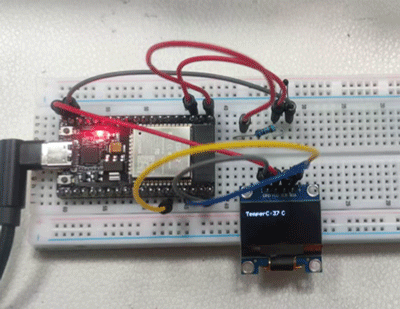
Project 30 Password Lock
1. Project Introduction:
For the commonly used digital button sensors, one button uses one IO port, but when we need many buttons, too many IO ports will be occupied. To save IO ports, multiple buttons are made into a matrix type. Through the control of row and column lines, multiple buttons are controlled with fewer IO ports. In this project, we will learn the ESP32 and the membrane 4*4 matrix keypad controlling a servo and a buzzer.
2. Project Components:
|
|
|
|---|---|---|
| ESP32*1 | Breadboard*1 | Servo*1 |
 |
|
|
| Membrane 4×4 Matrix Keypad*1 | USB Cable*1 | Several Jumper Wires |
|
|
|
| NPN Transistor (S8050)*1 | Active Buzzer*1 | 1KΩ Resistor*1 |
3. Component Knowledge:
4×4 matrix keypad: The keypad is a device that integrates many keys. As shown in the figure below, a 4x4 keypad integrates 16 keys.
Just like the LED matrix integration, in a 4x4 keypad, each row of keys is connected with one pin, and the same is true for each column of keys. Such a connection can reduce the occupation of processor ports. The internal circuit is shown below.

The usage method is similar to that of the matrix LED, that is, use the row scanning or column scanning method to detect the state of the keys on each column or each row. Taking the column scanning method as an example, send a low level to the 4th column (Pin4), detect the level state of rows 1, 2, 3, 4, and judge whether the A, B, C, D keys are pressed. Then send low levels to columns 3, 2, 1 in turn, and detect whether other keys are pressed. Then, you can obtain the state of all keys.
4. Read the Key Values of the 4*4 Matrix Keypad:
We first use a simple code to read the key values of the 4*4 matrix keypad and print them out. The wiring diagram is shown below:

The code used in this tutorial is saved in the path: "..\program-code\python-code".
You can move the code anywhere. For example, we saved the code in Drive D, with the path D:\2. Project Tutorials.
Open the "Thonny" software, click "This PC" → "D:" → "2. Project Tutorials" → "Project 30 Password Lock". Select "keypad.py", right-click the mouse and select "Upload to /", wait for "keypad.py" to be uploaded to the ESP32. And double-click "Project_30.1_4x4_Matrix_Keypad_Display.py" with the left mouse button.


# 导入 keypad 库.
from keypad import KeyPad
import time
# 将键盘模块与ESP32引脚关联.
keyPad = KeyPad(22, 21, 19, 18, 17, 16, 4, 0)
#调用函数keyPan.scan()来获取所按键的值。一旦得到,就打印出来.
def key():
    keyvalue = keyPad.scan()
    if keyvalue != None:
        print(keyvalue, end="\t")
        time.sleep_ms(300)
        return keyvalue

while True:
    key()

Click , and the code starts to run. The phenomenon you will see is: press the keypad, and the "Shell" window under the Thonny IDE will print the corresponding key value, as shown in the figure below. Press "Ctrl+C" or click to exit the program.


5. Wiring Diagram of the Password Lock:
In the previous experiment, we already knew the key values of the 4×4 matrix keypad. Next, we use the 4×4 matrix keypad as a keyboard to control the servo and the buzzer.

6. Project Code:
The code used in this tutorial is saved in the path: "..\program-code\python-code".
You can move the code anywhere. For example, we saved the code in Drive D, with the path D:\2. Project Tutorials.
Open the "Thonny" software, click "This PC" → "D:" → "2. Project Tutorials" → "Project 30 Password Lock". Select "keypad.py", right-click the mouse and select "Upload to /", wait for "keypad.py" to be uploaded to the ESP32. And double-click "Project_30.2_Keypad_Door.py" with the left mouse button.

from keypad import KeyPad
from machine import Pin, PWM
import time

keyPad = KeyPad(22, 21, 19, 18, 17, 16, 4, 0)
servo= PWM(Pin(15))
servo.freq(50)
servo.duty(256)
servo.duty_u16(1638)
time.sleep_ms(1000)
activeBuzzer = Pin(2, Pin.OUT)

# 定义数组并设置密码.
passWord = "1234"
keyIn = ""
def key():
    keyvalue = keyPad.scan()
    if keyvalue != None:
        print('Your input:', keyvalue)
        time.sleep_ms(200)
        return keyvalue

while True:
 # 每次按下一个键,蜂鸣器就会短促地鸣叫一声,
 # 键的键值将存储在keydata数组中.
    keydata = key()
    if keydata != None:
        activeBuzzer.value(1)
        time.sleep_ms(100)
        activeBuzzer.value(0)
        keyIn += keydata
# 当按下4个键时,判断密码是否正确。
# 如果正确,伺服将旋转90度,1秒后再转回来。
# 如果密码输入错误,蜂鸣器会长时间鸣叫一次,并清除keyInNum的值.
    if len(keyIn) == 4:
        if keyIn == passWord:
            print("passWord right!")
            servo.duty_u16(4915)
            time.sleep_ms(1000)
            servo.duty_u16(1638)
        else:
            print("passWord error!")
            activeBuzzer.value(1)
            time.sleep_ms(1000)
            activeBuzzer.value(0)
        keyIn = ""
Make sure the ESP32 is already connected to the computer, and click .

Click , and the code starts to run. The phenomenon you will see is: press the keypad to enter a 4-character password. If the input is correct (correct password: 1234), the servo will rotate a certain angle and then return to the original position. If the input is wrong, an input error alarm will sound. Press "Ctrl+C" or click to exit the program.


Project 31 Infrared Remote Control of Sound and LED
1. Project Introduction:
Infrared remote control is a low-cost and easy-to-use wireless communication technology. IR light is very similar to visible light, except that its wavelength is slightly longer. This means that infrared light cannot be detected by the human eye, which is perfect for wireless communication. For example, when you press a button on a TV remote control, an infrared LED repeatedly switches on and off at a frequency of 38,000 times per second, transmitting information (such as volume or channel control) to the infrared photosensor on the TV.
We will first explain how the common infrared communication protocol works. Then we will start this project with a remote control and an infrared receiving component.
2. Project Components:
|
|
 |
|
|---|---|---|---|
| ESP32*1 | Breadboard*1 | Infrared Receiver*1 | RGB LED*1 |
|
|
|
 |
| Active Buzzer*1 | 220Ω Resistor*3 | 10KΩ Resistor*1 | Infrared Remote Control*1 |
|
|
|
|
| NPN Transistor (S8050)*1 | 1kΩ Resistor*1 | USB Cable*1 | Several Jumper Wires |
3. Component Knowledge:
Infrared (IR) remote control: It is a device that can emit infrared light signals. Pressing different buttons causes the infrared emission tube at the front of the remote control to emit different commands of infrared light. Infrared remote control technology is widely used, such as in TVs, air conditioners, etc. Therefore, in today's technologically advanced society, infrared remote control technology makes it very convenient for you to switch TV programs and adjust air conditioning temperature.
The remote control we use is shown below:

This infrared remote control uses NEC encoding.
Infrared (IR) receiver: It is a component that can receive infrared light, so it can be used to receive the infrared light signals emitted by the infrared remote control. The infrared receiver demodulates the received infrared light signal and converts it back into binary, then passes the information to the microcontroller.
Diagram of the infrared signal modulation process:

4. Decode the Infrared Signal:
We connect the infrared receiving component to the ESP32 according to the wiring diagram below.

The code used in this tutorial is saved in the path: "..\program-code\python-code".
You can move the code anywhere. For example, we saved the code in Drive D, with the path D:\2. Project Tutorials.
Open the "Thonny" software, click "This PC" → "D:" → "2. Project Tutorials" → "Project 31 Infrared Remote Control of Sound and LED". Select "irrecvdata.py", right-click and select "Upload to /", wait for "irrecvdata.py" to be uploaded to the ESP32. And double-click "Project_31.1_Decoded_IR_Signal.py" with the left mouse button.


# 导入红外解码器.
from irrecvdata import irGetCMD

# 将红外解码器与GP0关联.
recvPin = irGetCMD(0)

# 当获得红外键值时,在“Shell”中打印出来.
try:
    while True:
        irValue = recvPin.ir_read() #调用ir_read()来读取所按键的值并将其赋值给IRValue.
        if irValue:
            print(irValue)
except:
    pass

Click , and the code starts to run. The phenomenon you will see is: aim the infrared remote control transmitter at the infrared receiving head, press a button on the infrared remote control, and the "Shell" window under the Thonny IDE will print the currently received key code value. Press "Ctrl+C" or click to exit the program.


Write down the key code values associated with each key of the infrared remote control, because you will need this information later.

5. Wiring Diagram of the Infrared Remote Control:

6. Project Code:
The code used in this tutorial is saved in the path: "..\program-code\python-code".
You can move the code anywhere. For example, we saved the code in Drive D, with the path D:\2. Project Tutorials.
Open the "Thonny" software, click "This PC" → "D:" → "2. Project Tutorials" → "Project 31 Infrared Remote Control of Sound and LED". Select "irrecvdata.py", right-click and select "Upload to /", wait for "irrecvdata.py" to be uploaded to the ESP32. And double-click "Project_31.2_IR_Control_Sound_And_LED.py" with the left mouse button.

from machine import Pin,PWM
import time
from irrecvdata import irGetCMD

#设置RGB的接口和频率
rgb_r = PWM(Pin(22))
rgb_g = PWM(Pin(21))
rgb_b = PWM(Pin(4))
rgb_r.freq(1000)
rgb_g.freq(1000)
rgb_b.freq(1000)
rgb_r.duty(0)
rgb_g.duty(0)
rgb_b.duty(0)
# 初始化蜂鸣器引脚
buzzer=Pin(15, Pin.OUT)

#配置红外接收引脚和库
recvPin = irGetCMD(0)

while True:
    irValue = recvPin.ir_read() # 读取远程控制数据
 #  确定是否有满足需求的按钮
    if irValue:
        print(irValue)
        buzzer.value(1)
        time.sleep(0.1)
        buzzer.value(0)
        if irValue == '0xff6897':   #1
           rgb_r.duty(1023)
           rgb_g.duty(0)
           rgb_b.duty(0)
           print('1')
        elif irValue == '0xff9867': #2
            rgb_r.duty(0)
            rgb_g.duty(1023)
            rgb_b.duty(0)
            print('2')
        elif irValue == '0xffb04f': #3
            rgb_r.duty(0)
            rgb_g.duty(0)
            rgb_b.duty(1023)
            print('3')
        elif irValue == '0xff30cf': #4
            rgb_r.duty(1023)
            rgb_g.duty(1023)
            rgb_b.duty(0)
            print('4')
        elif irValue == '0xff18e7': #5
            rgb_r.duty(1023)
            rgb_g.duty(0)
            rgb_b.duty(1023)
            print('5')
        elif irValue == '0xff7a85': #6
            rgb_r.duty(0)
            rgb_g.duty(1023)
            rgb_b.duty(1023)
            print('6')
        elif irValue == '0xff10ef': #7
            rgb_r.duty(1023)
            rgb_g.duty(1023)
            rgb_b.duty(1023)
            print('7')
        else:
            rgb_r.duty(0)
            rgb_g.duty(0)
            rgb_b.duty(0)
Make sure the ESP32 is already connected to the computer, and click .

Click , and the code starts to run. The phenomenon you will see is: press keys 1~7 on the infrared remote control, and the buzzer will sound once each time. At the same time, the RGB will respectively light up red, green, blue, yellow, magenta, cyan, and white. Press any other key (other than keys 1-7), and the RGB goes out. Press "Ctrl+C" or click to exit the program.

Special note: When the code is running, sometimes the following similar prompt message appears. Just click first, and then click to make the code run again.


Project 32 WiFi Working Mode
In today's era of rapid technological development, the method of uniformly controlling intelligent devices through mobile phones has gradually gained people's favor. This method uses a microcontroller to establish a connection between the mobile phone and the intelligent device through the WiFi module and the Internet, so as to realize remote control of the intelligent device. Our development board comes with a WiFi module. In this chapter, we will focus on the WiFi development of the ESP32.
The ESP32 has 3 different WiFi working modes: Station mode, AP mode, and AP+Station mode.
Project 32.1: WIFI Station Mode
1. Experimental Components:
|
|
|---|---|
| USB Cable x1 | ESP32 x1 |
2. Experimental Wiring:
Use a USB cable to connect the ESP32 board to the USB port on the computer.
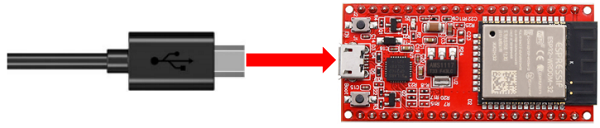
3. Component Knowledge:
Station mode: When the ESP32 selects Station mode, it acts as a WiFi client. It can connect to the router network and communicate with other devices on the router through the WiFi connection. As shown in the figure below, the PC and the router are already connected. If the ESP32 wants to communicate with the PC, it needs to connect the PC and the router.
4. Project Code:
The code used in this tutorial is saved in the path: "..\program-code\python-code".
You can move the code anywhere. For example, we saved the code in Drive D, with the path D:\2. Project Tutorials.
Open the "Thonny" software, click "This PC" → "D:" → "2. Project Tutorials" → "Project 32 WiFi Working Mode". And double-click "Project_32.1_WiFi_Station_Mode.py" with the left mouse button.

import time
import network # 导入 network 库.

ssidRouter     = 'ChinaNet-2.4G-0DF0' # 输入路由器名称
passwordRouter = 'ChinaNet@233' # 输入路由器密码

def STA_Setup(ssidRouter,passwordRouter):
    print("Setup start")
    sta_if = network.WLAN(network.STA_IF) # 设置ESP32为“Station模式”.
    if not sta_if.isconnected():
        print('connecting to',ssidRouter)
  # 激活ESP32的站模式,向路由器发起连接请求
 # 并输入连接密码.
        sta_if.active(True)
        sta_if.connect(ssidRouter,passwordRouter)
  #等待ESP32与路由器连接成功.
        while not sta_if.isconnected():
            pass
  # 在Shell中打印分配给ESP32-WROVER的IP地址.
    print('Connected, IP address:', sta_if.ifconfig())
    print("Setup End")

try:
    STA_Setup(ssidRouter,passwordRouter)
except:
    sta_if.disconnect()
Since the router name and password are different in each place, before running the code, users need to enter the correct router name and password in the red box shown in the figure above.
After confirming that the router name and password are correctly entered, click , and the code starts to run. Wait for the ESP32 to connect to your router, and the IP address assigned to the ESP32 by the router will be printed in the "Shell" window.


Project 35.2: WIFI AP Mode
1. Experimental Components & Wiring:
The experimental components and wiring are the same as those in Project 32.1: WIFI Station Mode above.
2. Component Knowledge:
AP mode: When the ESP32 selects AP mode, it creates a hotspot network independent of the Internet and waits for other WiFi devices to connect. As shown in the figure below, the ESP32 acts as the hotspot. If a phone or PC needs to communicate with the ESP32, it must connect to the ESP32's hotspot. Communication can only take place after a connection is established through the ESP32.
3. Project Code:
The code used in this tutorial is saved in the path: "..\program-code\python-code".
You can move the code anywhere. For example, we saved the code in Drive D, with the path D:\2. Project Tutorials.
Open the "Thonny" software, click "This PC" → "D:" → "2. Project Tutorials" → "Project 32 WiFi Working Mode". And double-click "Project_32.2_WiFi_AP_Mode.py" with the left mouse button.

import network #导入 network 库.

#请输入正确的路由器名称和密码.
ssidAP         = 'ESP32_Wifi' #输入AP名称
passwordAP     = '12345678'  #输入AP密码

local_IP       = '192.168.1.147'
gateway        = '192.168.1.1'
subnet         = '255.255.255.0'
dns            = '8.8.8.8'

#配置ESP32为AP模式.
ap_if = network.WLAN(network.AP_IF)

def AP_Setup(ssidAP,passwordAP):
    ap_if.ifconfig([local_IP,gateway,subnet,dns])
    print("Setting soft-AP  ... ")
    ap_if.config(essid=ssidAP,authmode=network.AUTH_WPA_WPA2_PSK, password=passwordAP)
    ap_if.active(True)
    print('Success, IP address:', ap_if.ifconfig())
    print("Setup End\n")

try:
    AP_Setup(ssidAP,passwordAP)
except:
    print("Failed, please disconnect the power and restart the operation.")
    ap_if.disconnect()
Before running the program code, you can make any changes to the AP name and password of the ESP32 in the red box as shown in the figure above. Of course, by default, you can also leave it unmodified.
Click , and the code starts to run, opening the ESP32's AP function, and the "Shell" window prints the access point information.


When observing the information printed by the serial monitor, open the phone's WiFi scanning function, and you can see the ssid_AP on the ESP32 being invoked, which is called "ESP32_Wifi" in this program code. You can enter the password "12345678" to connect to it, or modify its AP name and password by modifying the program code.
Project 35.3: WIFI AP+Station Mode
1. Experimental Components & Wiring:
The experimental components and wiring are the same as those in Project 32.1: WIFI Station Mode and Project 32.2: WIFI AP Mode above.
2. Component Knowledge:
AP+Station mode: In addition to AP mode and Station mode, the ESP32 can also use AP mode and Station mode at the same time. This mode contains the functions of the previous two modes. Turn on the Station mode of the ESP32 to connect it to the router network, so it can communicate with the Internet through the router. At the same time, turn on its AP mode to create a hotspot network. Other WiFi devices can choose to connect to the router network or the hotspot network to communicate with the ESP32.
3. Project Code:
The code used in this tutorial is saved in the path: "..\program-code\python-code".
You can move the code anywhere. For example, we saved the code in Drive D, with the path D:\2. Project Tutorials.
Open the "Thonny" software, click "This PC" → "D:" → "2. Project Tutorials" → "Project 32 WiFi Working Mode". And double-click "Project_32.3_WiFi_Station+AP_Mode.py" with the left mouse button.

import network #导入 network 库.

ssidRouter     = 'ChinaNet-2.4G-0DF0' #输入路由器名称
passwordRouter = 'ChinaNet@233' #输入路由器密码

ssidAP         = 'ESP32_Wifi'#输入AP名称
passwordAP     = '12345678' #输入AP密码

local_IP       = '192.168.4.147'
gateway        = '192.168.1.1'
subnet         = '255.255.255.0'
dns            = '8.8.8.8'

sta_if = network.WLAN(network.STA_IF)
ap_if = network.WLAN(network.AP_IF)

def STA_Setup(ssidRouter,passwordRouter):
    print("Setting soft-STA  ... ")
    if not sta_if.isconnected():
        print('connecting to',ssidRouter)
        sta_if.active(True)
        sta_if.connect(ssidRouter,passwordRouter)
        while not sta_if.isconnected():
            pass
    print('Connected, IP address:', sta_if.ifconfig())
    print("Setup End")

def AP_Setup(ssidAP,passwordAP):
    ap_if.ifconfig([local_IP,gateway,subnet,dns])
    print("Setting soft-AP  ... ")
    ap_if.config(essid=ssidAP,authmode=network.AUTH_WPA_WPA2_PSK, password=passwordAP)
    ap_if.active(True)
    print('Success, IP address:', ap_if.ifconfig())
    print("Setup End\n")

try:
    AP_Setup(ssidAP,passwordAP)
    STA_Setup(ssidRouter,passwordRouter)
except:
    sta_if.disconnect()
    ap_if.idsconnect()
It is similar to Project 32.1 and Project 32.2 above. Before running the code, you need to modify ssidRouter, passwordRouter, ssidAP, and passwordAP, as shown in the red box in the figure above. After ensuring the code is modified correctly, click , and the code starts to run. The "Shell" window will display the following:


Open the phone's WiFi search function, and you can see the ssid_AP being invoked on the ESP32.
Project 33 WiFi Test
1. Experimental Introduction:
In this experiment, we first use the WiFi Station mode of the ESP32 to read the WiFi IP address, and then connect to WiFi through the APP to read the characters sent by each function button on the APP.
2. Experimental Components:
|
|
 |
|---|---|---|
| ESP32*1 | USB Cable*1 | Smartphone/Tablet (self-provided)*1 |
3. Experimental Wiring:
Use a USB cable to connect the ESP32 board to the USB port on the computer.
4. Modify the Code
You need to first change the user WiFi name and user WiFi password in the code  to your own WiFi name and WiFi password.
5. Upload the Code
Restart the backend process -> Upload the code -> Run the current script -> Check the device IP

After the program runs, it will automatically connect to the WiFi defined in the code. Write down this IP address.

6. Open the Browser:
Enter the IP address from the serial log in a computer or phone browser, and the following interface will be displayed.

This is a web service provided by the ESP32.
Special note:Make sure that the computer network, the phone/tablet network, the ESP32 board, the router, and the WiFi name and password you enter in the code are all on the same local area network (WiFi).
6. Experimental Phenomenon
Click the various function buttons on the browser, and then the serial monitor will print the corresponding characters received.

Project 34 WiFi Smart Home
1. Experimental Description:
In the previous experiments, we have already learned about the three modes of the ESP32: WiFi Station mode, WiFi AP mode, and WiFi AP+Station mode. So in this chapter's experiment, we will use the WiFi Station mode of the ESP32 to connect to WiFi through the APP to control multiple sensors/modules to work, achieving the effect of a WiFi smart home.
2. Experimental Equipment:
|
|
|
|
|---|---|---|---|
| ESP32*1 | Breadboard*1 | DC Motor*1 | Relay Module*1 |
|
|
|
|
| Servo*1 | Temperature and Humidity Sensor*1 | Ultrasonic Sensor*1 | Several Dupont Wires |
|
|
|
|
| Smartphone/Tablet (self-provided)*1 | Breadboard Power Supply Module*1 | 6-cell AA Battery Box*1 | Fan Blade*1 |
|
|
|
|
| AA Battery (self-provided)*6 | MicroUSB Cable*1 | Several Jumper Wires |
3. Experimental Wiring Diagram:
| Relay | ESP32 Board | Temperature and Humidity Sensor | ESP32 Board |
|---|---|---|---|
| Gnd | Gnd | - | G |
| Vcc | 3.3V | + | 5V |
| IN | IO32 | out | IO15 |
| Ultrasonic Sensor | ESP32 Board | 130 Fan Module | ESP32 Board |
|---|---|---|---|
| Vcc | 5V | G | G |
| Trig | IO14 | V | 5V |
| Echo | IO27 | INA | IO18 |
| Gnd | GND | INB | IO19 |
| Servo | ESP32 Board |
|---|---|
| Red wire | 5V |
| Brown wire | G |
| Orange wire | IO4 |

5. Project Code:
See the sample source code in the compressed package for details.
Special note: You need to first change the user WiFi name and user WiFi password in the experimental code to your own WiFi name and WiFi password.
6. Experimental Phenomenon:
Special note:Make sure that the computer network, the phone/tablet network, the ESP32 board, the router, and the WiFi name and password you enter in the code are all on the same local area network (WiFi).
After confirming that the WiFi name and WiFi password in the program code are modified correctly, right-click on the code file: Upload to /, and then click to run the code.
Open the browser on your phone or computer, enter the device IP address in the figure above, and you can open the control panel.
For details, see "Wifi Smart Home" in the video tutorial.
Project 35 MQTT Internet of Things
1. Experimental Description:
In the previous experiments, we have already mastered the basic knowledge of WiFi and built a prototype of a smart home project within the local area network.
This lesson will focus on the relevant knowledge of the Internet of Things, and on this basis further improve the smart home project, ultimately realizing a remote anti-theft alarm system that supports cross-network-segment access.
2. Internet of Things Knowledge:
IoT technology is now widely used in fields such as industry, medical care, and daily life, mainly reflected in the ability of terminals such as phones and computers to obtain and control various devices in real time. In addition to the main board and various sensors we have come across in the course, there is also a communication technology involved: MQTT. This lesson will use MQTT communication technology to realize real-time interaction between the phone and the PIR sensor.
The core of the Internet of Things is to enable communication among phones, computers, and hardware devices.
In this tutorial, we can understand the whole process as a "message delivery chain":
Phone App → MQTT Server → ESP32 Development Board → LED Light / Relay / Sensor
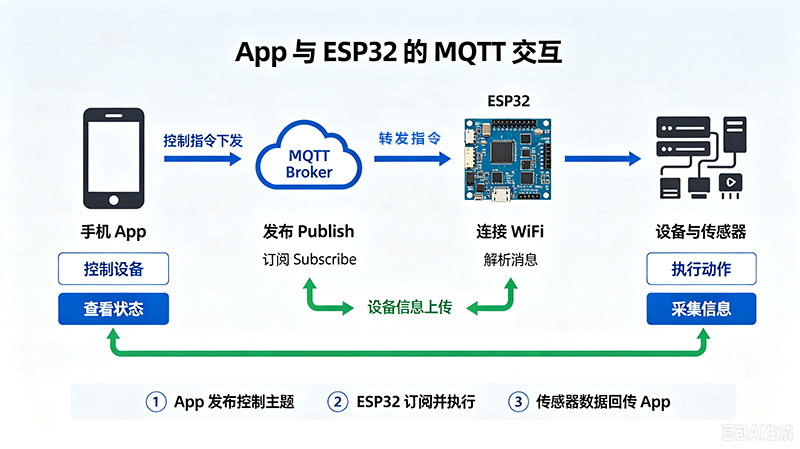
The MQTT server is a free test server provided by Qiguopai, deployed on the Internet. Both the app and the ESP32 board connect to this server through WiFi.
You can understand it as a "message relay station":
-
The App and the ESP32 agree on an identification number;
-
The App sends the identification number + message to the MQTT server;
-
The server then forwards the message to the ESP32 board with this identification number;
2. Experimental Equipment:
|
|
|
|---|---|---|
| ESP32*1 | Breadboard*1 | PIR Sensor*1 |
|
|
|
| LED Bulb*1 | 220Ω or 1K Resistor | |
|
|
|
| Smartphone/Tablet (self-provided)*1 | Several Dupont Wires | Several Jumper Wires |
3. Experimental Wiring Diagram:
| PIR Sensor | ESP32 Board |
|---|---|
| + | 3.3V |
| - | GND |
| OUT | IO35 |
| LED Bulb | ESP32 Board |
|---|---|
| Negative | GND |
| Positive | IO23 |
3. Experimental Code:
Open the code in the project resource package, then install the IoT protocol library PubSubClient. For code analysis, you can watch the video explanation.
If you want to learn app development, you can download the following source code. If you learn microcontroller development, you only need to download the installation package.
import network
import machine
import time
import ubinascii
from umqtt.simple import MQTTClient

# ==================== 1. WiFi 配置(后续修改) ====================
WIFI_SSID = "Niangao"
WIFI_PASSWORD = "12345ssdlh"

# ==================== 2. MQTT 配置(后续修改) ====================
MQTT_SERVER = "121.40.244.99"   # MQTT 服务器地址
MQTT_PORT = 1883                # MQTT 端口
MQTT_USER = "test_esp"          # 用户名,没有则留空 ""
MQTT_PASSWORD = "12345678"      # 密码,没有则留空 ""

# ==================== 硬件引脚 ====================
PIN_LED_BOARD = 2    # 板载 LED(预警开关指示)
PIN_LED_ALARM = 23   # 检测到人体时点亮的外接 LED
PIN_PIR = 35         # 人体红外传感器输出引脚

ALARM_HOLD_MS = 5000  # 预警灯点亮时长(毫秒)

# ==================== 引脚对象 ====================
led_board = machine.Pin(PIN_LED_BOARD, machine.Pin.OUT)
led_alarm = machine.Pin(PIN_LED_ALARM, machine.Pin.OUT)
pir = machine.Pin(PIN_PIR, machine.Pin.IN)
led_board.value(0)
led_alarm.value(0)

# ==================== 主题与状态 ====================
wlan = network.WLAN(network.STA_IF)
client = None
sub_topic = ""      # 订阅主题(末尾加 MAC 后 4 位)
pub_topic = ""      # 发布主题(末尾加 MAC 后 4 位)
client_id = ""      # MQTT 客户端 ID

alert_enabled = False   # 预警开关状态
alarm_active = False    # 当前是否处于预警保持期
alarm_end_time = 0      # 预警保持结束的时间点(ticks_ms)


def get_mac_suffix():
    """返回 MAC 地址后 4 位(小写)。"""
    mac = ubinascii.hexlify(wlan.config("mac")).decode()
    mac = mac.lower()
    return mac[-4:]


def connect_wifi():
    """连接 WiFi,直到成功。"""
    if not wlan.active():
        wlan.active(True)
    print("连接 WiFi:", WIFI_SSID)
    wlan.connect(WIFI_SSID, WIFI_PASSWORD)
    while not wlan.isconnected():
        time.sleep(0.5)
        print(".")
    wlan.config(pm=0)   # 关闭省电模式,避免响应延迟
    print("")
    print("WiFi 已连接,IP:", wlan.ifconfig()[0])


def mqtt_callback(topic, msg):
    """收到订阅消息时的回调。"""
    global alert_enabled, alarm_active
    try:
        text = msg.decode().strip().lower()
    except Exception:
        text = str(msg)
    print("收到订阅消息 [%s]: %s" % (topic, text))

    if text == "on" or text == "1":
        alert_enabled = True
        led_board.value(1)
        print("预警已开启")
    elif text == "off" or text == "0":
        alert_enabled = False
        alarm_active = False
        led_board.value(0)
        led_alarm.value(0)
        print("预警已关闭")


def connect_mqtt():
    """连接 MQTT 服务器并订阅主题(失败会重试)。"""
    global client, client_id
    client_id = "ESP32-" + get_mac_suffix()
    while True:
        try:
            print("连接 MQTT...", end="")
            client = MQTTClient(
                client_id,
                MQTT_SERVER,
                port=MQTT_PORT,
                user=MQTT_USER,
                password=MQTT_PASSWORD,
                keepalive=60,
            )
            client.set_callback(mqtt_callback)
            client.connect()
            client.subscribe(sub_topic.encode())
            print("已连接")
            print("已订阅主题:", sub_topic)
            return
        except OSError as e:
            print("失败:", e, ",2 秒后重试")
            time.sleep(2)


def main():
    global sub_topic, pub_topic, alert_enabled, alarm_active, alarm_end_time

    connect_wifi()

    suffix = get_mac_suffix()
    sub_topic = "esp32/alert/set/" + suffix
    pub_topic = "esp32/alert/detect/" + suffix

    mac_hex = ubinascii.hexlify(wlan.config("mac")).decode()
    mac_fmt = ":".join(mac_hex[i:i + 2] for i in range(0, 12, 2))
    print("ESP32 MAC 地址:", mac_fmt)
    print("MAC 后 4 位:", suffix)
    print("订阅主题:", sub_topic)
    print("发布主题:", pub_topic)

    connect_mqtt()

    while True:
        # WiFi 断开则重连
        if not wlan.isconnected():
            connect_wifi()

        # 处理 MQTT 收包;断开则重连
        try:
            client.check_msg()
        except OSError as e:
            print("MQTT 连接断开,正在重连...", e)
            try:
                client.disconnect()
            except Exception:
                pass
            time.sleep(1)
            connect_mqtt()

        now = time.ticks_ms()

        # 预警开启且检测到人体:点亮预警灯、发布消息,进入 5 秒保持
        if alert_enabled and not alarm_active and pir.value() == 1:
            alarm_active = True
            alarm_end_time = time.ticks_add(now, ALARM_HOLD_MS)
            led_alarm.value(1)
            try:
                client.publish(pub_topic.encode(), b"motion detected")
                print("检测到人体,预警灯点亮 5 秒,已发布预警消息")
            except OSError as e:
                print("发布失败:", e)

        # 保持期结束:熄灭预警灯
        if alarm_active and time.ticks_diff(now, alarm_end_time) >= 0:
            alarm_active = False
            led_alarm.value(0)
            print("预警保持结束,预警灯已熄灭")

        time.sleep_ms(50)


if __name__ == "__main__":
    main()
When someone enters the detection range of the PIR sensor, the LED lights up and sends data to the phone APP.
For a complete demonstration, refer to the video tutorial.
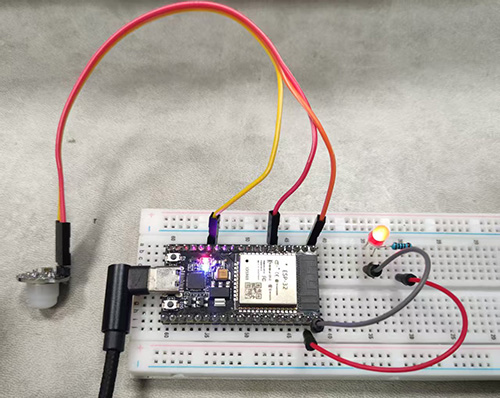
5. Extended Thinking:
-
Is it possible to connect more sensors? For example, a gas sensor can detect in real time whether there is a gas leak in the kitchen;
-
Connect an external 6V power adapter to solve the long-term power supply problem;
-
3D print a storage box, so it has a beautiful appearance and looks more like a marketable product.